EKS 중 AWS 스토리지 서비스 기능들을 정리합니다.
본 글은 가시다님이 운영하는 AEWS3기 스터디 내용을 참고하여 작성하였습니다.
Kubernetes CSI(Container Storage Interface) 아키텍처
CSI는 스토리지 인터페이스입니다. CSI와 쿠버네티스를 분리하여여 독립된 인터페이스를 제공하여 쿠버네티스 버전 업데이트 없이 관리할 수 있고 다양한 프로바이더를 사용할 수 있습니다.
- CSI Driver Container 는 각 노드의 볼륨을 관리하기 위해 데몬셋으로 배포됩니다.
- CSI Driver Container는 CSI API를 사용하여 Cloud API와 통신하고, 볼륨을 Kubernetes 노드에 자동으로 연결시킴
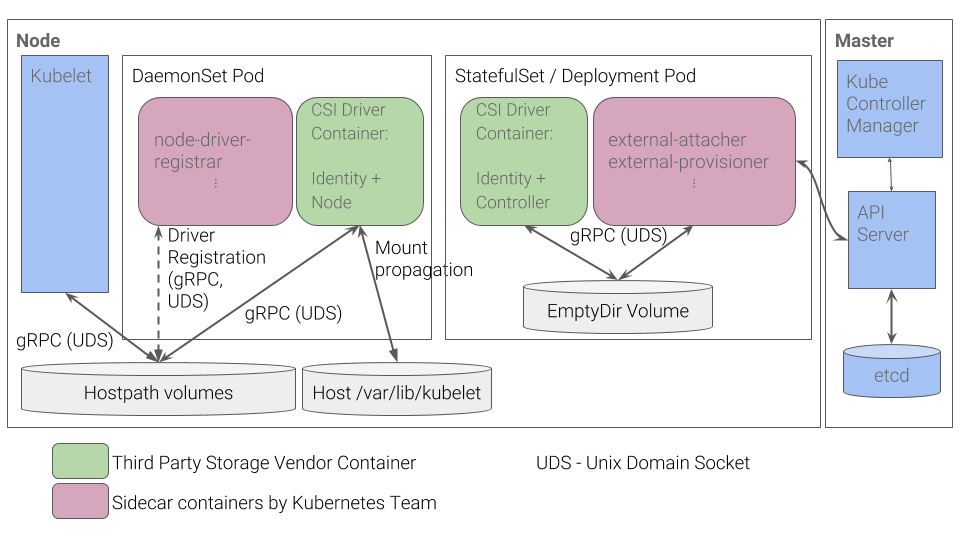
EKS 내 EBS, EFS, S3 사용시에도 CSI Driver 아키텍처를 따릅니다.
또한, AWS가 제공하는 스토리지 기능들을 EKS에서 그대로 사용할 수 있습니다.
실습 환경 구성

# yaml 파일 다운로드
curl -O https://s3.ap-northeast-2.amazonaws.com/cloudformation.cloudneta.net/K8S/myeks-3week.yaml

# 배포
# aws cloudformation deploy --template-file myeks-1week.yaml --stack-name mykops --parameter-overrides KeyName= SgIngressSshCidr=/32 --region <리전>
aws cloudformation deploy --template-file myeks-3week.yaml \
     --stack-name myeks-hsh --parameter-overrides KeyName=shhan SgIngressSshCidr=$(curl -s ipinfo.io/ip)/32 --region ap-northeast-2

# IP 확인
aws cloudformation describe-stacks --stack-name myeks-hsh --query 'Stacks[*].Outputs[*].OutputValue' --output text


chmod 400 shhan.pem
ssh -i shhan.pem ec2-user@43.202.5.82
# 베스천 서버 내 aws configrue 구성
aws configure

export CLUSTER_NAME=myeks-hsh

# myeks-VPC/Subnet 정보 확인 및 변수 지정
export VPCID=$(aws ec2 describe-vpcs --filters "Name=tag:Name,Values=$CLUSTER_NAME-VPC" --query 'Vpcs[*].VpcId' --output text)
echo $VPCID

export PubSubnet1=$(aws ec2 describe-subnets --filters Name=tag:Name,Values="$CLUSTER_NAME-Vpc1PublicSubnet1" --query "Subnets[0].[SubnetId]" --output text)
export PubSubnet2=$(aws ec2 describe-subnets --filters Name=tag:Name,Values="$CLUSTER_NAME-Vpc1PublicSubnet2" --query "Subnets[0].[SubnetId]" --output text)
export PubSubnet3=$(aws ec2 describe-subnets --filters Name=tag:Name,Values="$CLUSTER_NAME-Vpc1PublicSubnet3" --query "Subnets[0].[SubnetId]" --output text)
echo $PubSubnet1 $PubSubnet2 $PubSubnet3


#------------------
SSHKEYNAME=shhan
cat << EOF > myeks.yaml
apiVersion: eksctl.io/v1alpha5
kind: ClusterConfig
metadata:
name: myeks
region: ap-northeast-2
version: "1.31"
iam:
withOIDC: true # enables the IAM OIDC provider as well as IRSA for the Amazon CNI plugin
serviceAccounts: # service accounts to create in the cluster. See IAM Service Accounts
- metadata:
name: aws-load-balancer-controller
namespace: kube-system
wellKnownPolicies:
awsLoadBalancerController: true
vpc:
cidr: 192.168.0.0/16
clusterEndpoints:
privateAccess: true # if you only want to allow private access to the cluster
publicAccess: true # if you want to allow public access to the cluster
id: $VPCID
subnets:
public:
ap-northeast-2a:
az: ap-northeast-2a
cidr: 192.168.1.0/24
id: $PubSubnet1
ap-northeast-2b:
az: ap-northeast-2b
cidr: 192.168.2.0/24
id: $PubSubnet2
ap-northeast-2c:
az: ap-northeast-2c
cidr: 192.168.3.0/24
id: $PubSubnet3
addons:
- name: vpc-cni # no version is specified so it deploys the default version
version: latest # auto discovers the latest available
attachPolicyARNs: # attach IAM policies to the add-on's service account
- arn:aws:iam::aws:policy/AmazonEKS_CNI_Policy
configurationValues: |-
enableNetworkPolicy: "true"
- name: kube-proxy
version: latest
- name: coredns
version: latest
- name: metrics-server
version: latest
managedNodeGroups:
- amiFamily: AmazonLinux2023
desiredCapacity: 3
iam:
withAddonPolicies:
certManager: true # Enable cert-manager
externalDNS: true # Enable ExternalDNS
instanceType: t3.medium
preBootstrapCommands:
# install additional packages
- "dnf install nvme-cli links tree tcpdump sysstat ipvsadm ipset bind-utils htop -y"
labels:
alpha.eksctl.io/cluster-name: myeks
alpha.eksctl.io/nodegroup-name: ng1
maxPodsPerNode: 100
maxSize: 3
minSize: 3
name: ng1
ssh:
allow: true
publicKeyName: $SSHKEYNAME
tags:
alpha.eksctl.io/nodegroup-name: ng1
alpha.eksctl.io/nodegroup-type: managed
volumeIOPS: 3000
volumeSize: 120
volumeThroughput: 125
volumeType: gp3
EOF# eks 클러스터 배포
eksctl create cluster -f myeks.yaml --verbose 4- 약 15분정도 소요됩니다.
노드 접근 및 정보 확인
# EC2 공인 IP 변수 지정
export N1=$(aws ec2 describe-instances --filters "Name=tag:Name,Values=myeks-hsh-ng1-Node" "Name=availability-zone,Values=ap-northeast-2a" --query 'Reservations[*].Instances[*].PublicIpAddress' --output text)
export N2=$(aws ec2 describe-instances --filters "Name=tag:Name,Values=myeks-hsh-ng1-Node" "Name=availability-zone,Values=ap-northeast-2b" --query 'Reservations[*].Instances[*].PublicIpAddress' --output text)
export N3=$(aws ec2 describe-instances --filters "Name=tag:Name,Values=myeks-hsh-ng1-Node" "Name=availability-zone,Values=ap-northeast-2c" --query 'Reservations[*].Instances[*].PublicIpAddress' --output text)
echo $N1, $N2, $N3
# 보안 그룹 지정
# *remoteAccess* 포함된 보안그룹 ID
aws ec2 describe-security-groups --filters "Name=group-name,Values=*remoteAccess*" | jq
export MNSGID=$(aws ec2 describe-security-groups --filters "Name=group-name,Values=*remoteAccess*" --query 'SecurityGroups[*].GroupId' --output text)
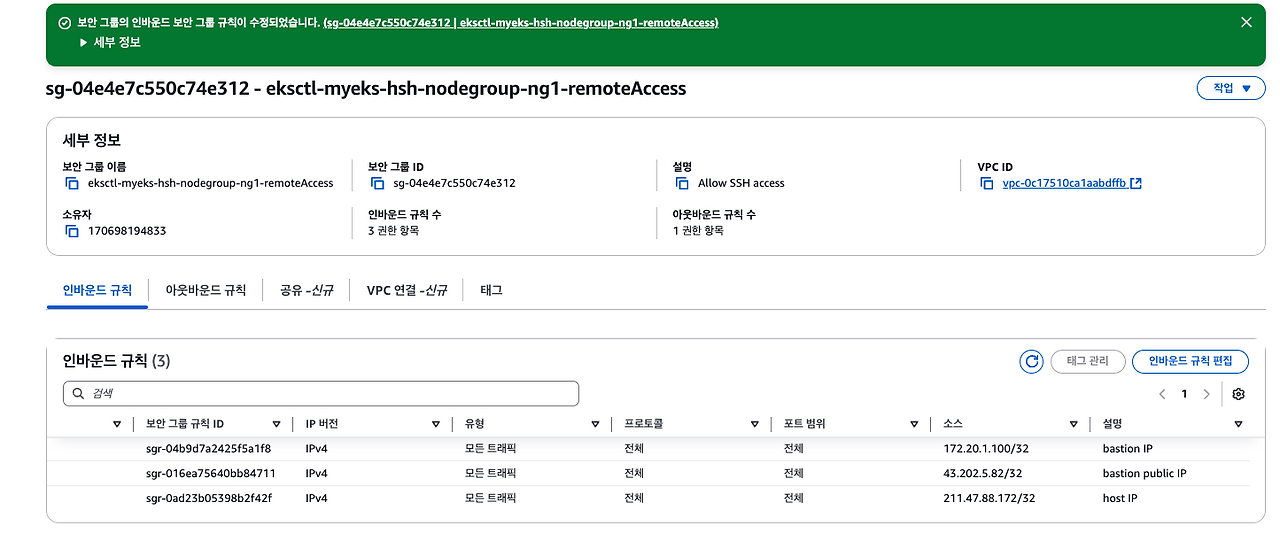
# 해당 보안그룹 inbound 에 자신의 집 공인 IP 룰 추가
aws ec2 authorize-security-group-ingress --group-id $MNSGID --protocol '-1' --cidr $(curl -s ipinfo.io/ip)/32
# 해당 보안그룹 inbound 에 운영서버 내부 IP 룰 추가
aws ec2 authorize-security-group-ingress --group-id $MNSGID --protocol '-1' --cidr 172.20.1.100/3
# 해당 보안그룹 Inbound 에 운영서버 공인 IP룰 추가
aws ec2 authorize-security-group-ingress --group-id $MNSGID --protocol '-1' --cidr $(aws cloudformation describe-stacks --stack-name myeks-hsh --query 'Stacks[*].Outputs[*].OutputValue' --output text
# 노드 접속 확인
for i in $N1 $N2 $N3; do
echo ">> node $i <<";
ssh -i shhan.pem -o StrictHostKeyChecking=no ec2-user@$i hostname;
echo;
done
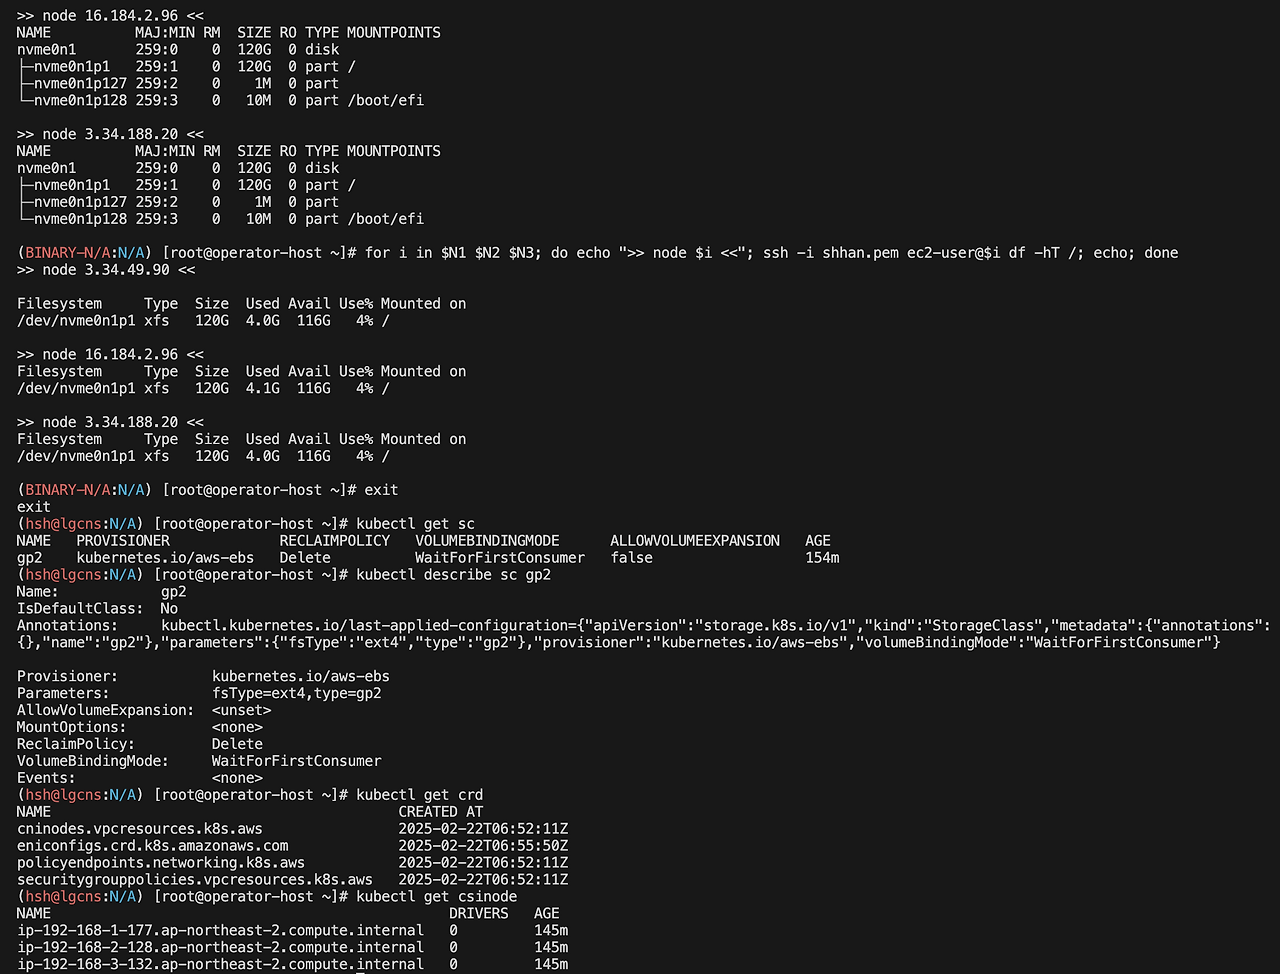
# 스토리지 확인
for i in $N1 $N2 $N3; do echo ">> node $i <<"; ssh -i shhan.pem ec2-user@$i lsblk; echo; done
for i in $N1 $N2 $N3; do echo ">> node $i <<"; ssh -i shhan.pem ec2-user@$i df -hT /; echo; done
kubectl get sc
kubectl describe sc gp2
# kubelet 업데이트 정보 확인
cat /etc/kubernetes/kubelet/config.json.d/00-nodeadm.conf스토리지 클래스를 통해 검토할 옵션은 다음과 같습니다.
- RECLAIMPOLICY: PV를 삭제할 때 실제 볼륨을 삭제하는 지정하는 옵션입니다. retain 이면 유지, Delete 는 PV 삭제시 같이 삭제됩니다.
- VOLUMEBINDINGMODE: 볼륨 바인딩 처리 시점을 지정하는 옵션입니다. WaitForFirstConsumer 옵션이면 실제 파드가 배치될 때 볼륨 바인딩을 처리합니다. 노드별 스케쥴링이 걸려있다면 해당 옵션을 지정해야 합니다.
- ALLOWVOLUMEEXPANSION: 볼륨 확장 가능 여부 옵션입니다. PVC 를 통해 볼륨량 변경할 수 있는 결정합니다.

EFS Mount 테스트
# EFS IP 확인
aws efs describe-mount-targets --file-system-id  <fs-id>
$EFSIP1=<EFS IP>

# EFS 마운트
df -hT
mkdir /mnt/myefs
mount -t nfs4 -o nfsvers=4.1,rsize=1048576,wsize=1048576,hard,timeo=600,retrans=2,noresvport $EFSIP1:/ /mnt/myefs
findmnt -t nfs4
df -hT --type nfs4

# 재부팅 후에도 마운트되게 확인
vi /etc/fstab
--
..
$EFSIP1:/ /mnt/myefs nfs4 defaults,nfsvers=4.1,rsize=1048576,wsize=1048576,hard,timeo=600,retrans=2,noresvport 0 0

# 부팅 확인
sudo mount -fav
ALB contoller & ExternalDNS 설치
- EKS에서 AWS ELB를 관리하기 위한 OIDC 설정은 eksctl 에서 iam.serviceAccounts 옵션을 통해 생성하였습니다.
# AWS LoadBalancerController
export CLUSTER_NAME=myeks-hsh

helm repo add eks https://aws.github.io/eks-charts
helm repo update
kubectl get sa -n kube-system aws-load-balancer-controller
helm install aws-load-balancer-controller eks/aws-load-balancer-controller -n kube-system --set clusterName=$CLUSTER_NAME \
  --set serviceAccount.create=false --set serviceAccount.name=aws-load-balancer-controller


# AWS ExternalDNS 설치
MyDomain=sub.horang.link
MyDnzHostedZoneId=$(aws route53 list-hosted-zones-by-name --dns-name "$MyDomain." --query "HostedZones[0].Id" --output text)
curl -s https://raw.githubusercontent.com/gasida/PKOS/main/aews/externaldns.yaml | MyDomain=$MyDomain MyDnzHostedZoneId=$MyDnzHostedZoneId envsubst | kubectl apply -f -

# CERT ARN 등록
CERT_ARN=

# 테스트
# kubeopsview 용 Ingress 설정 : group 설정으로 1대의 ALB를 여러개의 ingress 에서 공용 사용
cat <
EBS CSI Driver 설치
AWS EBS CSI Driver 를 통해 EBS 볼륨을 생성하고 파드에 볼륨을 연결시킬 수 있습니다.
- CSI-Controller : AWS 스토리지 관리
- CSI-Node : 파드 Attach/Detach 관리

# addon 전체 정보 확인
aws eks describe-addon-versions  \
    --query 'sort_by(addons  &owner)[].{publisher: publisher, owner: owner, addonName: addonName, type: type}' \
    --output table

# ebs-csi-driver 호환 정보 확인
aws eks describe-addon-versions \
    --addon-name aws-ebs-csi-driver \
    --kubernetes-version 1.31 \
    --query "addons[].addonVersions[].[addonVersion, compatibilities[].defaultVersion]" \
    --output text

export CLUSTER_NAME=myeks-hsh

#IAM serviceaccount 생성
eksctl create iamserviceaccount \
  --name ebs-csi-controller-sa \
  --namespace kube-system \
  --cluster ${CLUSTER_NAME} \
  --attach-policy-arn arn:aws:iam::aws:policy/service-role/AmazonEBSCSIDriverPolicy \
  --approve \
  --role-only \
  --role-name AmazonEKS_EBS_CSI_DriverRole-hsh

# OIDC 확인
eksctl get iamserviceaccount --cluster ${CLUSTER_NAME}

export ACCOUNT_ID=$(aws sts get-caller-identity --query 'Account' --output text)
eksctl create addon --name aws-ebs-csi-driver --cluster ${CLUSTER_NAME} --service-account-role-arn arn:aws:iam::${ACCOUNT_ID}:role/AmazonEKS_EBS_CSI_DriverRole-hsh --force

# addon 확인
eksctl get addon --cluster ${CLUSTER_NAME}

kubectl get pod -n kube-system -l app.kubernetes.io/component=csi-driver

# csidrvier 정보 확인
kubectl get csidrivers
kubectl describe csinodes
---
...
Spec:
  Drivers:
    ebs.csi.aws.com:
      Node ID:  i-0f2fd82d931458a51
      Allocatables:
        Count:        25
      Topology Keys:  [kubernetes.io/os topology.ebs.csi.aws.com/zone topology.kubernetes.io/zone]


# 노드에 최대 EBS 부착 수량 변경
aws eks update-addon --cluster-name ${CLUSTER_NAME} --addon-name aws-ebs-csi-driver \
  --addon-version v1.39.0-eksbuild.1 --configuration-values '{
    "node": {
      "volumeAttachLimit": 31,
      "enableMetrics": true
    }
  }'
- 부착 수량 변경시 ebs-csi-node 파드가 재배포됩니다.


# EBS 스토리지 생성
cat <<EOF | kubectl apply -f -
kind: StorageClass
apiVersion: storage.k8s.io/v1
metadata:
  name: gp3
  annotations:
    storageclass.kubernetes.io/is-default-class: "true" # 기본 스토리지 설정
allowVolumeExpansion: true
provisioner: ebs.csi.aws.com
volumeBindingMode: WaitForFirstConsumer
parameters:
  type: gp3
  allowAutoIOPSPerGBIncrease: 'true'
  encrypted: 'true'
  fsType: xfs # 기본값이 ext4
EOF

kubectl get sc 
# Attach 확인 및 볼륨 변경
# PVC 생성
cat <<EOF | kubectl apply -f -
apiVersion: v1
kind: PersistentVolumeClaim
metadata:
  name: ebs-claim
spec:
  accessModes:
    - ReadWriteOnce
  resources:
    requests:
      storage: 4Gi
  storageClassName: gp3
EOF
kubectl get pvc,pv

# 파드 생성
cat <<EOF | kubectl apply -f -
apiVersion: v1
kind: Pod
metadata:
  name: app
spec:
  terminationGracePeriodSeconds: 3
  containers:
  - name: app
    image: centos
    command: ["/bin/sh"]
    args: ["-c", "while true; do echo \$(date -u) >> /data/out.txt; sleep 5; done"]
    volumeMounts:
    - name: persistent-storage
      mountPath: /data
  volumes:
  - name: persistent-storage
    persistentVolumeClaim:
      claimName: ebs-claim
EOF
파드 배포를 했지만 스토리지가 Pending 상태로 유지될 수 있습니다.
파드 로그를 확인합시다.

kubectl get pv, pvc

kubectl describe persistentvolumeclaim/ebs-claim
---
....
  Normal   WaitForFirstConsumer  3m25s                 persistentvolume-controller                                                               waiting for first consumer to be created before binding
  Warning  ProvisioningFailed    3m22s                 ebs.csi.aws.com_ebs-csi-controller-6b5897f958-vbx94_f9ba357c-5e09-4e73-b4bd-244fefe09833  failed to provision volume with StorageClass "gp3": rpc error: code = Internal desc = Could not create volume "pvc-04b925d0-3a5b-4be6-b882-01b14abb394a": could not create volume in EC2: operation error EC2: CreateVolume, get identity: get credentials: failed to refresh cached credentials, failed to retrieve credentials, operation error STS: AssumeRoleWithWebIdentity, https response error StatusCode: 403, RequestID: e5034c88-653a-4074-820c-e63011c504f8, api error AccessDenied: Not authorized to perform sts:AssumeRoleWithWebIdentity
  Warning  ProvisioningFailed    3m21s                 ebs.csi.aws.com_ebs-csi-controller-6b5897f958-vbx94_f9ba357c-5e09-4e73-b4bd-244fefe09833  failed to provision volume with StorageClass "gp3": rpc error: code = Internal desc = Could not create volume "pvc-04b925d0-3a5b-4be6-b882-01b14abb394a": could not create volume in EC2: operation error EC2: CreateVolume, get identity: get credentials: failed to refresh cached credentials, failed to retrieve credentials, operation error STS: AssumeRoleWithWebIdentity, https response error StatusCode: 403, RequestID: f48d0d09-5e2c-4523-b762-cbd1196db130, api error AccessDenied: Not authorized to perform sts:AssumeRoleWithWebIdentity
  Warning  ProvisioningFailed    3m19s                 ebs.csi.aws.com_ebs-csi-controller-6b5897f958-vbx94_f9ba357c-5e09-4e73-b4bd-244fefe09833  failed to provision volume with StorageClass "gp3": rpc error: code = Internal desc = Could not create volume "pvc-04b925d0-3a5b-4be6-b882-01b14abb394a": could not create volume in EC2: operation error EC2: CreateVolume, get identity: get credentials: failed to refresh cached credentials, failed to retrieve credentials, operation error STS: AssumeRoleWithWebIdentity, https response error StatusCode: 403, RequestID: 82a495ab-9746-40cb-acab-e7aa51bc4f3c, api error AccessDenied: Not authorized to perform sts:AssumeRoleWithWebIdentity
  Warning  ProvisioningFailed    3m15s                 ebs.csi.aws.com_ebs-csi-controller-6b5897f958-vbx94_f9ba357c-5e09-4e73-b4bd-244fefe09833  failed to provision volume with StorageClass "gp3": rpc error: code = Internal desc = Could not create volume "pvc-04b925d0-3a5b-4be6-b882-01b14abb394a": could not create volume in EC2: operation error EC2: CreateVolume, get identity: get credentials: failed to refresh cached credentials, failed to retrieve credentials, operation error STS: AssumeRoleWithWebIdentity, https response error StatusCode: 403, RequestID: cc11269c-0db2-4a95-9673-340b2419b086, api error AccessDenied: Not authorized to perform sts:AssumeRoleWithWebIdentity
  Warning  ProvisioningFailed    3m7s                  ebs.csi.aws.com_ebs-csi-controller-6b5897f958-vbx94_f9ba357c-5e09-4e73-b4bd-244fefe09833  failed to provision volume with StorageClass "gp3": rpc error: code = Internal desc = Could not create volume "pvc-04b925d0-3a5b-4be6-b882-01b14abb394a": could not create volume in EC2: operation error EC2: CreateVolume, get identity: get credentials: failed to refresh cached credentials, failed to retrieve credentials, operation error STS: AssumeRoleWithWebIdentity, https response error StatusCode: 403, RequestID: e28a277c-1d7b-46e7-9120-4332c64c6f3a, api error AccessDenied: Not authorized to perform sts:AssumeRoleWithWebIdentity
  Warning  ProvisioningFailed    2m51s                 ebs.csi.aws.com_ebs-csi-controller-6b5897f958-vbx94_f9ba357c-5e09-4e73-b4bd-244fefe09833  failed to provision volume with StorageClass "gp3": rpc error: code = Internal desc = Could not create volume "pvc-04b925d0-3a5b-4be6-b882-01b14abb394a": could not create volume in EC2: operation error EC2: CreateVolume, get identity: get credentials: failed to refresh cached credentials, failed to retrieve credentials, operation error STS: AssumeRoleWithWebIdentity, https response error StatusCode: 403, RequestID: db129bb5-5b56-4cd4-ac47-2de189f70f2a, api error AccessDenied: Not authorized to perform sts:AssumeRoleWithWebIdentity
  Warning  ProvisioningFailed    2m19s                 ebs.csi.aws.com_ebs-csi-controller-6b5897f958-vbx94_f9ba357c-5e09-4e73-b4bd-244fefe09833  failed to provision volume with StorageClass "gp3": rpc error: code = Internal desc = Could not create volume "pvc-04b925d0-3a5b-4be6-b882-01b14abb394a": could not create volume in EC2: operation error EC2: CreateVolume, get identity: get credentials: failed to refresh cached credentials, failed to retrieve credentials, operation error STS: AssumeRoleWithWebIdentity, https response error StatusCode: 403, RequestID: ad54c86a-cb54-4f22-99da-778e4a4597dd, api error AccessDenied: Not authorized to perform sts:AssumeRoleWithWebIdentity
  Warning  ProvisioningFailed    75s                   ebs.csi.aws.com_ebs-csi-controller-6b5897f958-vbx94_f9ba357c-5e09-4e73-b4bd-244fefe09833  failed to provision volume with StorageClass "gp3": rpc error: code = Internal desc = Could not create volume "pvc-04b925d0-3a5b-4be6-b882-01b14abb394a": could not create volume in EC2: operation error EC2: CreateVolume, get identity: get credentials: failed to refresh cached credentials, failed to retrieve credentials, operation error STS: AssumeRoleWithWebIdentity, https response error StatusCode: 403, RequestID: 931c4f88-84fc-44ae-bcd5-3b9267568f05, api error AccessDenied: Not authorized to perform sts:AssumeRoleWithWebIdentity
  Normal   ExternalProvisioning  14s (x14 over 3m22s)  persistentvolume-controller                                                               Waiting for a volume to be created either by the external provisioner 'ebs.csi.aws.com' or manually by the system administrator. If volume creation is delayed, please verify that the provisioner is running and correctly registered.
  Normal   Provisioning          7s (x9 over 3m22s)    ebs.csi.aws.com_ebs-csi-controller-6b5897f958-vbx94_f9ba357c-5e09-4e73-b4bd-244fefe09833  External provisioner is provisioning volume for claim "default/ebs-claim"
  Warning  ProvisioningFailed    7s                    ebs.csi.aws.com_ebs-csi-controller-6b5897f958-vbx94_f9ba357c-5e09-4e73-b4bd-244fefe09833  failed to provision volume with StorageClass "gp3": rpc error: code = Internal desc = Could not create volume "pvc-04b925d0-3a5b-4be6-b882-01b14abb394a": could not create volume in EC2: operation error EC2: CreateVolume, get identity: get credentials: failed to refresh cached credentials, failed to retrieve credentials, operation error STS: AssumeRoleWithWebIdentity, https response error StatusCode: 403, RequestID: 46341c2c-7b93-460f-b01a-3245c3637f0a, api error AccessDenied: Not authorized to perform sts:AssumeRoleWithWebIdentity
확인해보니 ServiceAccount 에 OIDC 설정이 안되어있어 발생한 로그입니다.
kubectl describe pods ebs-csi-controller-6b5897f958-xfwqs -n kube-system
kubectl describe sa ebs-csi-controller-sa -n kube-system
삭제 후 IAM role 확인 후 다시 설치하겠습니다.
# addon 확인
eksctl get addon --cluster ${CLUSTER_NAME}

# addon 삭제
eksctl delete addon --name aws-ebs-csi-driver --cluster myeks-hsh

# 재배포
eksctl create iamserviceaccount \
  --name ebs-csi-controller-sa \
  --namespace kube-system \
  --cluster ${CLUSTER_NAME} \
  --attach-policy-arn arn:aws:iam::aws:policy/service-role/AmazonEBSCSIDriverPolicy \
  --approve \
  --role-only \
  --role-name AmazonEKS_EBS_CSI_DriverRole # 중복 이름 불가능

# 정상 확인
eksctl create addon \
  --name aws-ebs-csi-driver \
  --cluster ${CLUSTER_NAME} \
  --service-account-role-arn arn:aws:iam::${ACCOUNT_ID}:role/AmazonEKS_EBS_CSI_DriverRole-hsh \ # 이름 동일
  --force
---
Name:                ebs-csi-controller-sa
Namespace:           kube-system
Labels:              app.kubernetes.io/component=csi-driver
                     app.kubernetes.io/managed-by=EKS
                     app.kubernetes.io/name=aws-ebs-csi-driver
                     app.kubernetes.io/version=1.39.0
Annotations:         eks.amazonaws.com/role-arn: arn:aws:iam::....:role/AmazonEKS_EBS_CSI_DriverRole-hsh
Image pull secrets:  <none>
Mountable secrets:   <none>
Tokens:              <none>
Events:              <none>

# 파드 재배포 후 확인
kubectl get pods
kubectl get pvc -A 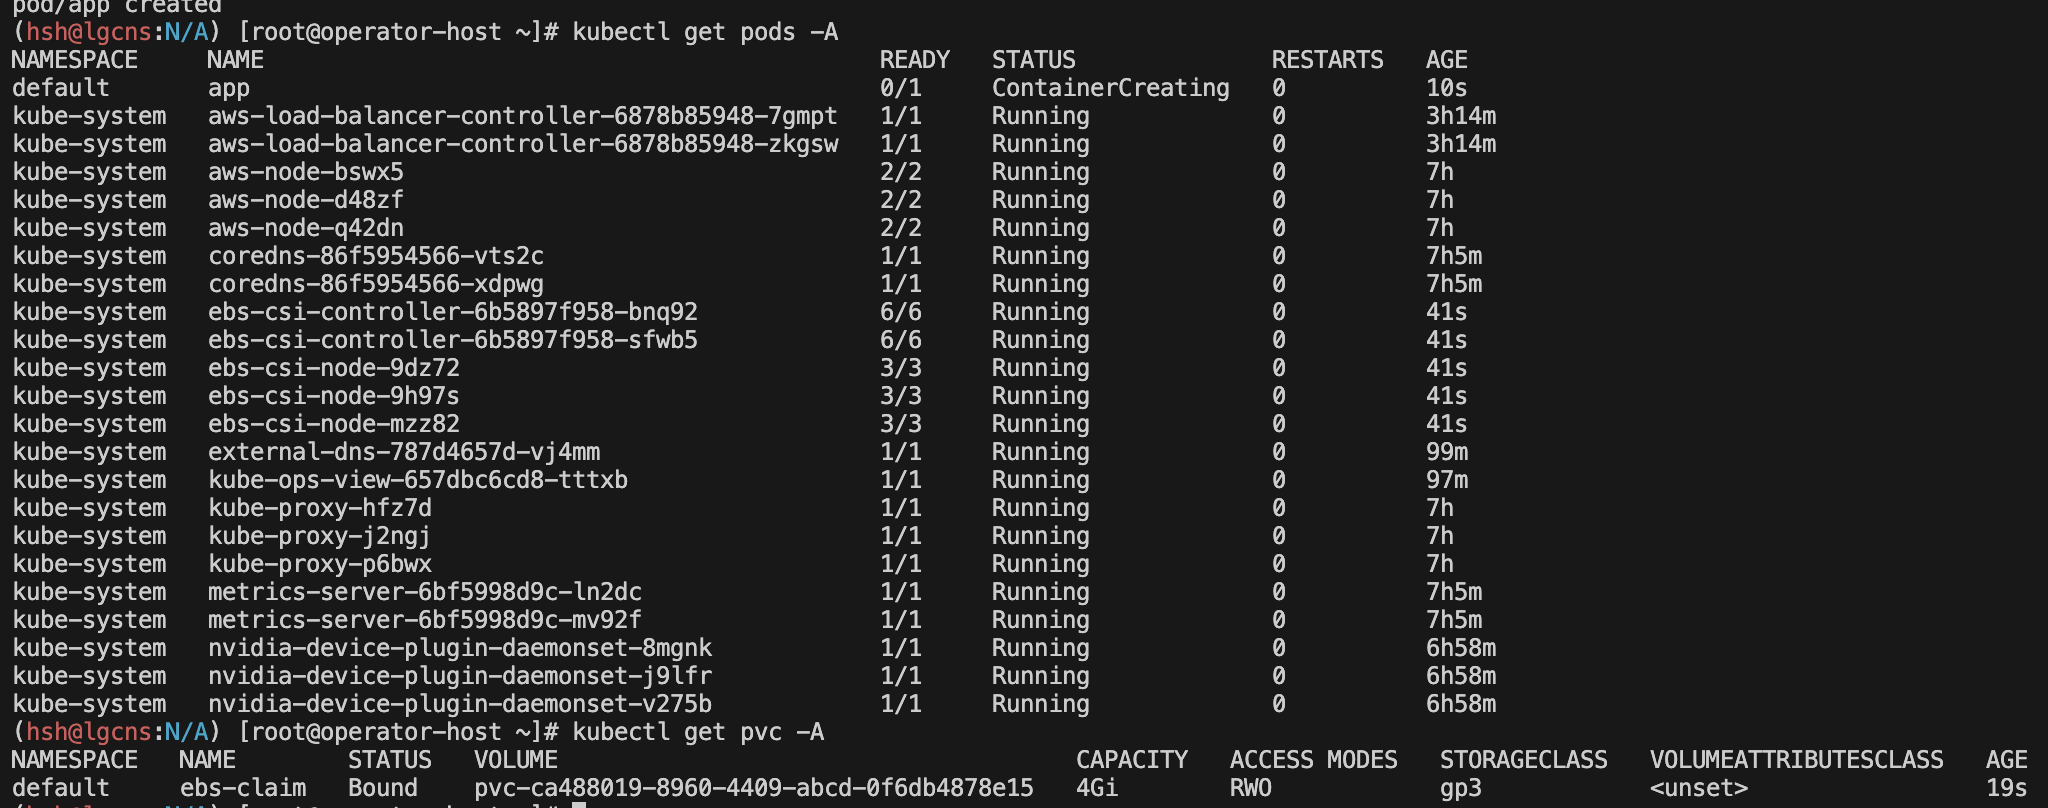
스토리지 증가 확인
kubectl patch pvc ebs-claim -p '{"spec":{"resources":{"requests":{"storage":"10Gi"}}}}'

# 반영 약 2분 소요
kubectl get pvc -A
kubectl exec -it app -- sh -c 'df -hT --type=xfs'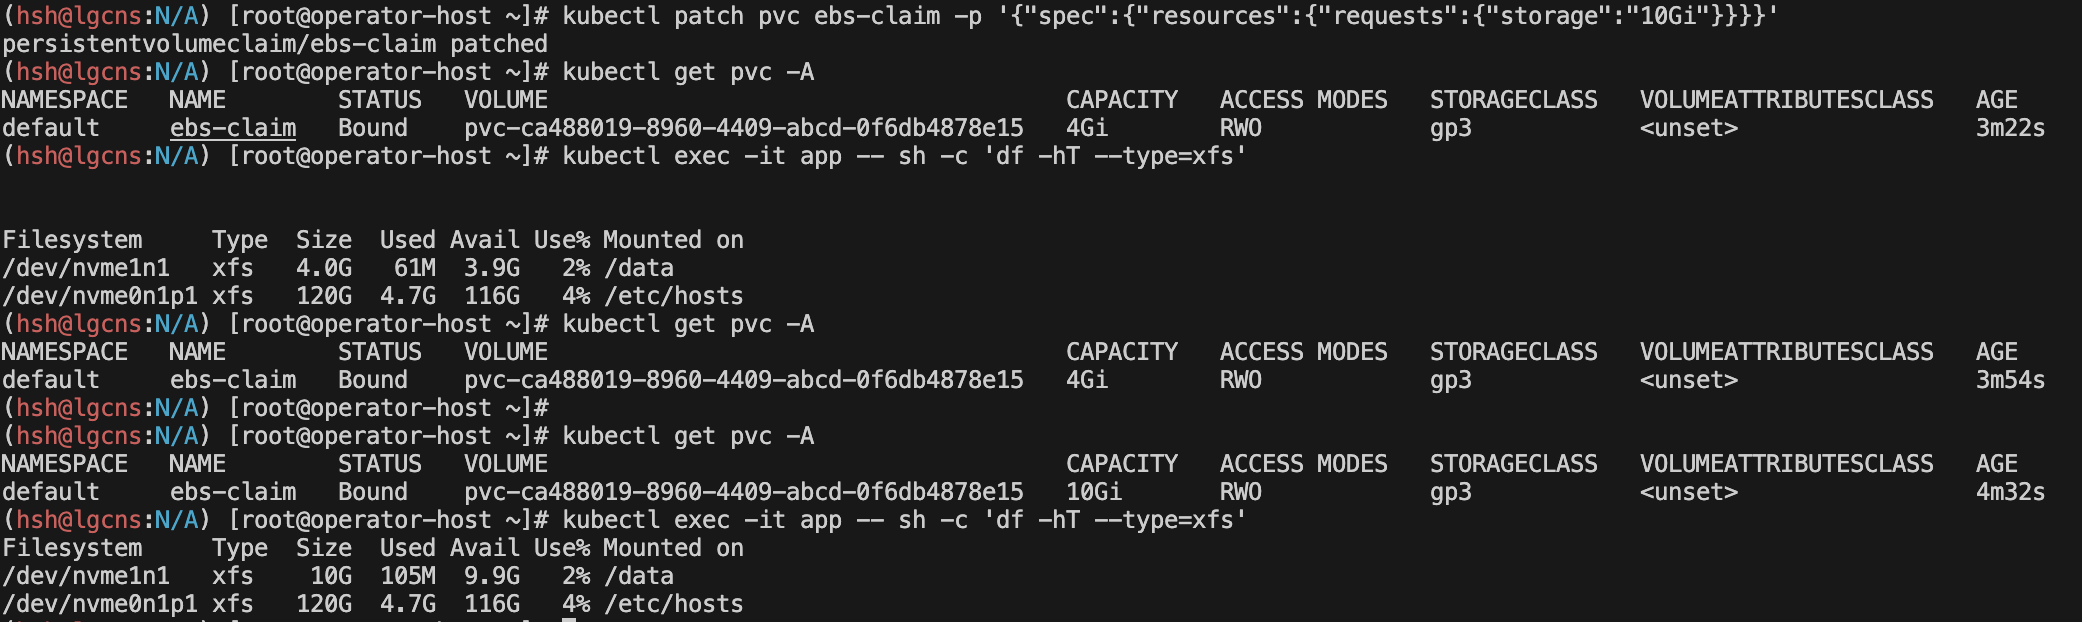
Use Instance Store volumes for containers
EBS 볼륨은 볼륨 유형(예: gp3)과 디스크 크기에 따라 입출력(I/O) 할당량이 있습니다.
git clone https://github.com/awslabs/aws-support-tools.git
cd /EBS/VolumeLimitCalculator

chmod +x volume_Limit_calculator.sh
./volume_Limit_calculator.sh 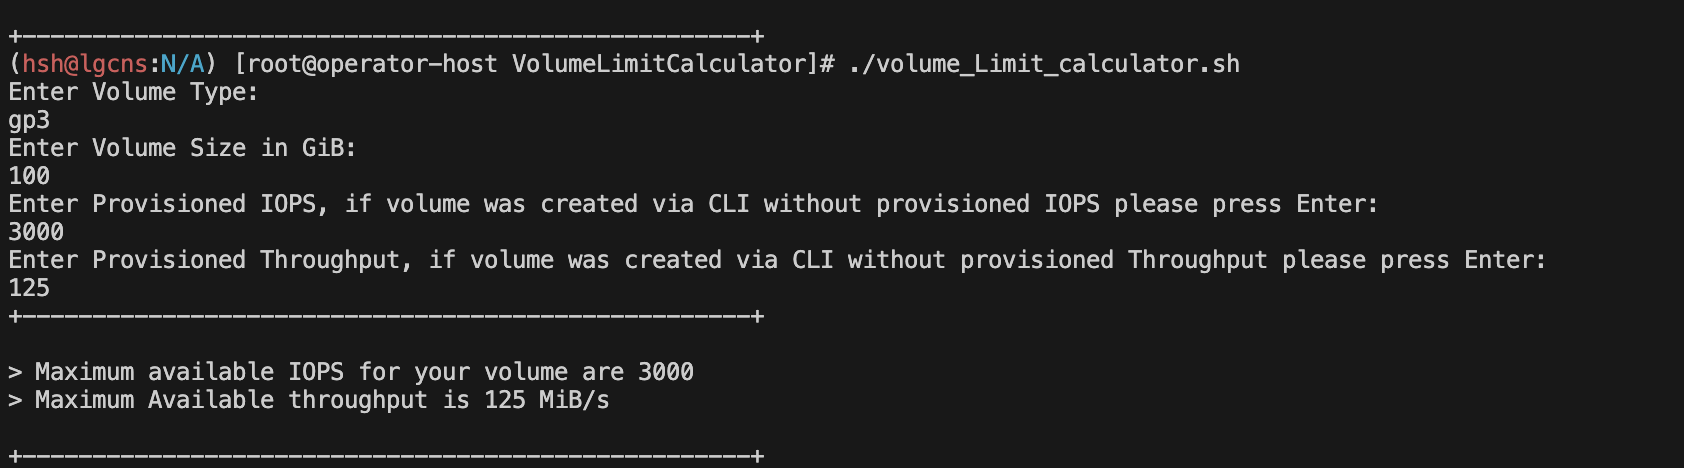
여러 개의 애플리케이션이 하나의 EBS 볼륨을 공유하면 디스크 I/O(입출력) 병목이 발생할 수 있습니다.
공식 문서와 같이 추가 EBS를 구성하여 안정성을 높일 수 있다고 하지만, 인스토어 스토어를 구성하여 7배 높은 IO성능을 사용할 수 있습니다.

인스토어 스토어에 대한 비용은 없습니다. 타입에 따라 볼륨이 자동 결정되며 타입별 볼륨을 다음의 명령어로 확인 가능합니다.
# 인스토어 구성 확인
aws ec2 describe-instance-types \
 --filters "Name=instance-type,Values=c5*" "Name=instance-storage-supported,Values=true" \
 --query "InstanceTypes[].[InstanceType, InstanceStorageInfo.TotalSizeInGB]" \
 --output table

 --------------------------
|  DescribeInstanceTypes |
+---------------+--------+
|  c5d.large    |  50    |
|  c5d.12xlarge |  1800  |
|  c5d.2xlarge  |  200   |
|  c5d.24xlarge |  3600  |
|  c5d.18xlarge |  1800  |
|  c5d.4xlarge  |  400   |
|  c5d.xlarge   |  100   |
|  c5d.metal    |  3600  |
|  c5d.9xlarge  |  900   |
+---------------+--------+
신규 노드 그룹을 구성하여 인스토어 스토어를 저장소로 설정하고, 성능을 측정하겠습니다.
cat << EOF > myng2.yaml
apiVersion: eksctl.io/v1alpha5
kind: ClusterConfig
metadata:
  name: myeks-hsh
  region: ap-northeast-2
  version: "1.31"

managedNodeGroups:
- amiFamily: AmazonLinux2
  desiredCapacity: 1
  instanceType: c5d.large
  labels:
    alpha.eksctl.io/cluster-name: myeks
    alpha.eksctl.io/nodegroup-name: ng2
    disk: instancestore
  maxPodsPerNode: 110
  maxSize: 1
  minSize: 1
  name: ng2
  ssh:
    allow: true
    publicKeyName: $SSHKEYNAME
  subnets:
  - $PubSubnet1
  - $PubSubnet2
  - $PubSubnet3
  tags:
    alpha.eksctl.io/nodegroup-name: ng2
    alpha.eksctl.io/nodegroup-type: managed
  volumeIOPS: 3000
  volumeSize: 30
  volumeThroughput: 125
  volumeType: gp3
  preBootstrapCommands:
    - |
      # Install Tools
      yum install nvme-cli links tree jq tcpdump sysstat -y

      # Filesystem & Mount
      mkfs -t xfs /dev/nvme1n1
      mkdir /data
      mount /dev/nvme1n1 /data

      # Get disk UUID
      uuid=\$(blkid -o value -s UUID mount /dev/nvme1n1 /data)

      # Mount the disk during a reboot
      echo /dev/nvme1n1 /data xfs defaults,noatime 0 2 >> /etc/fstab
EOF
# 신규 노드 그룹 생성
eksctl create nodegroup -f myng2.yaml
N4=52.78.182.197
ssh -i secret.key ec2-user@N4
nvme list
lsblk -e 7 -d
df -hT -t xfs
tree /data
cat /etc/fstab
# 로컬 스토리지 설정
curl -sL https://raw.githubusercontent.com/rancher/local-path-provisioner/v0.0.31/deploy/local-path-storage.yaml | sed 's/opt/data/g' | kubectl apply -f -
kubectl describe cm -n local-path-storage local-path-config
--
..
"nodePathMap":[
{
"node":"DEFAULT_PATH_FOR_NON_LISTED_NODES",
"paths":["/data/local-path-provisioner"]
}
]
..
# 성능 툴 설치
wget https://github.com/kastenhq/kubestr/releases/download/v0.4.48/kubestr_0.4.48_Linux_amd64.tar.gz
tar xvfz kubestr_0.4.48_Linux_amd64.tar.gz && mv kubestr /usr/local/bin/ && chmod +x /usr/local/bin/kubestr
cat << EOF > fio-read.fio
[global]
ioengine=libaio
direct=1
bs=4k
runtime=120
time_based=1
iodepth=16
numjobs=4
group_reporting
size=1g
rw=randread
[read]
EOF
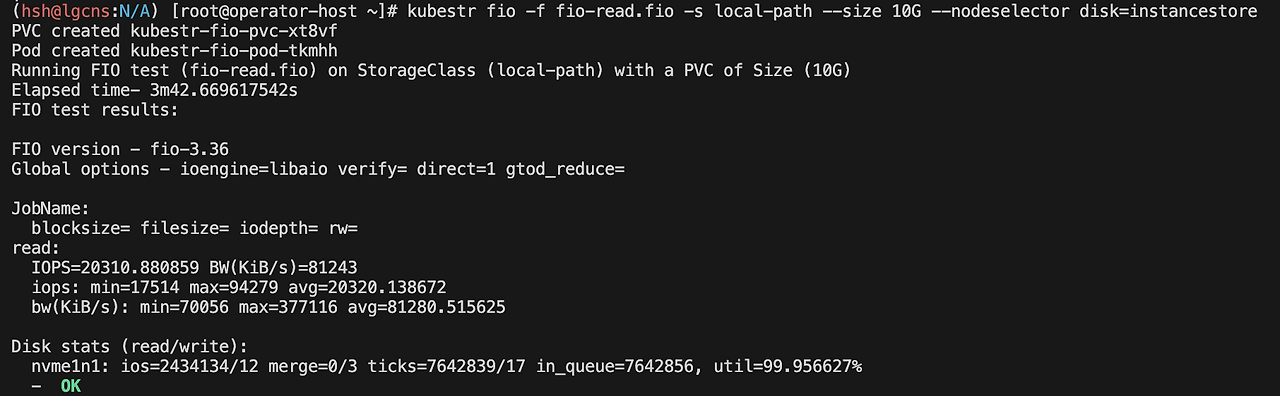
kubestr fio -f fio-read.fio -s local-path --size 10G --nodeselector disk=instancestore

IOPS가 약 20000정도로 EBS 볼륨에 비해 상당히 높은 것을 확인할 수 있습니다.
데이터 삭제는 아래 명령어를 통해 진행해주세요.
kubectl delete -f https://raw.githubusercontent.com/rancher/local-path-provisioner/v0.0.31/deploy/local-path-storage.yaml

eksctl delete nodegroup -c $CLUSTER_NAME -n ng2
AWS Volume SnapShots Controller
사용중인 볼륨에 대해 스냅샷 컨트롤러를 통해 스냅샷 설정도 가능합니다.
# Install Snapshot CRDs
kubectl apply -f https://raw.githubusercontent.com/kubernetes-csi/external-snapshotter/master/client/config/crd/snapshot.storage.k8s.io_volumesnapshots.yaml
kubectl apply -f https://raw.githubusercontent.com/kubernetes-csi/external-snapshotter/master/client/config/crd/snapshot.storage.k8s.io_volumesnapshotclasses.yaml
kubectl apply -f https://raw.githubusercontent.com/kubernetes-csi/external-snapshotter/master/client/config/crd/snapshot.storage.k8s.io_volumesnapshotcontents.yaml
kubectl get crd | grep snapshot
kubectl api-resources  | grep snapshot

# Install Common Snapshot Controller
kubectl apply -f https://raw.githubusercontent.com/kubernetes-csi/external-snapshotter/master/deploy/kubernetes/snapshot-controller/rbac-snapshot-controller.yaml
kubectl apply -f https://raw.githubusercontent.com/kubernetes-csi/external-snapshotter/master/deploy/kubernetes/snapshot-controller/setup-snapshot-controller.yaml
kubectl get deploy -n kube-system snapshot-controller
kubectl get pod -n kube-system

# Install Snapshotclass
kubectl apply -f https://raw.githubusercontent.com/kubernetes-sigs/aws-ebs-csi-driver/master/examples/kubernetes/snapshot/manifests/classes/snapshotclass.yaml
kubectl get vsclass # 혹은 volumesnapshotclasses
kubectl describe vsclass
예제 애플리케이션을 구성하여 로그를 넣고, 스냅샷을 설정하겠습니다.
# PVC 생성
cat <<EOF | kubectl apply -f -
apiVersion: v1
kind: PersistentVolumeClaim
metadata:
  name: ebs-claim
spec:
  accessModes:
    - ReadWriteOnce
  resources:
    requests:
      storage: 4Gi
  storageClassName: gp3
EOF
kubectl get pvc,pv

# 파드 생성
cat <<EOF | kubectl apply -f -
apiVersion: v1
kind: Pod
metadata:
  name: app
spec:
  terminationGracePeriodSeconds: 3
  containers:
  - name: app
    image: centos
    command: ["/bin/sh"]
    args: ["-c", "while true; do echo \$(date -u) >> /data/out.txt; sleep 5; done"]
    volumeMounts:
    - name: persistent-storage
      mountPath: /data
  volumes:
  - name: persistent-storage
    persistentVolumeClaim:
      claimName: ebs-claim
EOF

kubectl exec app -- tail -f /data/out.txt
스냅샷 CRD를 통해 볼륨을 백업하겠습니다.
백업 인자를 확인하면 스토리지 클래스와 PVC볼륨을 통해 백업합니다.
cat <<EOF | kubectl apply -f -
apiVersion: snapshot.storage.k8s.io/v1
kind: VolumeSnapshot
metadata:
  name: ebs-volume-snapshot
spec:
  volumeSnapshotClassName: csi-aws-vsc
  source:
    persistentVolumeClaimName: ebs-claim
EOF

# VolumeSnapshot 확인
kubectl get volumesnapshot
kubectl get volumesnapshotcontents
kubectl get volumesnapshotcontents -o jsonpath='{.items[*].status.snapshotHandle}' ; echo

# app & pvc 제거 : 강제로 장애 재현
kubectl delete pod app && kubectl delete pvc ebs-claim
복원은 PVC볼륨에 이전 스냅샷 구성 정보를 입력합니다.
cat <<EOF | kubectl apply -f -
apiVersion: v1
kind: PersistentVolumeClaim
metadata:
  name: ebs-snapshot-restored-claim
spec:
  storageClassName: gp3
  accessModes:
    - ReadWriteOnce
  resources:
    requests:
      storage: 4Gi
  dataSource: # 스냅샷 정보 입력
    name: ebs-volume-snapshot
    kind: VolumeSnapshot
    apiGroup: snapshot.storage.k8s.io
EOF

cat <<EOF | kubectl apply -f -
apiVersion: v1
kind: Pod
metadata:
  name: app
spec:
  terminationGracePeriodSeconds: 3
  containers:
  - name: app
    image: centos
    command: ["/bin/sh"]
    args: ["-c", "while true; do echo \$(date -u) >> /data/out.txt; sleep 5; done"]
    volumeMounts:
    - name: persistent-storage
      mountPath: /data
  volumes:
  - name: persistent-storage
    persistentVolumeClaim:
      claimName: ebs-snapshot-restored-claim
EOF

kubectl exec app -- cat /data/out.txt
AWS EFS Controller
EKS addon을 통해 구성이 가능합니다.
EBS Controller 설치와 같이 EKS에서 EFS 제어하기 위해 IAM role를 설정하고 SA에 부여합니다.
# efs 호환 버전 확인
aws eks describe-addon-versions \
    --addon-name aws-efs-csi-driver \
    --kubernetes-version 1.31 \
    --query "addons[].addonVersions[].[addonVersion, compatibilities[].defaultVersion]" \
    --output text

eksctl create iamserviceaccount \
  --name efs-csi-controller-sa \
  --namespace kube-system \
  --cluster ${CLUSTER_NAME} \
  --attach-policy-arn arn:aws:iam::aws:policy/service-role/AmazonEFSCSIDriverPolicy \
  --approve \
  --role-only \
  --role-name AmazonEKS_EFS_CSI_DriverRole

export ACCOUNT_ID=$(aws sts get-caller-identity --query 'Account' --output text)
eksctl create addon --name aws-efs-csi-driver --cluster ${CLUSTER_NAME} --service-account-role-arn arn:aws:iam::${ACCOUNT_ID}:role/AmazonEKS_EFS_CSI_DriverRole --force
kubectl get sa -n kube-system efs-csi-controller-sa -o yaml | head -5

kubectl get pod -n kube-system -l "app.kubernetes.io/name=aws-efs-csi-driver,app.kubernetes.io/instance=aws-efs-csi-driver"
다수의 파드에서 단일 EFS에 접근하기 위한 예제입니다.
curl -s -O https://raw.githubusercontent.com/kubernetes-sigs/aws-efs-csi-driver/master/examples/kubernetes/dynamic_provisioning/specs/storageclass.yaml
cat storageclass.yaml
kind: StorageClass
apiVersion: storage.k8s.io/v1
metadata:
  name: efs-sc
provisioner: efs.csi.aws.com
parameters:
  provisioningMode: efs-ap #  The type of volume to be provisioned by Amazon EFS. Currently, only access point based provisioning is supported (efs-ap).
  fileSystemId: fs-92107410 # The file system under which the access point is created.
  directoryPerms: "700" # The directory permissions of the root directory created by the access point.
  gidRangeStart: "1000" # optional, The starting range of the Posix group ID to be applied onto the root directory of the access point. The default value is 50000.
  gidRangeEnd: "2000" # optional, The ending range of the Posix group ID. The default value is 7000000.
  basePath: "/dynamic_provisioning" # optional, The path on the file system under which the access point root directory is created. If the path isn't provided, the access points root directory is created under the root of the file system.
  subPathPattern: "${.PVC.namespace}/${.PVC.name}" # optional, A pattern that describes the subPath under which an access point should be created. So if the pattern were ${.PVC.namespace}/${PVC.name}, the PVC namespace is foo and the PVC name is pvc-123-456, and the basePath is /dynamic_provisioner the access point would be created at /dynamic_provisioner/foo/pvc-123-456
  ensureUniqueDirectory: "true" # optional # A boolean that ensures that, if set, a UUID is appended to the final element of any dynamically provisioned path, as in the above example. This can be turned off but this requires you as the administrator to ensure that your storage classes are set up correctly. Otherwise, it's possible that 2 pods could end up writing to the same directory by accident. Please think very carefully before setting this to false!
  reuseAccessPoint: "false" # EFS 액세스 포인트 설정 옵션


EfsFsId=
kubectl apply -f storageclass.yaml
kubectl get sc efs-sc

# 예제 파드 배포
curl -s -O https://raw.githubusercontent.com/kubernetes-sigs/aws-efs-csi-driver/master/examples/kubernetes/dynamic_provisioning/specs/pod.yaml
cat pod.yaml
---
apiVersion: v1
kind: PersistentVolumeClaim
metadata:
  name: efs-claim
spec:
  accessModes:
    - ReadWriteMany # EFS 다수 읽기, 쓰기 옵션
  storageClassName: efs-sc
  resources:
    requests:
      storage: 5Gi
---
apiVersion: v1
kind: Pod
metadata:
  name: efs-app
spec:
  containers:
    - name: app
      image: centos
      command: ["/bin/sh"]
      args: ["-c", "while true; do echo $(date -u) >> /data/out; sleep 5; done"]
      volumeMounts:
        - name: persistent-storage
          mountPath: /data
  volumes:
    - name: persistent-storage
      persistentVolumeClaim:
        claimName: efs-claim


kubectl apply -f pod.yaml


# 스토리지 확인
kubectl exec -it efs-app -- sh -c "df -hT -t nfs4"
kubectl exec efs-app -- bash -c "ls -l /data/out"

EFS 리소스 삭제는 다음과 같이 진행해주세요.
kubectl delete -f pod.yaml
kubectl delete -f storageclass.yaml'Cloud Tech' 카테고리의 다른 글
| Grafana Observability구성 (0) | 2025.03.01 |
|---|---|
| EKS 노드 그룹 (1) | 2025.02.23 |
| Kubeflow 구성 비용 최소화 및 대시보드 구성기(feat. JuJu) (1) | 2025.02.16 |
| RayCluster on EKS and Serving LLM Model (1) | 2025.02.09 |
| Kubernetes CI & CD (ArgoCD, Jenkins) (2) | 2024.12.22 |