CloudNet@ LLMSO(=Hands-On LLM Serving and Optimization Study) 스터디 학습 내용을 정리합니다.
Model Serving 실습
모델 서빙과 최적화를 위해 모델 동작과 환경 설정을 확인하겠습니다.
이번 장에서 사용할 모델은 Qwen 2.5 입니다.
실습 1. Transformer 구성 확인
실습 환경 → 구글 Colab 에서 진행
https://github.com/orca3/llm-model-inference/blob/main/ch02/ch2_Batching.ipynb
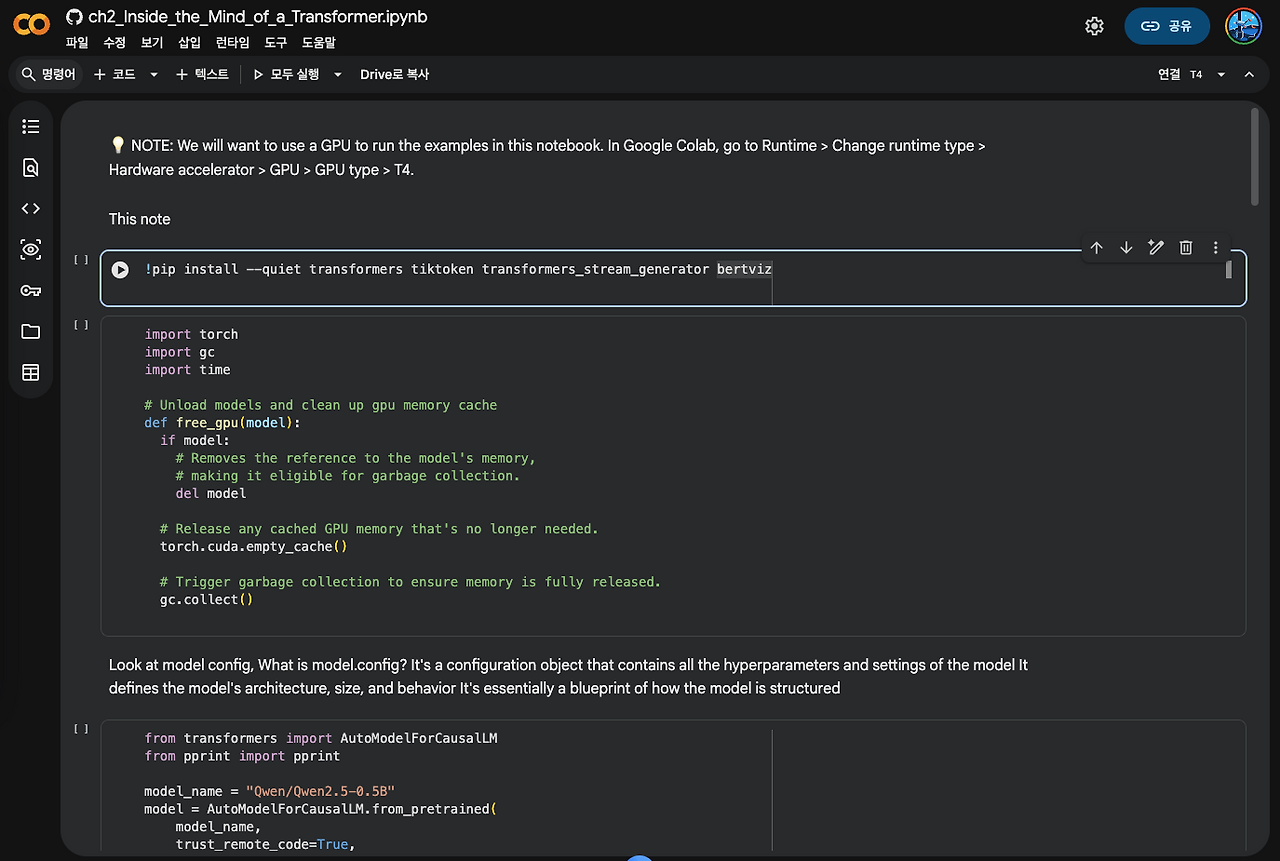
모델 Config 확인
from transformers import AutoModelForCausalLM
from pprint import pprint

model_name = "Qwen/Qwen2.5-0.5B"
model = AutoModelForCausalLM.from_pretrained(
    model_name,
    trust_remote_code=True,
    device_map="auto"
)

# Print all configuration parameters
config = model.config
print("\n=== Model Configuration Parameters ===")

# Architecture parameters
print("\nArchitecture Parameters:")
print(f"Hidden size: {config.hidden_size}")  # Size of the hidden layers
print(f"Number of layers: {config.num_hidden_layers}")  # Number of transformer blocks
print(f"Number of attention heads: {config.num_attention_heads}")  # Number of attention heads
print(f"Intermediate size: {config.intermediate_size}")  # Size of the MLP intermediate layer

# Tokenizer parameters
print("\nTokenizer Parameters:")
print(f"Vocabulary size: {config.vocab_size}")  # Size of the vocabulary
print(f"Maximum position embeddings: {config.max_position_embeddings}")  # Maximum sequence length

# Print model size
total_params = sum(p.numel() for p in model.parameters())
print(f"\nModel Size:")
print(f"Total parameters: {total_params:,}")

# Model-specific parameters
print("\nModel-specific Parameters:")
for key, value in config.to_dict().items():
    if key not in ['architectures', 'model_type', 'torch_dtype']:
        print(f"{key}: {value}")

# Free GPU memory
free_gpu(model) # GPU에 올려놓은 모델을 메모리에서 제거- free_gpu(model) : GPU에 올려놓은 모델을 메모리에서 제거
config.json: 100%
 681/681 [00:00<00:00, 43.3kB/s]
Warning: You are sending unauthenticated requests to the HF Hub. Please set a HF_TOKEN to enable higher rate limits and faster downloads.
WARNING:huggingface_hub.utils._http:Warning: You are sending unauthenticated requests to the HF Hub. Please set a HF_TOKEN to enable higher rate limits and faster downloads.
model.safetensors: reconstructing file: 100%
  988MB /  988MB, 75.9MB/s
model.safetensors: downloading bytes:
  855MB, 69.3MB/s
Loading weights: 100%
 290/290 [00:00<00:00, 877.37it/s]
generation_config.json: 100%
 138/138 [00:00<00:00, 16.3kB/s]

=== Model Configuration Parameters ===


Architecture Parameters: 아키텍처 파라미터 - 총 파라미터 약 4억 9,400만 개
Hidden size: 896         # 모델 내부에서 토큰 하나를 표현하는 벡터의 차원 수(임베딩 차원), 모든 레이어를 통과하는 동안 이 크기의 벡터로 정보가 흐름
Number of layers: 24     # 트랜스포머 블록(Self-Attention + FFN)이 24번 반복됨, 레이어가 깊을수록 더 복잡한 패턴/추론을 학습할 수 있지만, 학습 난이도와 추론 지연시간도 증가
Number of attention heads: 14  #  Multi-Head Attention에서 어텐션을 14개의 독립적인 "머리"로 나눠 병렬로 계산 , 각 head 차원 = 896 / 14 = 64
Intermediate size: 4864  # FFN(Feed-Forward Network)의 은닉층 크기

Tokenizer Parameters:
Vocabulary size: 151936  # 모델이 인식하는 고유 토큰(서브워드)의 개수, 다국어(특히 중국어 포함) 지원을 위해 매우 큰 편 — 영어 전용 모델(GPT-2 등)은 보통 5만 개 내외
Maximum position embeddings: 32768  # 모델이 한 번에 처리할 수 있는 최대 시퀀스 길이(컨텍스트 윈도우), 32K 토큰 ≈ 책 한 권 분량의 텍스트를 한 번에 처리 가능

Model Size:
Total parameters: 494,032,768  # 임베딩(1.36억) + 24개 레이어(약 3.5억대) 를 합치면 약 4.94억 개


Model-specific Parameters: 세부 설정값
transformers_version: 5.13.1
return_dict: True
dtype: bfloat16            # 가중치가 16비트 부동소수점으로 저장됨 (메모리 절반 절약, GPU 서빙 표준)
chunk_size_feed_forward: 0
is_encoder_decoder: False
id2label: {0: 'LABEL_0', 1: 'LABEL_1'}
label2id: {'LABEL_0': 0, 'LABEL_1': 1}
problem_type: None
vocab_size: 151936
hidden_size: 896
intermediate_size: 4864
num_hidden_layers: 24
num_attention_heads: 14
num_key_value_heads: 2    # GQA(Grouped Query Attention) 사용 — 어텐션 헤드는 14개지만 K/V 헤드는 2개만 사용해 KV 캐시 메모리를 크게 절감
hidden_act: silu          # FFN(피드포워드)의 활성화 함수로 SiLU 사용
max_position_embeddings: 32768
initializer_range: 0.02
rms_norm_eps: 1e-06       # RMSNorm(레이어 정규화)의 안정성용 작은 상수
use_cache: True           # 생성 시 KV 캐시를 재사용하겠다는 설정 (디코딩 속도 향상의 핵심)
tie_word_embeddings: True # 입력 임베딩과 출력(LM head) 가중치를 공유해 파라미터 수 절약 - 작은 모델(0.5B)에서 흔한 기법
rope_parameters: {'rope_theta': 1000000.0, 'rope_type': 'default'} # RoPE(Rotary Position Embedding) 방식으로 위치 정보를 인코딩
use_sliding_window: False # 슬라이딩 윈도우 어텐션 미사용 → 모든 레이어가 전체 시퀀스에 대해 어텐션 계산 (layer_types가 전부 full_attention인 것과 일치)
sliding_window: None
max_window_layers: 24
layer_types: ['full_attention', 'full_attention', 'full_attention', 'full_attention', 'full_attention', 'full_attention', 'full_attention', 'full_attention', 'full_attention', 'full_attention', 'full_attention', 'full_attention', 'full_attention', 'full_attention', 'full_attention', 'full_attention', 'full_attention', 'full_attention', 'full_attention', 'full_attention', 'full_attention', 'full_attention', 'full_attention', 'full_attention']
attention_dropout: 0.0
pad_token_id: None
bos_token_id: 151643      # 시작/종료 토큰 ID (Qwen은 둘이 동일)  — 생성 종료 조건 판단에 사용
eos_token_id: 151643      # 상동
_name_or_path: Qwen/Qwen2.5-0.5B
use_mrope: False
output_attentions: False  # 추론 시 어텐션 가중치나 중간 hidden state를 반환하지 않음 (성능을 위해 기본값 False)
output_hidden_states: False # 상동
디코더 레이어 확인 : 모델 내부 모듈 출력
- num_hidden_layers: 24 로 24계층의 모듈이 반복적으로 호출됨
import torch
from transformers import AutoModelForCausalLM
from pprint import pprint


# Load the model
model = AutoModelForCausalLM.from_pretrained(
    "Qwen/Qwen2.5-0.5B",
    trust_remote_code=True,
    device_map="auto"  # This will automatically handle device placement
)

print(f"\n=== {model_name} Architecture ===")
print("\nModel Configuration:")
# pprint(model.config.to_dict())

print("\nModel Structure:")
def print_module_structure(module, prefix=''):
    for name, child in module.named_children():
        # Skip certain internal modules for clarity
        if name in ['_orig_mod', 'wrapped_model']:
            continue

        # Print the current module
        print(f"{prefix}{name}: {type(child).__name__}")

        if "Qwen2Attention" in name.lower():
          print(f"\nFound attention module: {name}")
          print(f"Type: {type(module).__name__}")

          # Print attention-specific attributes
          if hasattr(module, 'num_heads'):
              print(f"Number of attention heads: {module.num_heads}")
          if hasattr(module, 'head_dim'):
              print(f"Head dimension: {module.head_dim}")
          if hasattr(module, 'hidden_size'):
              print(f"Hidden size: {module.hidden_size}")
          if hasattr(module, 'rotary_emb'):
              print(f"Has rotary embeddings: {module.rotary_emb is not None}")

        # If it's a container module (has children), recurse
        if list(child.children()):
            print_module_structure(child, prefix + '  ')

print_module_structure(model)

free_gpu(model)
Attention Layer 확인
# Find all attention layers
attention_layers = []
for name, module in model.named_modules():
    #if "attention" in name.lower():
    if "Qwen2Attention" in type(module).__name__:
        attention_layers.append((name, module))

print(f"\nFound {len(attention_layers)} attention layers")

# Analyze each attention layer
for i, (name, module) in enumerate(attention_layers):
    print(f"\nAttention Layer {i}: {name}")
    print("=" * 50)

    # Basic information
    print(f"Type: {type(module).__name__}")

    # Attention parameters
    if hasattr(module, 'num_heads'):
        print(f"Number of attention heads: {module.num_heads}")
    if hasattr(module, 'head_dim'):
        print(f"Head dimension: {module.head_dim}")
    if hasattr(module, 'hidden_size'):
        print(f"Hidden size: {module.hidden_size}")

    # Rotary embeddings
    if hasattr(module, 'rotary_emb'):
        print(f"Rotary embeddings: {type(module.rotary_emb).__name__ if module.rotary_emb else 'None'}")

    # Attention projections
    print("\nAttention projections:")
    for sub_name, sub_module in module.named_children():
        if hasattr(sub_module, 'weight'):
            shape = sub_module.weight.shape
            print(f"  {sub_name}: {type(sub_module).__name__}, Shape: {shape}")

    # Additional attention-specific attributes
    print("\nAdditional attributes:")
    for attr_name in dir(module):
        if not attr_name.startswith('_') and not callable(getattr(module, attr_name)):
            try:
                value = getattr(module, attr_name)
                if not isinstance(value, (torch.Tensor, torch.nn.Module)):
                    print(f"  {attr_name}: {value}")
            except:
                pass

# Print model's attention-related configuration
print("\nAttention-related configuration:")
config = model.config.to_dict()
attention_config = {k: v for k, v in config.items() if 'attention' in k.lower()}
pprint(attention_config)

free_gpu(model)
GQA
GQA(Grouped Query Attention) : 헤드(key, Value) 가 128인 이유 ? 메모리 사용량과 메모리 대역폭 병목을 줄이기 위해 7개의 쿼리 헤드가 하나의 K/V 그룹을 같이 사용
==================================================
Type: Qwen2Attention
Head dimension: 64

Attention projections:
  q_proj: Linear, Shape: torch.Size([896, 896])
  k_proj: Linear, Shape: torch.Size([128, 896])
  v_proj: Linear, Shape: torch.Size([128, 896])
  o_proj: Linear, Shape: torch.Size([896, 896])

Additional attributes:
  T_destination: ~T_destination
  attention_dropout: 0.0
  call_super_init: False
  config: Qwen2Config {
  "architectures": [
    "Qwen2ForCausalLM"
  ],
  "attention_dropout": 0.0,
  "bos_token_id": 151643,
  "dtype": "bfloat16",
  "eos_token_id": 151643,
  "hidden_act": "silu",
  "hidden_size": 896,
  "initializer_range": 0.02,
  "intermediate_size": 4864,
  "layer_types": [
    "full_attention",
    "full_attention",
    "full_attention",
    "full_attention",
    "full_attention",
    "full_attention",
    "full_attention",
    "full_attention",
    "full_attention",
    "full_attention",
    "full_attention",
    "full_attention",
    "full_attention",
    "full_attention",
    "full_attention",
    "full_attention",
    "full_attention",
    "full_attention",
    "full_attention",
    "full_attention",
    "full_attention",
    "full_attention",
    "full_attention",
    "full_attention"
  ],
  "max_position_embeddings": 32768,
  "max_window_layers": 24,
  "model_type": "qwen2",
  "num_attention_heads": 14,
  "num_hidden_layers": 24,
  "num_key_value_heads": 2,
  "pad_token_id": null,
  "rms_norm_eps": 1e-06,
  "rope_parameters": {
    "rope_theta": 1000000.0,
    "rope_type": "default"
  },
  "sliding_window": null,
  "tie_word_embeddings": true,
  "transformers_version": "5.13.1",
  "use_cache": true,
  "use_mrope": false,
  "use_sliding_window": false,
  "vocab_size": 151936
}

  dump_patches: False
  head_dim: 64
  is_causal: True
  layer_idx: 0
  layer_type: full_attention
  num_key_value_groups: 7
  scaling: 0.125
  sliding_window: None
  training: False

Attention Layer 1: model.layers.1.self_attn
==================================================
Type: Qwen2Attention
Head dimension: 64

Attention projections:
  q_proj: Linear, Shape: torch.Size([896, 896])
  k_proj: Linear, Shape: torch.Size([128, 896])
  v_proj: Linear, Shape: torch.Size([128, 896])
  o_proj: Linear, Shape: torch.Size([896, 896])
...
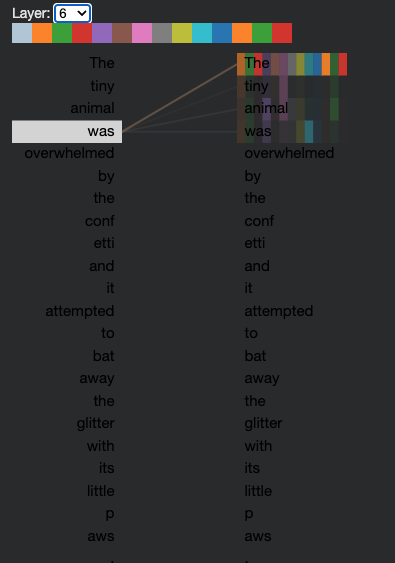
어텐션 시각화
# prompt: use bertviz library to visualize the attention result of the input prompt "write a short introduction about US capital city"
from transformers import AutoTokenizer
from bertviz import head_view

# Your input text
text = "The tiny animal was overwhelmed by the confetti and it attempted to bat away the glitter with its little paws."
model_name = "Qwen/Qwen2.5-0.5B"
tokenizer = AutoTokenizer.from_pretrained(model_name, output_attentions=True)
model = AutoModelForCausalLM.from_pretrained(model_name, output_attentions=True).eval().cuda()

# Tokenize input and get token strings
inputs = tokenizer(text, return_tensors="pt").to(model.device)
tokens = tokenizer.convert_ids_to_tokens(inputs['input_ids'][0])

# Generate outputs with attention
with torch.no_grad():
    outputs = model(**inputs, output_attentions=True)

# Get attention weights
attention = outputs.attentions

# Use bertviz to visualize
head_view(attention, tokens)
실습 2 : A Step-by-Step Waklthrough
LLM을 사용하는 예제이며 Hugging Face 의 Pipeline API를 통해 수행
텍스트 생성 실습
from transformers import pipeline
from transformers import AutoTokenizer, AutoModelForCausalLM
import torch

# Initialize the text generation pipeline
# text-generation', 텍스트 생성 파이프라인 초기화
generator = pipeline('text-generation', model='Qwen/Qwen2.5-0.5B')

# Define your prompt(질문)
prompt = "Write a short introduction about US capital city."

# Generate text
# max_length=50: 생성될 전체 시퀀스(입력 프롬프트 + 생성된 텍스트)의 최대 토큰 길이를 50으로 제한
# num_return_sequences=1: 하나의 결과만 생성 (여러 개 생성하고 싶다면 값을 늘리면 됨, 이 경우 서로 다른 샘플링 결과를 여러 개 받을 수 있음)
generated_text = generator(prompt, max_length=50, num_return_sequences=1)

# Print the generated text
print(generated_text[0]['generated_text'])

free_gpu(generator.model)
generator function to examine step by step
Hugging Face API 없이 순차별로 동작 확인
(1) 토크나이저와 모델 로드 (2) 입력 프롬프트 정의 : “인간 역사~다음 세대 커뮤니케이션 도구에 대한 질문” (3) 프롬프트 토큰화 (4) 메인 생성 루프 : 토큰을 하나씩 생성, max_new_tokens=100회 반복
- (A) 현재까지의 시퀀스(idx_cond = idx)를 컨텍스트로 설정
- (B) outputs = model(idx_cond) → 모델이 forward pass를 실행해 logits(각 토큰에 대한 원시 예측 점수) 획득
- (C) 다음 토큰 선택
- (D) 새 토큰을 시퀀스 끝에 이어붙임 (앞서 설명한 자기회귀 방식 그대로)
- (E) 생성된 토큰이 EOS(문장 종료) 토큰이면 루프 종료
(5) 전체 시퀀스 디코딩
import torch
import time
from transformers import AutoTokenizer, AutoModelForCausalLM

first_token_generated = False

# (1) 토크나이저와 모델 로드
model_name = "Qwen/Qwen2.5-0.5B"
tokenizer = AutoTokenizer.from_pretrained(model_name, trust_remote_code=True)
model = AutoModelForCausalLM.from_pretrained(model_name, trust_remote_code=True).to("cuda" if torch.cuda.is_available() else "cpu")

# (2) 입력 프롬프트 정의 : “인간 역사~다음 세대 커뮤니케이션 도구에 대한 질문”
prompt = """The history of human communication is a story of innovation. From ancient cave paintings and spoken language to the invention of writing systems, humans have constantly developed new methods to express ideas and share knowledge. The printing press revolutionized the spread of information, enabling books to be produced and distributed at an unprecedented scale. Centuries later, the invention of the telegraph, radio, and television further transformed how we connect with one another. But perhaps no advancement has reshaped communication more profoundly than the internet.
Today, digital platforms allow billions of people to share messages, media, and experiences in real time. Social media, messaging apps, and video conferencing have broken down geographical barriers and created new ways of building communities. At the same time, these technologies raise important questions about privacy, information overload, and the nature of human interaction.
Looking ahead, emerging technologies such as virtual reality, brain-computer interfaces, and artificial intelligence promise to once again redefine how we communicate. As we reflect on this history and anticipate the future, one question arises:

How might the next wave of communication tools shape our relationships, societies, and sense of identity?"""

# (3) 프롬프트 토큰화
max_new_tokens = 100
# tokenize the input prompt for the first output token
# PS: prompt is the initial input sequence for LLM generation
idx = tokenizer(prompt, return_tensors="pt").input_ids.to(model.device)
start_time = total_time = time.time()
times = []

# (4) 메인 생성 루프 : 토큰을 하나씩 생성, max_new_tokens=100회 반복
for _ in range(max_new_tokens):

    # (A) 현재까지의 시퀀스(idx_cond = idx)를 컨텍스트로 설정
    idx_cond = idx
    with torch.no_grad():
        # (B) outputs = model(idx_cond) → 모델이 forward pass를 실행해 logits(각 토큰에 대한 원시 예측 점수) 획득
        outputs = model(idx_cond)
        # Get the logits (raw prediction scores) for each token predictions
        logits = outputs.logits

    # (C) 다음 토큰 선택
    logits = logits[:, -1, :] #  Select only the logits for the last token
    probas = torch.softmax(logits, dim=-1) # Convert logits to probabilities using softmax
    # 확률적 샘플링(단순히 가장 높은 확률의 토큰만 뽑는 게 아니라 분포에서 무작위 샘플링 → 이 때문에 같은 프롬프트라도 실행할 때마다 다른 결과가 나올 수 있음)
    idx_next = torch.multinomial(probas, num_samples=1)
    print("Next Token is:", tokenizer.decode(idx_next[0], skip_special_tokens=True))
    time_cost = time.time() - start_time
    times.append(time_cost)

    # Track time spent in token generation
    if not first_token_generated:
        print(f"Time taken for generating the first token: {time_cost:.4f} seconds")
        first_token_generated = True
    else:
        print(f"Time taken for generating a token: {time_cost:.4f} seconds")

    start_time = time.time()

    # (D) 새 토큰을 시퀀스 끝에 이어붙임 (앞서 설명한 자기회귀 방식 그대로)
    idx = torch.cat((idx, idx_next), dim=1)

    # (E) 생성된 토큰이 EOS(문장 종료) 토큰이면 루프 종료
    if idx_next.item() == tokenizer.eos_token_id:
        print("\n[Generation completed - EOS token reached]")
        break

# (5) 전체 시퀀스 디코딩
generated_text = tokenizer.decode(idx[0], skip_special_tokens=True)
print(f"Total time take for next token: {time.time() - total_time:.4f} seconds")
print(generated_text)

# Free GPU memory
free_gpu(model=model)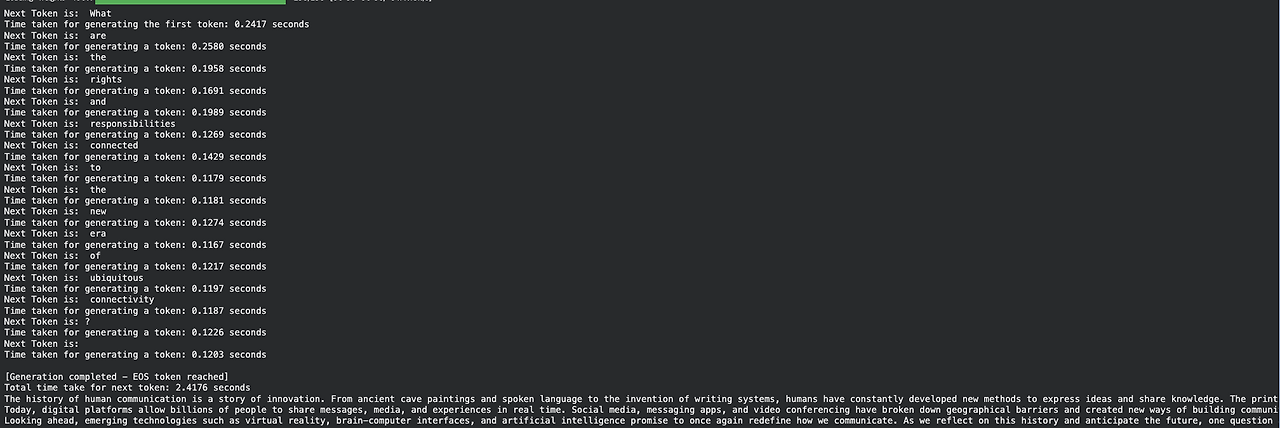
각 토큰 생성 시간
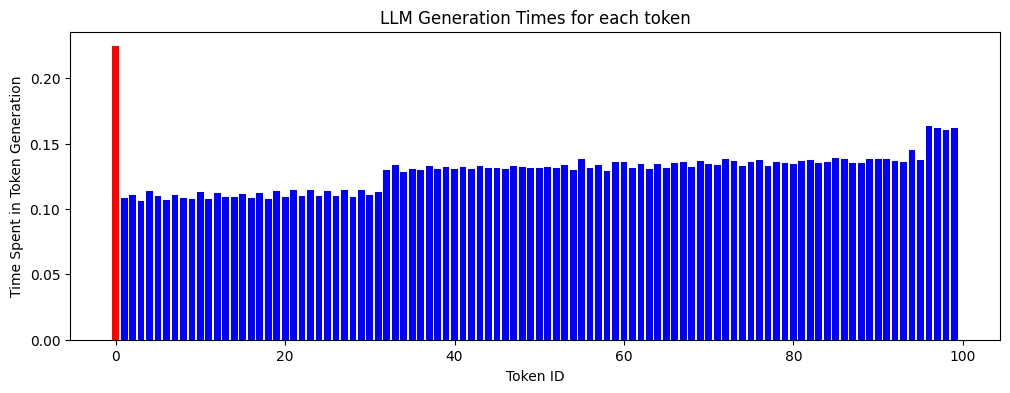
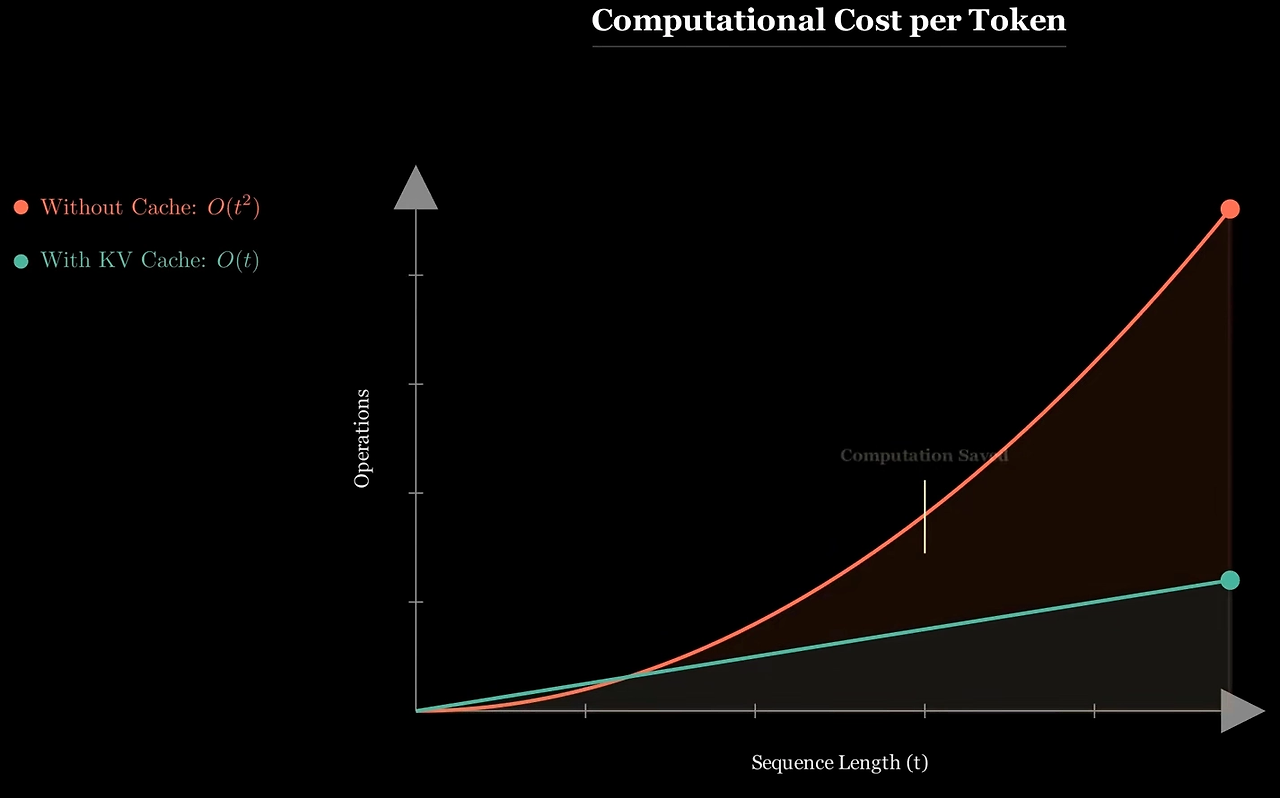
→ 매 스텝마다 idx_cond(=idx 전체)를 다시 모델에 통째로 입력하기 때문에, 시퀀스가 길어질수록 이전에 이미 계산했던 토큰들의 어텐션까지 매번 처음부터 다시 계산하게 됩니다
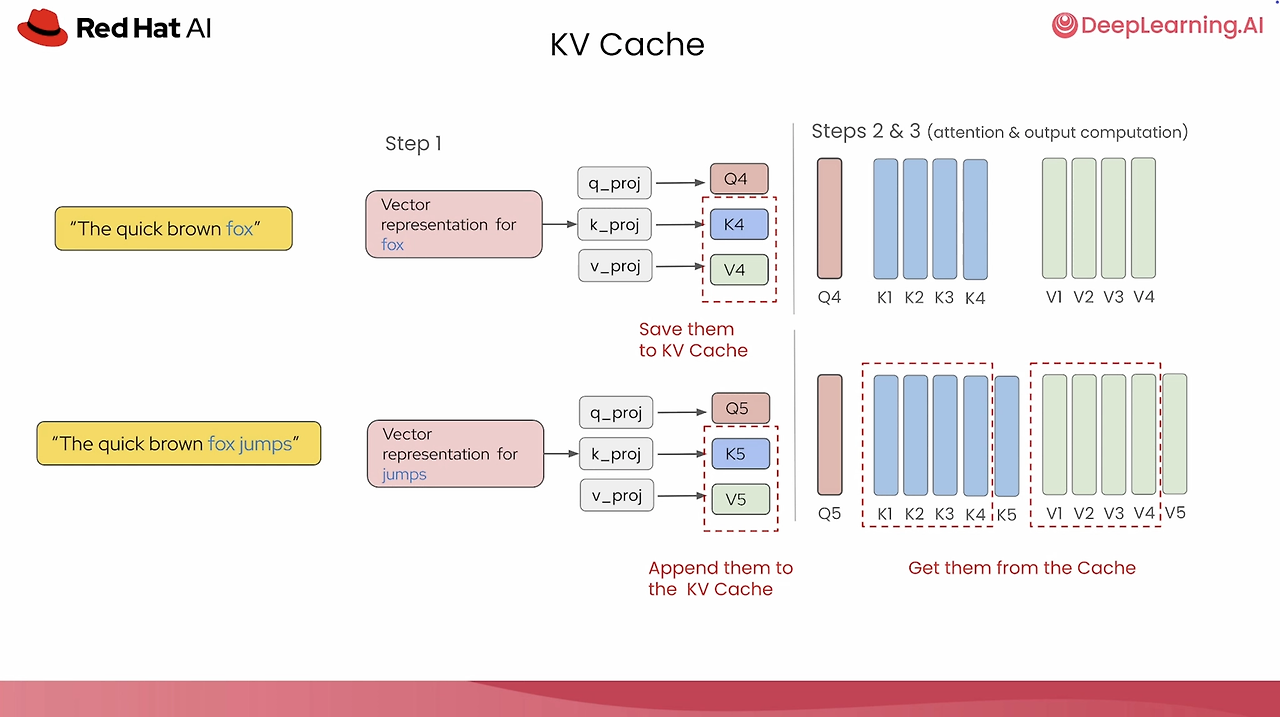
KV cache
Attention 의 Key, Value 를 캐시하는 동작
→ Key, Value 는 이전 값에 추가로 붙여서 사용함 → 캐시로 이용 가능
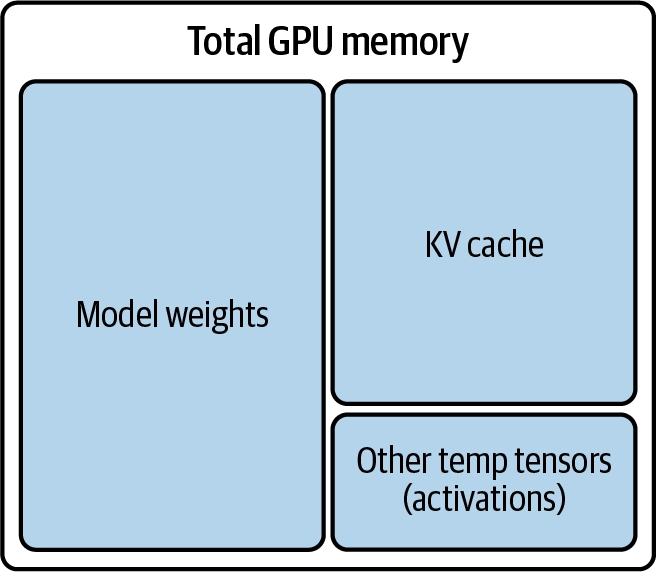
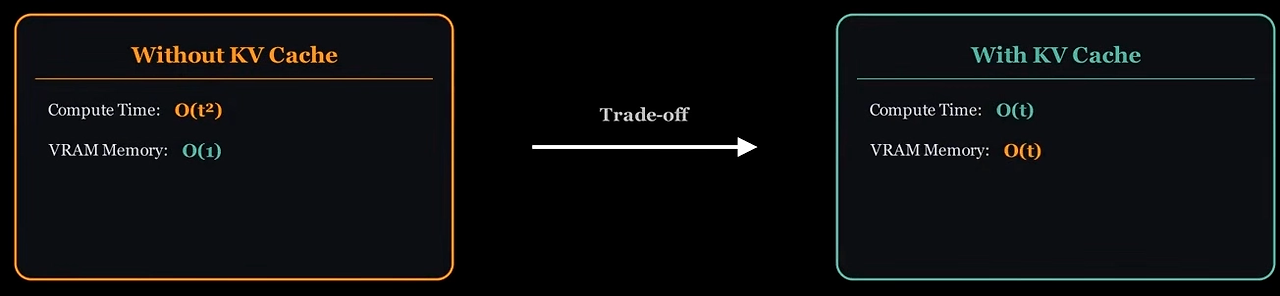
→ KV Cache가 없다면 토큰으로 새로 처음부터 붙여서 계산이 필요함 O(L2 D) 로 * D는 Dimension, L은 query 전체 길이 L → KV Cache를 사용하면 O(LD) 로 경감하나 KV 캐시 메모리가 GPU 에 필요함 → 트레이드 오프 확인
KV Cahce 동작
# (1) Define key/value cache for faster generation
past_key_values = None

for _ in range(num_interations):
   print("input_ids size: " + str(input_ids.size()))
   with torch.no_grad():
       outputs = model(input_ids=input_ids,
         # (2) Use KV-cache from previous iteration
         past_key_values=past_key_values,           # 이전 스텝의 KV 캐시
         # (2) Enable KV caching
         use_cache=True,                            # 캐시 사용/생성 활성화
         max_new_tokens = 100,
         min_new_tokens= 100)

       logits = outputs.logits
       # (3) Update KV Cache
       past_key_values = outputs.past_key_values    # 모델이 새 토큰을 처리하면서 계산한 Key/Value를 기존 캐시에 이어붙여 다음 스텝에 전달
       torch.cuda.synchronize()

   logits = logits[:, -1, :]
   probas = torch.softmax(logits, dim=-1)
   generated_token_id = torch.multinomial(probas, num_samples=1)

   # (4) Update input_ids with only the new token (using KV-cache)
   # Note: Not concatenating with previous tokens due to KV-cache
   input_ids = generated_token_id
   idx = torch.cat((idx, generated_token_id), dim=1)

   if generated_token_id.item() == tokenizer.eos_token_id:
       print("\n[Generation completed - EOS token reached]")
       break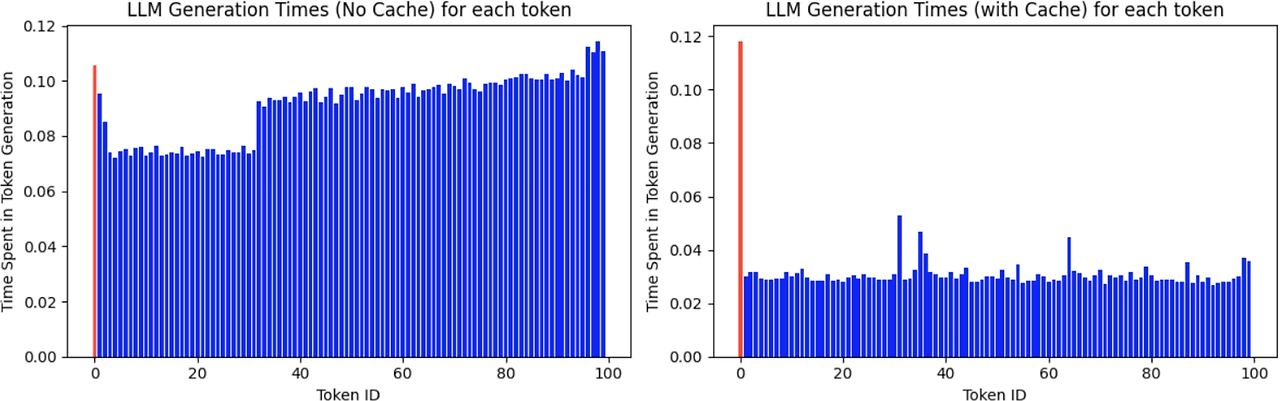
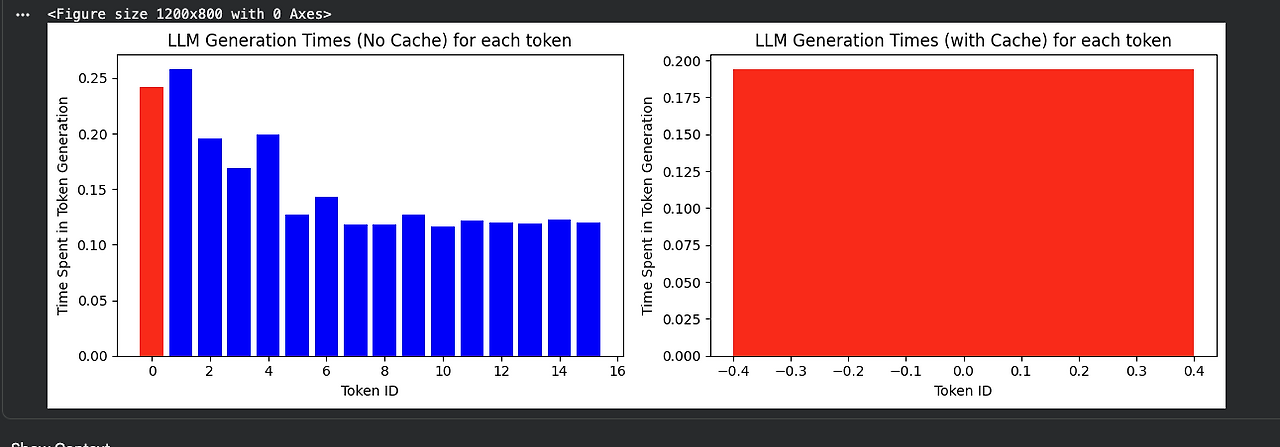
- (참고) KV 캐시는 추론에서만 사용됨. 훈련 단계에서는 모든 정보가 필요하여 사용할 수 없음
- 필자의 경우 KV Cache를 사용하면 리스트에 값이 딱 1개로 표현됨
vLLM
Hugging Face transformers는 모델을 정의하고 다루는 "범용 툴킷"이고, vLLM은 그 모델을 빠르게 서빙(추론)하기 위한 전용 엔진
|
항목
|
Hugging Face Transformers
|
vLLM
|
|
주요 목적
|
모델 정의·학습·실험용 범용 툴킷
|
추론 서빙 전용 엔진
|
|
KV 캐시 관리
|
시퀀스마다 연속 메모리 미리 할당 (낭비 큼)
|
PagedAttention — 페이지 단위로 쪼개 관리 (낭비 최소)
|
|
배치 처리 방식
|
정적 배칭 (배치 전체가 끝나야 다음 배치 시작)
|
연속 배칭 (요청 끝나는 즉시 새 요청 투입)
|
|
동시 요청 처리
|
기본적으로 비효율적, 직접 로직 구현 필요
|
기본 내장, 자동 최적화
|
|
학습(fine-tuning) 지원
|
지원
|
미지원
|
|
API 서버
|
직접 FastAPI 등으로 구현 필요
|
vllm serve 한 줄로 OpenAI 호환 서버 실행
|
|
처리량(throughput)
|
기준
|
동시 요청 많은 환경에서 수 배~10배 이상
|
|
모델 아키텍처 유연성
|
매우 다양한 모델·태스크 지원
|
주로 인기 있는 LLM 아키텍처 위주 지원
|
|
생태계 관계
|
기반 (모델 가중치·포맷 제공)
|
Transformers 위에서 동작하는 서빙 계층
|
예제 실습
- 실습 라이브러리 버전 호환성으로 25.07 라이브러리로 설정하고, 설치 라이브러리 버전 명시
# [6분] 5분 설치 -> 세션 재시작
!pip install vllm==0.6.6.post1
!pip install transformers
vLLM 을 통한 API 호출
import time
from vllm import LLM, SamplingParams

model_name = "Qwen/Qwen2.5-0.5B"

# Load model with vLLM.
llm = LLM(model=model_name, dtype="float16")

# Define the prompt.
prompt = """You are an expert AI historian writing a detailed chapter for a book titled "The Evolution of Human-AI Collaboration."

Begin by summarizing the early stages of artificial intelligence in the 1950s, touching on symbolic logic and rule-based systems. Then transition into the rise of machine learning, particularly deep learning in the 2010s.

Afterward, describe how large language models like GPT transformed human-computer interaction, enabling applications in education, creative writing, customer support, and software development.

Finally, reflect on the societal and ethical implications of AI, such as misinformation, bias, and the alignment problem.

Write in a formal tone, with rich detail and examples in each era."""

# Create sampling parameters.
sampling_params = SamplingParams(temperature=0.8, top_p=0.95, max_tokens=128)

# Time the model generation.
start_time = time.time()
outputs = llm.generate([prompt], sampling_params)
end_time = time.time()

# Print the results.
for output in outputs:
  print(f"Generated text: {output}")
  print(f"Time taken: {end_time - start_time:.2f} seconds")

free_gpu(llm)
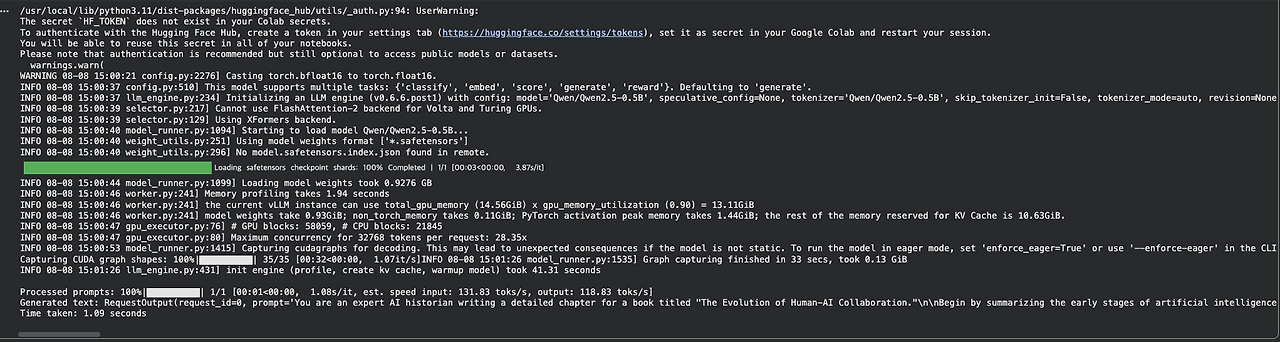
왜 vLLM이 17배(1.12s vs 19.58s) 빠른가? → 같은 GPU, 같은 모델, 같은 프롬프트인데도 차이가 나는 건 추론 엔진 구조 자체가 다르기 때문임
- PagedAttention: vLLM은 KV 캐시를 페이지 단위로 관리해 메모리 낭비 없이 효율적으로 재사용. HF generate()는 시퀀스마다 연속된 메모리를 통째로 할당해 비효율적.
- CUDA Graph 캡처: 앞서 로그에서 봤듯 vLLM은 초기화 시점에 실행 그래프를 미리 캡처(Capturing CUDA graphs)해서 커널 실행 오버헤드를 없앰. HF generate()는 매 토큰마다 Python 레벨에서 순수 eager 모드로 순회.
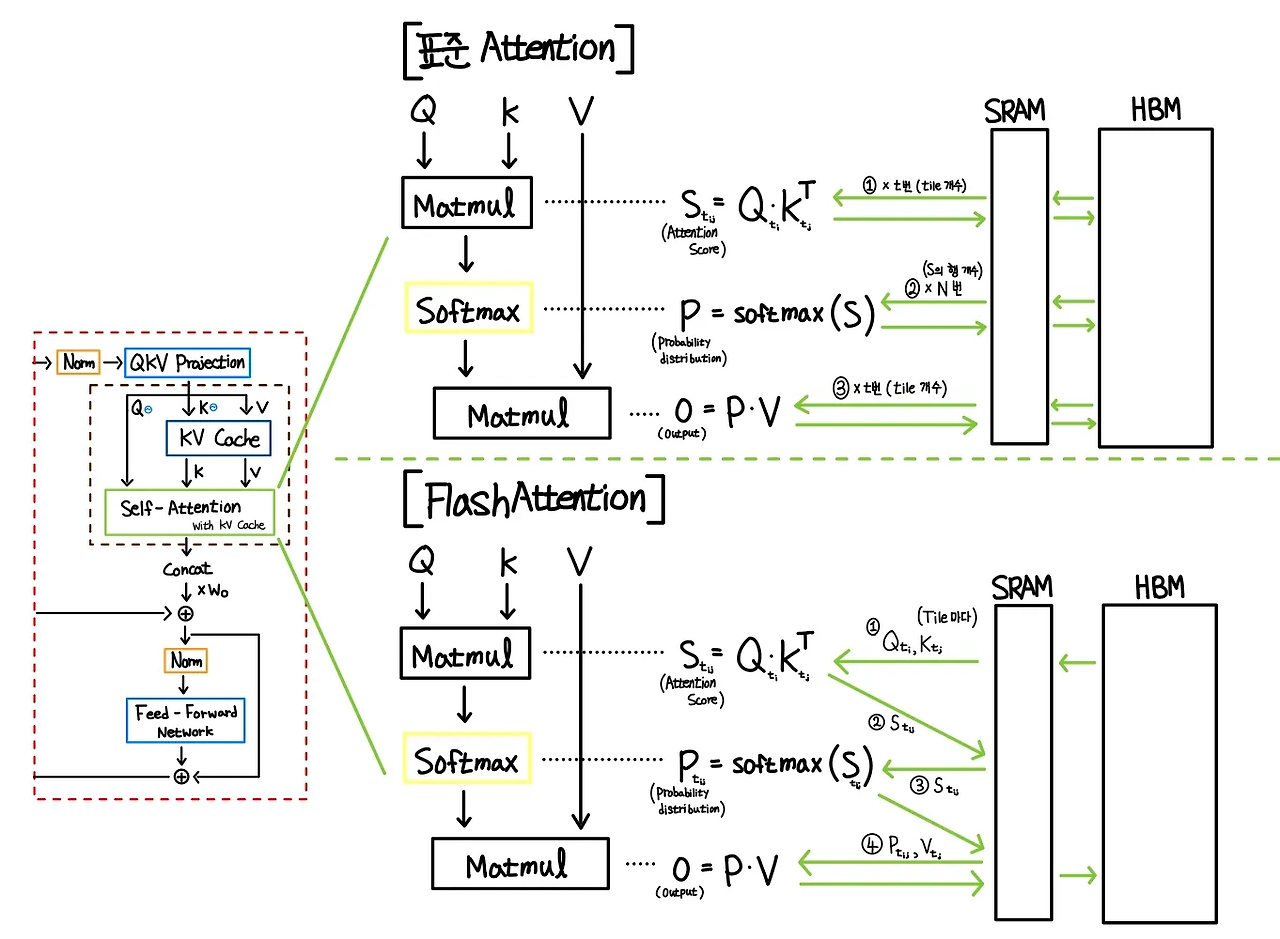
- 최적화된 커널: FlashAttention 등 저수준 커널을 직접 사용(로그의 Using FlashAttention version 2). HF도 SDPA/FlashAttention을 쓸 수 있지만 기본 pipeline()은 튜닝 안 된 설정으로 도는 경우가 많음.
- pipeline() 자체의 오버헤드: 전/후처리, 텐서 변환 등 편의성 레이어가 매 호출마다 추가 비용 발생.
- 연속 배칭(continuous batching) : 이 예시는 단일 프롬프트라 체감이 적지만, 동시 요청이 늘어날수록 vLLM은 요청을 동적으로 배치에 끼워 넣어 GPU를 계속 바쁘게 유지하는 반면 HF는 요청 단위로 순차 처리되어 격차가 더 커짐(하단 정리)
[용어 정리]
PagedAttention : KV 캐시를 페이지 단위로 관리 → OS의 가상 메모리 & 페이지 관리 적용
FlashAttention : SRAM 안에서 한 번에 처리해 HBM 접근 횟수를 최소화
LLM Streaming Serving
LLM 출력을 스트리밍으로 서빙하는 기능 → 사용자 UI에 용이함
import asyncio
from vllm.engine.arg_utils import AsyncEngineArgs
from vllm.engine.async_llm_engine import AsyncLLMEngine
from vllm.sampling_params import SamplingParams

# Initialize the engine arguments
engine_args = AsyncEngineArgs(
    model="Qwen/Qwen2.5-0.5B",
    dtype="float16",
    tensor_parallel_size=1,      # Number of GPUs to use
    gpu_memory_utilization=0.9,  # GPU memory utilization
    max_num_batched_tokens=32768, # Maximum number of tokens to process in a batch
    max_num_seqs=256,           # Maximum number of sequences to process
    disable_log_requests=True,   # Disable request logging
    disable_log_stats=True,      # Disable stats logging
)

# Create the vLLM async streaming engine, 비동기로 결과를 가져옴
engine = AsyncLLMEngine.from_engine_args(engine_args)

async def generate_text(prompt: str, max_tokens: int = 100, request_id="id"):
  try:
    # Define sampling parameters
    sampling_params = SamplingParams(
        temperature=0.0,
        max_tokens=max_tokens,
        stop=["\n"],  # Stop at newline
    )

    # Generate text in async and streaming fashion
    results_generator = engine.generate(
        prompt=prompt,
        sampling_params=sampling_params,
        request_id=request_id
    )

    # Process the results
    final_output = None
    async for request_output in results_generator:
        final_output = request_output
        # Print each token as it's generated
        print("chunk \n")
        for output in request_output.outputs:
            print(output.text, end="", flush=True)
        print()
    print()  # Newline at the end

    # This will only be reached if all tokens are generated
    print("\nGeneration completed successfully")

    return final_output
  except asyncio.CancelledError:
    print("\nGeneration was cancelled")
    return None
  finally:
    # Always clean up
    try:
      await engine.abort(request_id) # 엔진 사용
    except:
      pass
LLM Batch Serving
여러 입력 요청을 하나로 묶어 처리하는 방식 → 효율성이 올라감
- 왜 트랜스포머는 배치가 특히 효과적인가 ?
- 행렬곱(matmul)과 어텐션 연산은 시퀀스 차원으로 병렬화 가능
- 모델 가중치(HBM)는 모든 요청이 공유하므로, 한번 읽어올 때 여러 요청에 돌려써서 메모리 병목 최소화 가능
- GPU 연산 코어(ALU)에 여러 요청의 데이터를 동시에 채워넣어 활용률을 높일 수 있음
- llm.generate(prompts, sampling_params) : 배치 처리
- for prompt in prompts: vllm_outputs = llm.generate([prompt], sampling_params : 순차적 처리
import torch
import gc
import time
from vllm import LLM, SamplingParams
from transformers import pipeline

# Prompts for batch generation, 4 input sequences
prompts = [
    "What is the meaning of life?",
    "Write a short story about a robot learning to love.",
    "Explain quantum physics in simple terms.",
    "Translate 'Hello, world!' into Spanish."
]

sampling_params = SamplingParams(
    temperature=0.8,
    top_p=0.95,
    max_tokens=100
)

start_time = time.time()
# process four input sequences (prompts) together in one batch
vllm_outputs = llm.generate(prompts, sampling_params)
end_time = time.time()
vllm_time = end_time - start_time

print(f"\nvLLM generation time for 4 prompts in a batch: {vllm_time:.4f} seconds")

# process prompt one by one
start_time = time.time()
for prompt in prompts:
    vllm_outputs = llm.generate([prompt], sampling_params)
end_time = time.time()
vllm_time = end_time - start_time

print(f"\nvLLM generation time for 4 prompts one by one: {vllm_time:.4f} seconds")
→ 결과 : 순차 처리 약 2초, 배치 처리 약 1.1초

4배 성능이 아닌 이유?
- 프롬프트 길이가 다 달라서 → 가장 긴 것에 맞춰 나머지에 패딩(빈 자리)을 채워야 하고, 이 패딩도 GPU가 똑같이 연산함 → 낭비
- 출력 길이도 제각각이라 → 먼저 끝난 요청도 가장 늦게 끝나는 요청을 기다려야 함 → 그동안 GPU가 놀게 됨
- 배치 크기 4는 너무 작음 → GPU는 수천 개 코어를 가진 병렬 장치인데, 4개로는 그 능력을 다 못 씀 → 배치를 32, 64로 늘릴수록 오히려 효율이 더 좋아짐
'AI' 카테고리의 다른 글
| Model Serving Best Practices (0) | 2026.08.16 |
|---|---|
| Model Serving System Design: A Deep Dive (0) | 2026.08.16 |
| LLM 기초 이해 - Transformer (0) | 2026.08.09 |
| [GitAIOps로 인프라 구성하기] 9. AI 에게 저장소 분석 시키기 (1) | 2026.07.27 |
| [GitAIOps로 인프라 구성하기] 8. 고도화 (0) | 2026.07.27 |