CloudNet@ 가디사님 CI/CD 스터디 실습 내용을 공유합니다.
이번 글은 GitOps Cookbook ch 1~4장을 정리하였습니다.
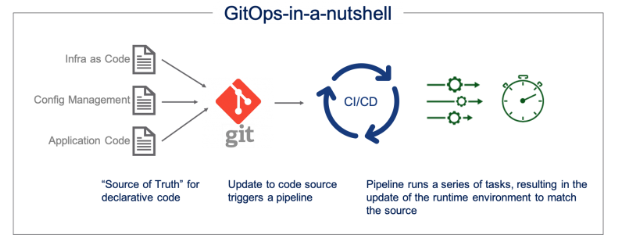
Gitops
- GIt 저장소를 단일 소스로 사용하여 인프라와 애플리케이션 설정을 관리하는 방법론 및 관행
- GitOps 4가지 원칙(선언적, 버전 관리 및 불변성, 자동 반영, 지속적 조정)
쿠버네티스의 GItOps
- GItops를 쓰면 CI/CD 중 CD 영역을 자동화하여 Git 저장소의 선언전 매니페스트(yaml)를 기준으로 쿠버네티스 환경을 자동 동기화함
- 보통 CI 영역도 GIt 저장소를 통해 관리함 → GitOps는 CI/CD파이프라인을 통해 애플리케이션 및 인프라를 관리하는데 사용함
https://blogs.vmware.com/cloud/2021/02/24/gitops-cloud-operating-model/
실습 환경 구성
구성 환경 : Mac Max 1 에서 Kind 를 통한 쿠버네티스 환경 구성(K8S 1.32) 도커 및 Kind 사전 설치 완료
1. 로컬 환경 실행 컨테이너 모두 중지 및 삭제
docker stop $(docker ps -aq)
docker rm $(docker ps -aq)
2. kind로 k8s배포
# Create a cluster with kind
kind create cluster --name myk8s --image kindest/node:v1.32.8 --config - <<EOF
kind: Cluster
apiVersion: kind.x-k8s.io/v1alpha4
nodes:
- role: control-plane
  extraPortMappings:
  - containerPort: 30000
    hostPort: 30000
  - containerPort: 30001
    hostPort: 30001
- role: worker
EOF- 약 5분 소요
3. 환경 확인
# 쿠버네티스 구성 환경 확인
kubectl cluster-info --context kind-myk8s
---
Kubernetes control plane is running at https://127.0.0.1:61289
CoreDNS is running at https://127.0.0.1:61289/api/v1/namespaces/kube-system/services/kube-dns:dns/proxy

To further debug and diagnose cluster problems, use 'kubectl cluster-info dump'.


# 도커 이미지 및 쿠버네티스 환경
docker ps
docker images


# 도커 네트워크 확인
#. Kind 는 별도 네트워크 환경 구성을 사용함
docker network ls
docker inspect kind | jq

docker network ls ㅇ
NETWORK ID     NAME                     DRIVER    SCOPE
c05a1e707c76   kind                     bridge    local

docker inspect kind | jq
..
    "IPAM": {
      "Driver": "default",
      "Options": {},
      "Config": [
        {
          "Subnet": "172.18.0.0/16",
          "Gateway": "172.18.0.1"
        },
        {
..
    "ConfigOnly": false,
    "Containers": {
      "238588c64e5e53fb98e089286a9dfbcde908897fb9830746dd606970586836a4": {
        "Name": "myk8s-worker",
        "EndpointID": "002da5f8df5cea469e1c8441f6e6eaa8a6b1b8eb8f783c0494dafd4e4886947d",
        "MacAddress": "02:42:ac:12:00:02",
        "IPv4Address": "172.18.0.2/16",
        "IPv6Address": "fc00:f853:ccd:e793::2/64"
      },
      "a1b2a9d8ca18700ac3f912cc45c4995a1bf64647cfbf077fad287ca1ee8a6b2e": {
        "Name": "myk8s-control-plane",
        "EndpointID": "b49590f0f72d43b6fabd61db53be85aeb306440056f6b9e54d3bc93e7bca87fa",
        "MacAddress": "02:42:ac:12:00:03",
        "IPv4Address": "172.18.0.3/16",
        "IPv6Address": "fc00:f853:ccd:e793::3/64"
      }
    },
..

# 쿠버네티스 환경 확인
kubectl get nodes
kubectl get pods -A

# 도커 Kinds 서버 접근
docker ps
docker exec -it myk8s-control-plane bash

root@myk8s-control-plane:/#

# 디버그용 내용 출력에 권한 확인
kubectl get pods -v6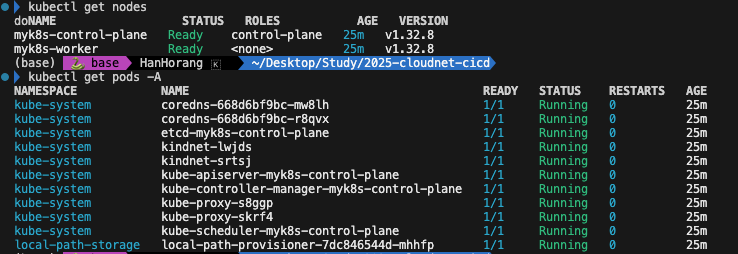
도커를 사용한 컨테이너 빌드
컨테이너
- 애플리케이션 배포 목적으로 패키징할 때 사용하는 표준 형식
- OCI 표준으로 서로 다른 운영체제, 공급 체제 플랫폼 또는 클라우드 사이에서의 이식성과 상호 운용성을 보장함
도커
- OCI 컨테이너와 런타임을 오픈 소스로 구현하는 것으로 널리 사용하고 있는 엔진임
- dockerfile이라는 매니페스트에서 컨테이너 이미지를 만듬
도커 빌드 예제
- ubi8/python-39 이미지는 25년 11월 만료 예정임
# 책 예제 Clone
git clone https://github.com/gitops-cookbook/chapters

cd chapters/chapters/ch03/python-app
cat Dockerfile
---

FROM registry.access.redhat.com/ubi8/python-39
ENV PORT 8080
EXPOSE 8080
WORKDIR /usr/src/app

COPY requirements.txt ./
RUN pip install --no-cache-dir -r requirements.txt

COPY . .

ENTRYPOINT ["python"]
CMD ["app.py"]

# 환경 설정
MYREGISTRY=docker.io
MYUSER=<아이디>

# 이미지 빌드
docker build -f Dockerfile -t $MYREGISTRY/$MYUSER/pythonapp:latest .

# 이미지 확인
docker inspect $MYUSER/pythonapp:latest | jq
..
      }
    },
    "Architecture": "arm64",
    "Variant": "v8",
    "Os": "linux",
..
# 히스토리 확인
docker history $MYUSER/pythonapp:latest

# 이미지 푸시
docker login $MYREGISTRY # -u $MYUSER
docker push $MYREGISTRY/$MYUSER/pythonapp:latest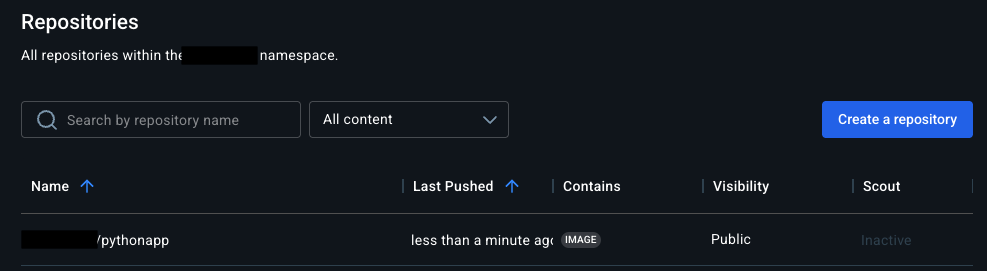
Kustomize
Kustomize는 쿠버네티스 객체를 사용자 정의하는 도구입니다.
yaml 개발한 이후 단순 변경 작업(이미 업데이트,replicas 수 변경 같은)만 발생하나, yaml를 직접 수정할 수 있지만 휴먼 에러가 발생할 수 있습니다.
→ 자주 변경되지 않은 기본 쿠버네티스 매니페스트를 하나 두고 자주 변경되는 파라미터를 설정하기 위한 파일을 구별하여 환경별로 정의 & 관리 필요합니다.

Cloud Native Spring Action (2023)
Kubernetes Declarative Management of Kubernetes Objects Using Kustomize
[configMapGenerator] 1. Secret과 ConfigMap 생성
- env 로 생성한 configmap에서 별도의 키로 생성됨(application.properties는 단일키로 포함됨)
- literals 로 key/values 를 사용하기에 옵션 확인
cat <<EOF > application.properties
FOO=Bar
EOF

cat <<EOF > kustomization.yaml
configMapGenerator:
- name: example-configmap-1
  files:
  - application.properties
EOF

# -k 가 kustomize 옵션이며 --kustomize 축약임
kubectl create -k ./ --dry-run=client -o yaml --save-config=false
---
apiVersion: v1
data:
  application.properties: |
    FOO=Bar
kind: ConfigMap
metadata:
  name: example-configmap-1-g4hk9g2ff8
  namespace: default

# env 파일에서 Configmap을 생성하려면 .envs목록에 추가
cat << EOF > .env
FOO=Bar
STUDY=Cicd
EOF

cat << EOF > kustomization.yaml
configMapGenerator:
- name: example-configmap-1
  envs:
  - .env
EOF

kubectl create -k ./ --dry-run=client -o yaml --save-config=false
---
apiVersion: v1
data:
  FOO: Bar
  STUDY: Cicd
kind: ConfigMap
metadata:
  name: example-configmap-1-4c5kbfd9mc
  namespace: default


cat <<EOF > ./kustomization.yaml
configMapGenerator:
- name: example-configmap-2
  literals:
  - FOO=Bar
EOF
---
apiVersion: v1
data:
  FOO: Bar
kind: ConfigMap
metadata:
  name: example-configmap-2-42cfbf598f
namespace: default[configMapGenerator] 2. 디플로이먼트 활용 예제
# Create an application.properties file
cat <<EOF >application.properties
FOO=Bar
EOF

cat <<EOF >deployment.yaml
apiVersion: apps/v1
kind: Deployment
metadata:
  name: my-app
  labels:
    app: my-app
spec:
  selector:
    matchLabels:
      app: my-app
  template:
    metadata:
      labels:
        app: my-app
    spec:
      containers:
      - name: app
        image: my-app
        volumeMounts:
        - name: config
          mountPath: /config
      volumes:
      - name: config
        configMap:
          name: example-configmap-1
EOF

cat <<EOF >./kustomization.yaml
resources:
- deployment.yaml
configMapGenerator:
- name: example-configmap-1
  files:
  - application.properties
EOF


---
apiVersion: v1
data:
  application.properties: |
    FOO=Bar
kind: ConfigMap
metadata:
  name: example-configmap-1-g4hk9g2ff8
  namespace: default
..
    spec:
      containers:
      - image: my-app
        name: app
        volumeMounts:
        - mountPath: /config
          name: config
      volumes:
      - configMap:
          name: example-configmap-1-g4hk9g2ff8
        name: config
[secretGenerator]
cat << EOF > password.txt
username=admin
password=secret
EOF

cat << EOF > kustomization.yaml
secretGenerator:
- name: example-secret-1
  files:
  - password.txt
EOF

kubectl create -k ./ --dry-run=client -o yaml --save-config=false
---
apiVersion: v1
data:
  password.txt: dXNlcm5hbWU9YWRtaW4KcGFzc3dvcmQ9c2VjcmV0Cg==
kind: Secret
metadata:
  name: example-secret-1-2kdd8ckcc7
  namespace: default
type: Opaque


cat << EOF > kustomization.yaml
secretGenerator:
- name: example-secret-2
  literals:
  - username=admin
  - password=secret
EOF

kubectl create -k ./ --dry-run=client -o yaml --save-config=false
---
apiVersion: v1
data:
  password: c2VjcmV0
  username: YWRtaW4=
kind: Secret
metadata:
  name: example-secret-2-8c5228dkb9
  namespace: default
type: Opaque

# 디플로이먼트 사용 예제
# Create a password.txt file
cat << EOF > password.txt
username=admin
password=secret
EOF

cat << EOF > deployment.yaml
apiVersion: apps/v1
kind: Deployment
metadata:
  name: my-app
  labels:
    app: my-app
spec:
  selector:
    matchLabels:
      app: my-app
  template:
    metadata:
      labels:
        app: my-app
    spec:
      containers:
      - name: app
        image: nginx:alpine
        volumeMounts:
        - name: password
          mountPath: /secrets
      volumes:
      - name: password
        secret:
          secretName: example-secret-1
EOF

cat << EOF > kustomization.yaml
resources:
- deployment.yaml
secretGenerator:
- name: example-secret-1
  files:
  - password.txt
EOF


kubectl create -k ./ --dry-run=client -o yaml --save-config=false[generatorOptions - 접미사 옵션]
cat << EOF > kustomization.yaml
configMapGenerator:
- name: example-configmap-3
  literals:
  - FOO=Bar
generatorOptions:
  disableNameSuffixHash: true
  labels:
    type: generated
  annotations:
    note: generated
EOF

kubectl create -k ./ --dry-run=client -o yaml --save-config=false
---
apiVersion: v1
data:
  FOO: Bar
kind: ConfigMap
metadata:
  annotations:
    note: generated
  labels:
    type: generated
  name: example-configma
[ Setting cross-cutting fields ]
- 모든 리소스에 대해 동일한 네임스페이스 설정
- 설정 이름 접두사 또는 접미사 추가
- 설정 레이블 세트 추가
- 설정 주석 세트 추가
cat << EOF > deployment.yaml
apiVersion: apps/v1
kind: Deployment
metadata:
  name: nginx-deployment
  labels:
    app: nginx
spec:
  selector:
    matchLabels:
      app: nginx
  template:
    metadata:
      labels:
        app: nginx
    spec:
      containers:
      - name: nginx
        image: nginx:alpine
EOF

cat << EOF > kustomization.yaml
namespace: my-namespace
namePrefix: dev-
nameSuffix: "-82"
labels:
  - pairs:
      app: bingo # 키 & 값 벨류 추가
    includeSelectors: true  # 셀렉터 포함 여부. ㅗㅂ션
commonAnnotations: # 공통 주석 정의
  oncallPager: 02-1234-5678
resources:
- deployment.yaml
EOF

kubectl create -k ./ --dry-run=client -o yaml --save-config=false
---
apiVersion: apps/v1
kind: Deployment
metadata:
  annotations:
    oncallPager: 02-1234-5678
  labels:
    app: bingo
  name: dev-nginx-deployment-82
  namespace: my-namespace
spec:
  selector:
    matchLabels:
      app: bingo
  template:
    metadata:
      annotations:
        oncallPager: 02-1234-5678
      labels:
        app: bingo
    spec:
      containers:
      - image: nginx:alpine
        name: nginx
[ Customizing ] : 패치나 기타 사용자 지정 기능 적용
- patches 파일이 우선되어 패치
# Create a deployment.yaml file
cat << EOF > deployment.yaml
apiVersion: apps/v1
kind: Deployment
metadata:
  name: my-nginx
spec:
  selector:
    matchLabels:
      run: my-nginx
  replicas: 2
  template:
    metadata:
      labels:
        run: my-nginx
    spec:
      containers:
      - name: my-nginx
        image: nginx:alpine
        ports:
        - containerPort: 80
EOF

# Create a patch increase_replicas.yaml
cat << EOF > increase_replicas.yaml
apiVersion: apps/v1
kind: Deployment
metadata:
  name: my-nginx
spec:
  replicas: 3
EOF

# Create another patch set_memory.yaml
cat << EOF > set_memory.yaml
apiVersion: apps/v1
kind: Deployment
metadata:
  name: my-nginx
spec:
  template:
    spec:
      containers:
      - name: my-nginx
        resources:
          limits:
            memory: 512Mi
EOF

cat << EOF > kustomization.yaml
resources:
- deployment.yaml
patches:
  - path: increase_replicas.yaml
  - path: set_memory.yaml
EOF

kubectl create -k ./ --dry-run=client -o yaml --save-config=false- target : 조건 별 패치 가능
# Create a deployment.yaml file
cat << EOF > deployment.yaml
apiVersion: apps/v1
kind: Deployment
metadata:
  name: my-nginx
spec:
  selector:
    matchLabels:
      run: my-nginx
  replicas: 2
  template:
    metadata:
      labels:
        run: my-nginx
    spec:
      containers:
      - name: my-nginx
        image: nginx:alpine
        ports:
        - containerPort: 80
EOF

# Create a json patch
cat << EOF > patch.yaml
- op: replace
  path: /spec/replicas
  value: 3
EOF

# Create a kustomization.yaml
cat << EOF > kustomization.yaml
resources:
- deployment.yaml

patches:
- target:
    group: apps
    version: v1
    kind: Deployment
    name: my-nginx
  path: patch.yaml
EOF
패치를 생성하지 않고도 컨테이너 이미지 주입이 가능하다.
- 테스트상 이미지 확인이 안되나 직접 생성하면 확인 가능
cat << EOF > deployment.yaml
apiVersion: apps/v1
kind: Deployment
metadata:
  name: my-nginx
spec:
  selector:
    matchLabels:
      run: my-nginx
  replicas: 2
  template:
    metadata:
      labels:
        run: my-nginx
    spec:
      containers:
      - name: my-nginx
        image: nginx:alpine
        ports:
        - containerPort: 80
EOF

# https://quay.io/repository/nginx/nginx-unprivileged?tab=tags
cat << EOF > kustomization.yaml
resources:
- deployment.yaml
images:
- name: nginx
  newName: quay.io/nginx/nginx-unprivileged
  newTag: "alpine"
EOF

kubectl create -k ./ --save-config=false
---
.. # 정보 확인 안되나 신규로 생성하면 확인됨
[Bases and Overlays]
- 베이스는 리소스 세트와 관련 사용자 지정 항목을 포함하는 디렉터리
- 오버레이는 kustomization 을 다른 디렉터리를 참조하는 디렉터리

예제) base 를 바탕으로 dev에는 접미사 dev가 prod에는 접미사 prod가 추가됨
cd ..
mkdir base dev prod


# base 파일 작성
# Create a base/deployment.yaml
cat << EOF > base/deployment.yaml
apiVersion: apps/v1
kind: Deployment
metadata:
  name: my-nginx
spec:
  selector:
    matchLabels:
      run: my-nginx
  replicas: 2
  template:
    metadata:
      labels:
        run: my-nginx
    spec:
      containers:
      - name: my-nginx
        image: nginx:alpine
EOF

# Create a base/service.yaml file
cat << EOF > base/service.yaml
apiVersion: v1
kind: Service
metadata:
  name: my-nginx
  labels:
    run: my-nginx
spec:
  ports:
  - port: 80
    protocol: TCP
  selector:
    run: my-nginx
EOF
# Create a base/kustomization.yaml
cat << EOF > base/kustomization.yaml
resources:
- deployment.yaml
- service.yaml
EOF

# dev overlay 파일 작성
cat <<EOF > dev/kustomization.yaml
resources:
- ../base
namePrefix: dev-
EOF

# prod overlay 파일 작성
cat <<EOF > prod/kustomization.yaml
resources:
- ../base
namePrefix: prod-
EOF

# 디렉터리 환경 확인
tree base dev prod
---
base
├── deployment.yaml
├── kustomization.yaml
└── service.yaml
dev
└── kustomization.yaml
prod
└── kustomization.yaml

3 directories, 5 files

# 상용기 확인
kubectl create -k prod/ --dry-run=client -o yaml --save-config=false
---
...
apiVersion: apps/v1
kind: Deployment
metadata:
  name: prod-my-nginx
  namespace: default
spec:
..
kustomization 도구도 있지만, 쿠버네티스 객체 관리 도구로 helm 을 사용합니다.
다음 블로그 글에서 자세히 다뤄보겠습니다.
'Cloud' 카테고리의 다른 글
| Gitops CI & CD 구성(Jenkins & ArgoCD) (0) | 2025.11.02 |
|---|---|
| Helm 과 lgtm Stack 맛보기(Loki) (0) | 2025.10.26 |
| Amazon VPC Lattice for Amazon EKS (0) | 2025.04.27 |
| EKS 파드로 노드 관리하기 (0) | 2025.04.12 |
| EKS Version Upgrade (0) | 2025.04.02 |