EKS Fargate & AutoMode 실습 내용을 공유합니다.
블로그 글은 CloudNet@ 가시다님이 진행하는 스터디, AEWS3기에서 참고하였습니다.
EKS Fargate
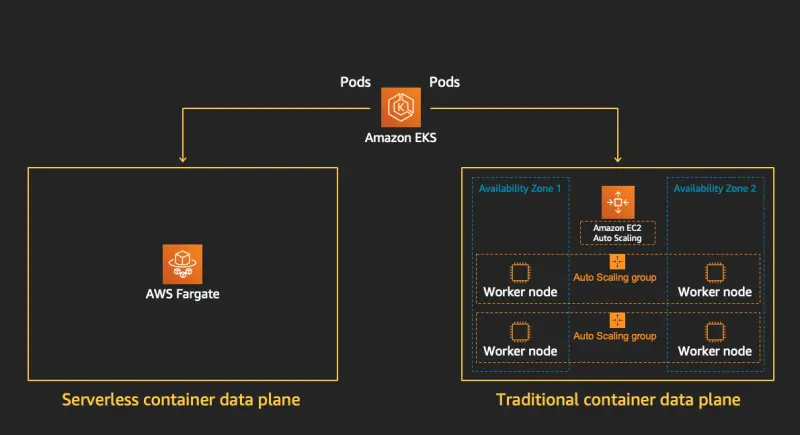
EKS 워크노드를 Serverless로 제공하는 노드 형태입니다.
워커 노드의 기본 인프라의 가용성, 용량 및 유지 관리에 대한 책임을 serverless로 구성하여,
사용자는 운영 부담을 줄이고 Pod 단위로 리소스를 효율적으로 관리할 수 있습니다.
고려 사항
|
항목 (Feature)
|
지원 여부 및 특성
|
|
데몬셋 (DaemonSet)
|
❌ 지원하지 않음 (사이드카 컨테이너 사용 권장)
|
|
Privileged 컨테이너
|
❌ 지원하지 않음
|
|
HostPort, HostNetwork
|
❌ 지원하지 않음
|
|
GPU 사용
|
❌ 지원하지 않음
|
|
Arm 프로세서
|
❌ 지원하지 않음 (x86만 지원)
|
|
노드 SSH 접근
|
❌ 지원하지 않음
|
|
서브넷 지원 범위
|
⚠️ Private 서브넷만 지원 (NAT Gateway 필수)
|
|
EC2 인스턴스 메타데이터 서비스(IMDS)
|
❌ 지원하지 않음
|
|
대체 CNI 플러그인
|
❌ 지원하지 않음 (AWS VPC CNI만 지원)
|
|
EFS 동적 프로비저닝
|
❌ 지원하지 않음 (Static PV는 지원)
|
|
Fargate Spot
|
❌ 지원하지 않음
|
|
EBS 볼륨 마운트
|
❌ 지원하지 않음 (EFS만 지원)
|
|
토폴로지 분산(topologySpreadConstraints)
|
❌ 지원하지 않음
|
|
EC2 Dedicated Host
|
❌ 지원하지 않음
|
|
AWS Bottlerocket OS
|
❌ 지원하지 않음
|
|
Pod 자원 예약 특성
|
✅ Guaranteed QoS로만 실행 (CPU, 메모리 요청과 제한 동일 필수)
|
|
Pod 기본 메모리 예약량
|
✅ Pod당 기본 메모리 예약량에 256MB 추가
|
|
임시 저장소 (Ephemeral Storage)
|
✅ 기본 20 GiB 제공, 최대 175 GiB까지 설정 가능
|
실습 환경 구성
git clone https://github.com/aws-ia/terraform-aws-eks-blueprints
tree terraform-aws-eks-blueprints/patterns
cd terraform-aws-eks-blueprints/patterns/fargate-serverless Fargate 구성을 위해 profile을 정의해야 합니다.
테라폼 모듈 내 다음의 내용이 구성되어 있습니다.
- 네임스페이스가 study-로 시작하는 모든 네임스페이스(study-dev, study-prod 등)의 Pod가 자동으로 Fargate에서 구동됩니다.
- kube-system 내의 Pod들이 Fargate에서 동작하도록 명시적으로 지정합니다.
- Fargate로 실행되는 Pod들이 로깅을 CloudWatch로 보낼 수 있는 권한을 추가합니다.
  fargate_profiles = {
    study_wildcard = {
      selectors = [
        { namespace = "study-*" }
      ]
    }
    kube_system = {
      name = "kube-system"
      selectors = [
        { namespace = "kube-system" }
      ]
    }
  }

  fargate_profile_defaults = {
    iam_role_additional_policies = {
      additional = module.eks_blueprints_addons.fargate_fluentbit.iam_policy[0].arn
    }
  }
# init 초기화
terraform init
cat .terraform/modules/modules.json | jq
tree .terraform/providers/registry.terraform.io/hashicorp -L 2
.terraform/providers/registry.terraform.io/hashicorp
├── aws
│ └── 5.92.0
├── cloudinit
│ └── 2.3.6
├── helm
│ └── 2.17.0
├── kubernetes
│ └── 2.36.0
├── null
│ └── 3.2.3
├── random
│ └── 3.7.1
├── time
│ └── 0.13.0
└── tls
└── 4.0.6
# plan
terraform plan
# apply
terraform apply -auto-approve
# 약 13분 소요
aws eks --region ap-northeast-2 update-kubeconfig --name hsh
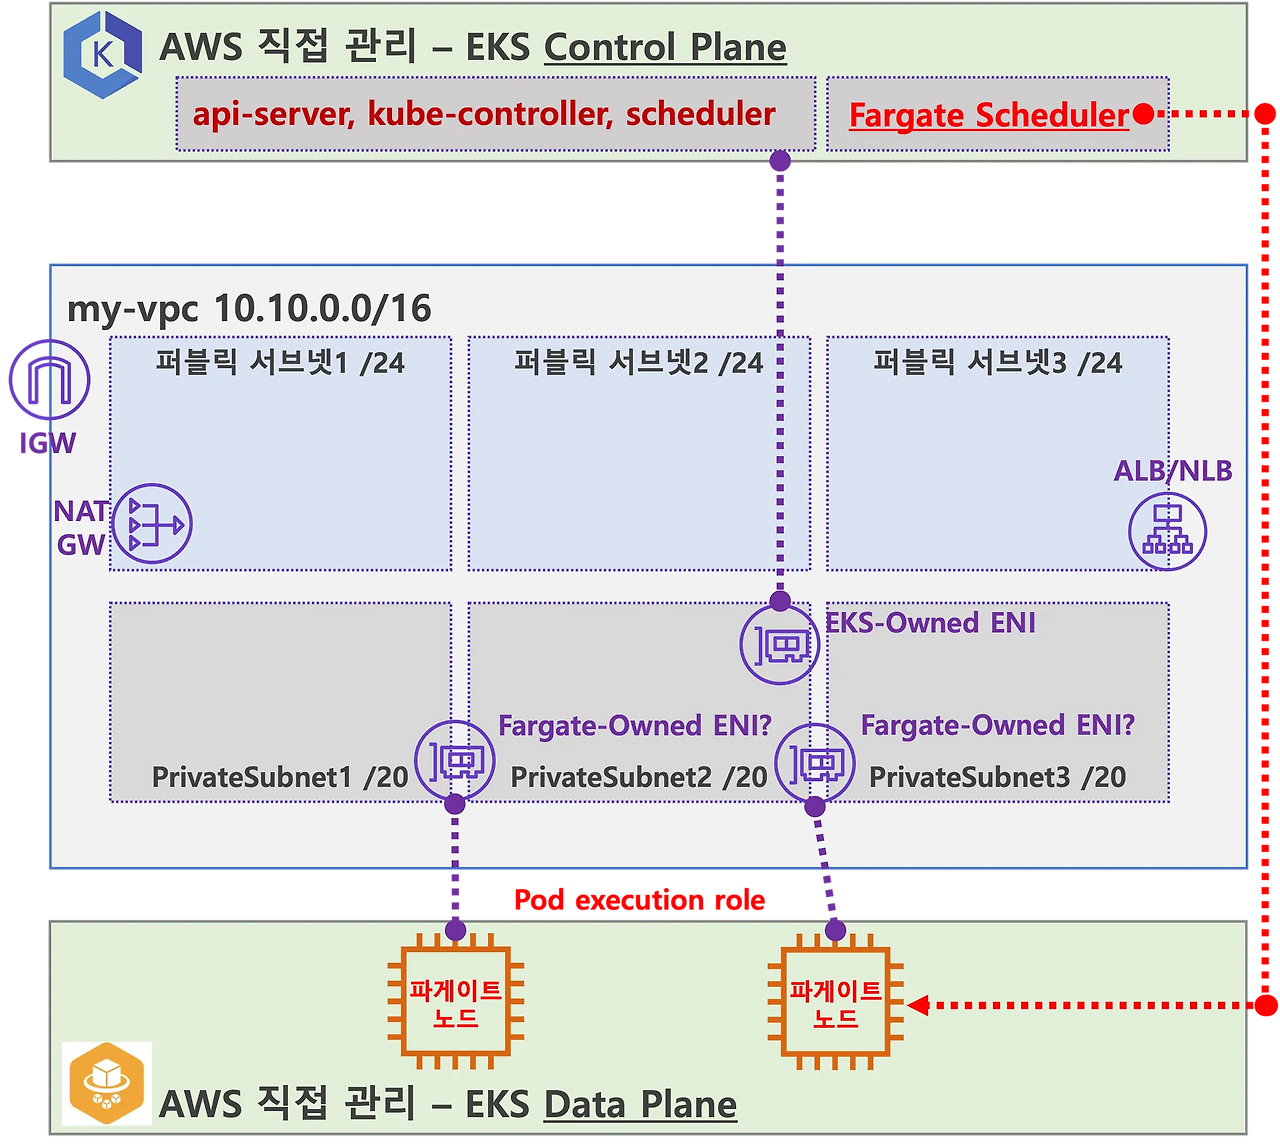
구성 확인
- Pod와 Node IP가 동일함
- profile만큼 aws-auth가 추가됨
- schedulerName: fargate-scheduler라는 별도 스케쥴러가 동작
# Pod와 Node IP가 동일함
kubectl get pods -o wide  -A
NAMESPACE     NAME                                            READY   STATUS    RESTARTS   AGE   IP             NODE                                                      NOMINATED NODE   READINESS GATES
kube-system   aws-load-balancer-controller-7c7b54dff6-cxjw5   1/1     Running   0          14m   10.10.8.52     fargate-ip-10-10-8-52.ap-northeast-2.compute.internal     <none>           <none>
kube-system   aws-load-balancer-controller-7c7b54dff6-rlmg2   1/1     Running   0          14m   10.10.39.243   fargate-ip-10-10-39-243.ap-northeast-2.compute.internal   <none>           <none>
kube-system   coredns-64696d8b7f-bb479                        1/1     Running   0          14m   10.10.46.165   fargate-ip-10-10-46-165.ap-northeast-2.compute.internal   <none>           <none>
kube-system   coredns-64696d8b7f-dqcd4                        1/1     Running   0          14m   10.10.41.216   fargate-ip-10-10-41-216.ap-northeast-2.compute.internal   <none>           <none>


# Profile 2개 존재
kubectl get cm -n kube-system aws-auth -o yaml
apiVersion: v1
data:
  mapRoles: |
    - groups:
      - system:bootstrappers
      - system:nodes
      - system:node-proxier
      rolearn: arn:aws:iam::17..:role/study_wildcard-20250322101254354400000010
      username: system:node:{{SessionName}}
    - groups:
      - system:bootstrappers
      - system:nodes
      - system:node-proxier
      rolearn: arn:aws:iam::17...:role/kube-system-2025032210125435440000000f
      username: system:node:{{SessionName}}
kind: ConfigMap
metadata:
  creationTimestamp: "2025-03-22T10:13:28Z"
  name: aws-auth
  namespace: kube-system
  resourceVersion: "1461"
  uid: 65df2ac0-42bb-46a4-aeb0-4f1ed397d180


# 스케쥴러 이름
kubectl get pod -n kube-system -l k8s-app=kube-dns -o yaml | grep scheduler
schedulerName: fargate-scheduler

kubectl get mutatingwebhookconfigurations.admissionregistration.k8s.io
NAME                                             WEBHOOKS   AGE
0500-amazon-eks-fargate-mutation.amazonaws.com   2          29m
aws-load-balancer-webhook                        3          27m
pod-identity-webhook                             1          35m
vpc-resource-mutating-webhook                    1          35m

kubectl describe mutatingwebhookconfigurations 0500-amazon-eks-fargate-mutation.amazonaws.com

kubectl get validatingwebhookconfigurations.admissionregistration.k8s.io
NAME                              WEBHOOKS   AGE
aws-load-balancer-webhook         3          27m
vpc-resource-validating-webhook 2 35m- EC2 자원 확인이 안되며, Fargate 접근을 위한 ENI만 존재함
kubectl get svc,ep
NAME                 TYPE        CLUSTER-IP   EXTERNAL-IP   PORT(S)   AGE
service/kubernetes   ClusterIP   172.20.0.1   <none>        443/TCP   32m

NAME                   ENDPOINTS                          AGE
endpoints/kubernetes   10.10.10.171:443,10.10.36.99:443   32m
예제 파드 배포
1. 예제 파드(netshot) 배포
kubectl create ns study-aews

# 테스트용 파드 netshoot 디플로이먼트 생성 : 0.5vCPU 1GB 할당되어,
# 아래 Limit 값은 의미가 없음
cat <<EOF | kubectl apply -f -
apiVersion: apps/v1
kind: Deployment
metadata:
  name: netshoot
  namespace: study-aews
spec:
  replicas: 1
  selector:
    matchLabels:
      app: netshoot
  template:
    metadata:
      labels:
        app: netshoot
    spec:
      containers:
      - name: netshoot
        image: nicolaka/netshoot
        command: ["tail"]
        args: ["-f", "/dev/null"]
        resources:
          requests:
            cpu: 500m
            memory: 500Mi
          limits:
            cpu: 2
            memory: 2Gi
      terminationGracePeriodSeconds: 0
EOF

|
vCPU value
|
Memory value
|
|
.25 vCPU
|
0.5 GB, 1 GB, 2 GB
|
|
.5 vCPU
|
1 GB, 2 GB, 3 GB, 4 GB
|
|
1 vCPU
|
2 GB, 3 GB, 4 GB, 5 GB, 6 GB, 7 GB, 8 GB
|
|
2 vCPU
|
Between 4 GB and 16 GB in 1-GB increments
|
|
4 vCPU
|
Between 8 GB and 30 GB in 1-GB increments
|
|
8 vCPU
|
Between 16 GB and 60 GB in 4-GB increments
|
|
16 vCPU
|
Between 32 GB and 120 GB in 8-GB increments
|
Fargate 는 CPU와 메모리는 위와 같이 지정된다(limit 상관없이 지정됨)
볼륨은 EBS 마운트가 불가능하며 EFS를 사용해야합니다.
2. Priviled 파드 배포로 노드 탈취 시도시
kubectl apply -f - <<EOF
apiVersion: v1
kind: Pod
metadata:
  name: root-shell
  namespace: study-aews
spec:
  containers:
  - command:
    - /bin/cat
    image: alpine:3
    name: root-shell
    securityContext:
      privileged: true
    tty: true
    stdin: true
    volumeMounts:
    - mountPath: /host
      name: hostroot
  hostNetwork: true
  hostPID: true
  hostIPC: true
  tolerations:
  - effect: NoSchedule
    operator: Exists
  - effect: NoExecute
    operator: Exists
  volumes:
  - hostPath:
      path: /
    name: hostroot
EOF
- Fargate 스케쥴러에 의해 배포가 안됨
3. ALB 예제 파드 배포
- AWS로드밸런서 컨트롤러는 테라폼으로 배포하였음
# 게임 디플로이먼트와 Service, Ingress 배포
cat <<EOF | kubectl apply -f -
apiVersion: apps/v1
kind: Deployment
metadata:
  namespace: study-aews
  name: deployment-2048
spec:
  selector:
    matchLabels:
      app.kubernetes.io/name: app-2048
  replicas: 2
  template:
    metadata:
      labels:
        app.kubernetes.io/name: app-2048
    spec:
      containers:
      - image: public.ecr.aws/l6m2t8p7/docker-2048:latest
        imagePullPolicy: Always
        name: app-2048
        ports:
        - containerPort: 80
---
apiVersion: v1
kind: Service
metadata:
  namespace: study-aews
  name: service-2048
spec:
  ports:
    - port: 80
      targetPort: 80
      protocol: TCP
  type: ClusterIP
  selector:
    app.kubernetes.io/name: app-2048
---
apiVersion: networking.k8s.io/v1
kind: Ingress
metadata:
  namespace: study-aews
  name: ingress-2048
  annotations:
    alb.ingress.kubernetes.io/scheme: internet-facing
    alb.ingress.kubernetes.io/target-type: ip
spec:
  ingressClassName: alb
  rules:
    - http:
        paths:
        - path: /
          pathType: Prefix
          backend:
            service:
              name: service-2048
              port:
                number: 80
EOF


kubectl describe ingress -n study-aews ingress-2048
Name:             ingress-2048
Labels:           <none>
Namespace:        study-aews
Address:          k8s-studyaew-ingress2-13cf8b943a-879946675.ap-northeast-2.elb.amazonaws.com
Ingress Class:    alb
Default backend:  <default>
Rules:
  Host        Path  Backends
  ----        ----  --------
  *
              /   service-2048:80 (10.10.14.195:80,10.10.4.13:80)
Annotations:  alb.ingress.kubernetes.io/scheme: internet-facing
              alb.ingress.kubernetes.io/target-type: ip
Events:
  Type    Reason                  Age    From     Message
  ----    ------                  ----   ----     -------
  Normal  SuccessfullyReconciled  2m34s  ingress  Successfully reconciled


# ALB 접속
kubectl get ingress -n study-aews ingress-2048 -o jsonpath='{.status.loadBalancer.ingress[0].hostname}' | awk '{ print "Game URL = http://"$1 }'


# 파드 개수를 4개로 늘리면 ? 노드가 같이 증가함
kubectl scale deployment -n study-aews  deployment-2048 --replicas 4

# 실습 정리
kubectl delete ingress ingress-2048 -n study-aews
kubectl delete svc service-2048 -n study-aews && kubectl delete deploy deployment-2048 -n study-aews
4. Job 의 경우 ttlSecondsAfterFinished 을 통해 파드를 삭제해야 노드도 같이 삭제됨
ttlSecondsAfterFinished 는 TTL 컨트롤러가 Job의 ttlSecondsAfterFinished 필드를 감지하여, 작업이 완료된 후 설정된 시간 후 자동으로 리소스를 정리하는 옵션입니다.
cat <<EOF | kubectl apply -f -
apiVersion: batch/v1
kind: Job
metadata:
  name: busybox1
  namespace: study-aews
spec:
  template:
    spec:
      containers:
      - name: busybox
        image: busybox
        command: ["/bin/sh", "-c", "sleep 10"]
      restartPolicy: Never
  ttlSecondsAfterFinished: 60 # <-- TTL controller
---
apiVersion: batch/v1
kind: Job
metadata:
  name: busybox2
  namespace: study-aews
spec:
  template:
    spec:
      containers:
      - name: busybox
        image: busybox
        command: ["/bin/sh", "-c", "sleep 10"]
      restartPolicy: Never
EOF
로깅
Fargate의 Amazon EKS는 Fluent Bit 기반의 내장 로그 라우터를 제공합니다.
즉, Fluent Bit 컨테이너를 사이드카로 명시적으로 실행하지 않고 Amazon에서 실행합니다
테라폼 구성시 로깅을 설정하여 배포하면 configmap이 배포되어 정보를 확인할 수 있습니다.
- configmap 은 동적 배포가 되지 않으며, 변경사항에 대한 부분은 배포된 파드에만 적용됨
# main.tf
...
  # Enable Fargate logging this may generate a large ammount of logs, disable it if not explicitly required
  enable_fargate_fluentbit = true
  fargate_fluentbit = {
    flb_log_cw = true
  }
...

kubectl get cm -n aws-observability aws-logging -o yaml
..
data:
  filters.conf: |
    [FILTER]
      Name parser
      Match *
      Key_name log
      Parser crio
    [FILTER]
      Name kubernetes
      Match kube.*
      Merge_Log On
      Keep_Log Off
      Buffer_Size 0
      Kube_Meta_Cache_TTL 300s
  flb_log_cw: "true"
  output.conf: |+
    [OUTPUT]
          Name cloudwatch
          Match kube.*
          region ap-northeast-2
          log_group_name /hsh/fargate-fluentbit-logs2025032210122575360000000c
          log_stream_prefix fargate-logs-
          auto_create_group true
    [OUTPUT]
          Name cloudwatch_logs
          Match *
          region ap-northeast-2
          log_group_name /hsh/fargate-fluentbit-logs2025032210122575360000000c
          log_stream_prefix fargate-logs-fluent-bit-
          auto_create_group true

  parsers.conf: |
    [PARSER]
      Name crio
      Format Regex
      Regex ^(?<time>[^ ]+) (?<stream>stdout|stderr) (?<logtag>P|F) (?<log>.*)$
      Time_Key    time
      Time_Format %Y-%m-%dT%H:%M:%S.%L%z
      Time_Keep On
이전 파드들에 대한 로깅도 Cloudwatch 로그 그룹에서 확인할 수 있습니다.


구성한 인프라는 테라폼을 통해 삭제해주세요.
terraform destroy -auto-approve
EKS Automode
EKS AutoMode는 Dataplane (워커 노드) 의 일부를 AWS에서 관리하는 기능입니다.
아래 그림과 같이 필수 EKS Add-ons 을 AWS측에서 관리, 일부 운영 도움이되는 기능 제공되며, 대상 EC2는 AWS측에서 관리하게 됩니다.

Addon 들은 AutoMode AMI 내 프로세스로 동작합니다.
AMI는 잠금 소프트웨어를 강제하고 SELinux 필수 액세스 제어를 활성화하며 읽기 전용 루트 파일 시스템을 제공하며 노드에 대한 ssh 접근이 차단됩니다.

실습 환경 구성
배포는 예제 Repo를 참고하여 배포합니다.
git clone https://github.com/aws-samples/sample-aws-eks-auto-mode.git
cd sample-aws-eks-auto-mode/terraform
# 리전 설정
vi variables.tf
---
variable "name" {
description = "Name of the VPC and EKS Cluster"
default = "hsh-eks"
type = string
}
variable "region" {
description = "region"
default = "ap-northeast-2"
type = string
}
variable "eks_cluster_version" {
description = "EKS Cluster version"
default = "1.31"
type = string
}
# VPC with 65536 IPs (10.0.0.0/16) for 3 AZs
variable "vpc_cidr" {
description = "VPC CIDR. This should be a valid private (RFC 1918) CIDR range"
default = "10.20.0.0/16"
type = string
}
# 테라폼 배포
terraform init
terraform plan
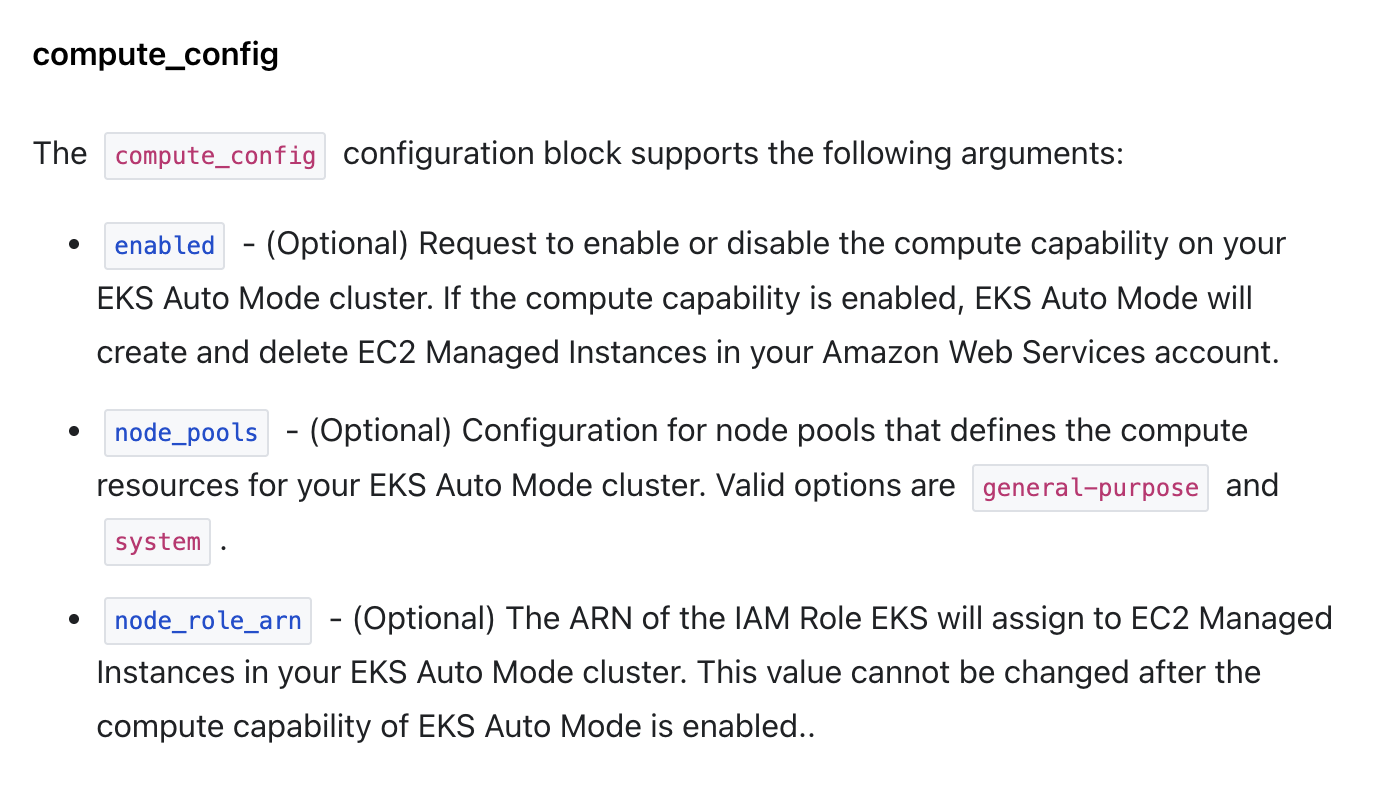
terraform apply -auto-approve위 코드를 확인하면 AutoMode는 아래 코드를 통해 활성화를 할 수 있습니다.
# eks.tf
module "eks" {
  source  = "terraform-aws-modules/eks/aws"
  version = "~> 20.24"

  cluster_name    = var.name
  cluster_version = var.eks_cluster_version

  # Give the Terraform identity admin access to the cluster
  # which will allow it to deploy resources into the cluster
  enable_cluster_creator_admin_permissions = true
  cluster_endpoint_public_access           = true

  vpc_id     = module.vpc.vpc_id
  subnet_ids = module.vpc.private_subnets

	# 오토 모드 활성화 부분
  cluster_compute_config = {
    enabled    = true
    node_pools = ["general-purpose"]
  }
  tags = local.tags
}
|
항목
|
system
|
general-purpose
|
|
용도
|
시스템 컴포넌트 전용
|
범용 애플리케이션 워크로드
|
|
테인트
|
CriticalAddonsOnly 있음
|
없음
|
|
아키텍처 지원
|
amd64, arm64 모두 지원
|
amd64만 지원
|
|
대상 워크로드
|
CoreDNS, kube-proxy 등
|
사용자 애플리케이션 등
|
구성시 노드와 파드에 대한 자원을 확인할 수 없습니다.

- 필수 addon 들은 AMI 안 프로세스로 동작하여 확인할 수 없습니다.
오토모드는 AWS 콘솔에서 확인 가능합니다.


Addon은 없지만 콘솔에서 배포는 또 가능합니다(..)
CoreDNS를 임시적으로 배포하면 Fargate와 같이 파드별 노드가 생성하여 배포됩니다.
다만 addon 에 접근하면 저하된 상태로 나오니 삭제하겠습니다.


[컴퓨팅] Karpenter 동작 확인
cat <<EOF | kubectl apply -f -
apiVersion: apps/v1
kind: Deployment
metadata:
  name: inflate
spec:
  replicas: 1
  selector:
    matchLabels:
      app: inflate
  template:
    metadata:
      labels:
        app: inflate
    spec:
      terminationGracePeriodSeconds: 0
      nodeSelector:
        eks.amazonaws.com/compute-type: auto
      securityContext:
        runAsUser: 1000
        runAsGroup: 3000
        fsGroup: 2000
      containers:
        - name: inflate
          image: public.ecr.aws/eks-distro/kubernetes/pause:3.7
          resources:
            requests:
              cpu: 1
          securityContext:
            allowPrivilegeEscalation: false
EOF

kubectl get events -w --sort-by '.lastTimestamp'
kubectl get nodes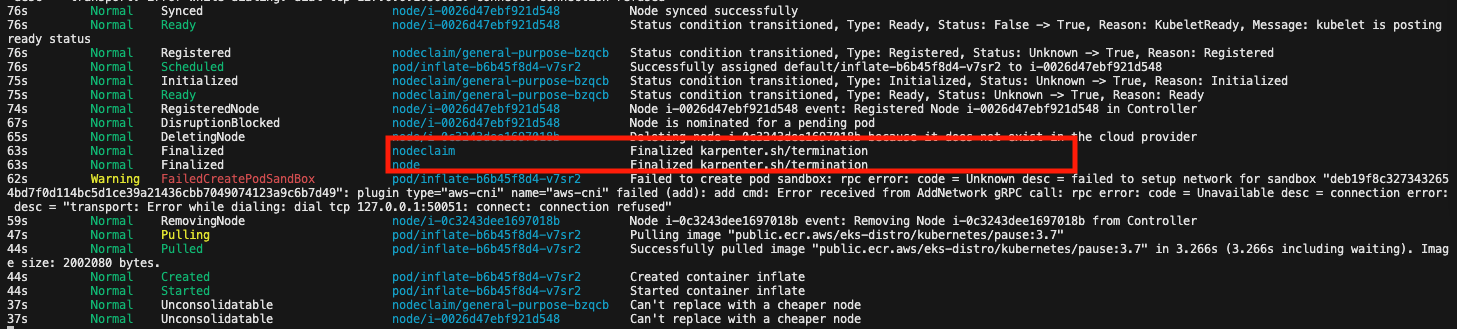
kubectl delete deployment inflate [네트워킹] Graviton Workloads (2048 game) 배포 및 ALB 동작 확인
Gravition 카펜터 노드 그룹을 추가로 배포해야 합니다.
cat ../nodepools/graviton-nodepool.yaml
---
apiVersion: eks.amazonaws.com/v1
kind: NodeClass
metadata:
  name: graviton-nodeclass
spec:
  role: hsh-eks-eks-auto-20250322135054159000000002
  subnetSelectorTerms:
    - tags:
        karpenter.sh/discovery: "automode-demo"
  securityGroupSelectorTerms:
    - tags:
        kubernetes.io/cluster/automode-cluster: owned
  tags:
    karpenter.sh/discovery: "automode-demo"
---
apiVersion: karpenter.sh/v1
kind: NodePool
metadata:
  name: graviton-nodepool
spec:
  template:
    spec:
      nodeClassRef:
        group: eks.amazonaws.com
        kind: NodeClass
        name: graviton-nodeclass
      requirements:
        - key: "eks.amazonaws.com/instance-category"
          operator: In
          values: ["c", "m", "r"]
        - key: "eks.amazonaws.com/instance-cpu"
          operator: In
          values: ["4", "8", "16", "32"]
        - key: "kubernetes.io/arch"
          operator: In
          values: ["arm64"]
      taints:
        - key: "arm64"
          value: "true"
          effect: "NoSchedule"
  limits:
    cpu: 1000
  disruption:
    consolidationPolicy: WhenEmpty
    consolidateAfter: 30s
다만 필자의 경우 알맞는 보안 그룹이 없어 노드 그룹 생성에 에러가 발생하였습니다.
Events:
  Type    Reason                Age    From       Message
  ----    ------                ----   ----       -------
  Normal  SubnetsReady          4m28s  karpenter  Status condition transitioned, Type: SubnetsReady, Status: Unknown -> True, Reason: SubnetsReady
  Normal  SecurityGroupsReady   4m28s  karpenter  Status condition transitioned, Type: SecurityGroupsReady, Status: Unknown -> False, Reason: SecurityGroupsNotFound, Message: SecurityGroupSelector did not match any SecurityGroups
  Normal  InstanceProfileReady  4m28s  karpenter  Status condition transitioned, Type: InstanceProfileReady, Status: Unknown -> True, Reason: InstanceProfileReady
  Normal  Ready                 4m28s  karpenter  Status condition transitioned, Type: Ready, Status: Unknown -> False, Reason: UnhealthyDependents, Message: SecurityGroupsReady=False
VPC 내 보안 그룹을 생성하여 kubernetes.io/cluster/automode-cluster: owned 태그를 붙이고 재생성시 정상적으로 생성됩니다.
kubectl get nodepool
NAME                NODECLASS            NODES   READY   AGE
general-purpose     default              0       True    61m
graviton-nodepool   graviton-nodeclass   0       True    3m55s

kubectl get nodeclass
NAME                 ROLE                                          READY   AGE
default              hsh-eks-eks-auto-20250322135054159000000002   True    61m
graviton-nodeclass   hsh-eks-eks-auto-20250322135054159000000002   True    22s
이후 ALB 및 예제 파드를 배포하겠습니다.
cd ../examples/graviton
kubectl apply -f game-2048.yaml
kubectl apply -f 2048-ingress.yaml

cat game-2048.yaml
...
     automountServiceAccountToken: false
      tolerations:
      - key: "arm64"
        value: "true"
        effect: "NoSchedule"
      nodeSelector:
        kubernetes.io/arch: arm64 # 를 통해 노드 class 선택
필자의 경우 Spot 노드 할당량이 없어 파드 스케쥴을 받지 못했습니다.
노드 클레임을 확인하면 spot이 명시되어 있어 그런데 정작 spot 인스턴스가 없습니다.
또한, 명시적으로 spot에 대한 key가 없었는데 spot이 지정된 지는 참고가 필요합니다.
nodepool에 capacity-type을 추가하여 다시 배포하겠습니다.

# 구성 노드 풀 spot 확인
kubectl describe nodeclaim graviton-nodepool-qktnd  | grep spot
              karpenter.sh/capacity-type=spot

kubectl delete -f graviton-nodepool.yaml
vi graviton-nodepool.yaml
kubectl apply -f graviton-nodepool.yaml
..
        - key: "kubernetes.io/arch"
          operator: In
          values: ["arm64"]
        - key: "karpenter.sh/capacity-type"
          operator: In
          values: ["on-demand"] # 추가
수정 후 배포를 하면 다음과 같이 nodeclaim 및 노드는 생성되지만,
EKS에 붙질않은 현상이 있었습니다.

해당 이슈 확인시 Karpenter 자체 버그가 있는 것으로 추정되며 깃허브 이슈를 통해 확인할 수 있습니다.
버전 다운 그레이드를 하면 수정된다지만, AutoMode에 따라 addon 버전을 관리하지 못해 문제가 발생하는 단점이 있네요.
[스토리지] EBS Controller 동작 확인
# Create the storage class
cat <<EOF | kubectl apply -f -
apiVersion: storage.k8s.io/v1
kind: StorageClass
metadata:
  name: auto-ebs-sc
  annotations:
    storageclass.kubernetes.io/is-default-class: "true"
provisioner: ebs.csi.eks.amazonaws.com  # Uses EKS Auto Mode
volumeBindingMode: WaitForFirstConsumer  # Delays volume creation until a pod needs it
parameters:
  type: gp3
  encrypted: "true"
EOF

# Create the persistent volume claim
cat <<EOF | kubectl apply -f -
apiVersion: v1
kind: PersistentVolumeClaim
metadata:
  name: auto-ebs-claim
spec:
  accessModes:
    - ReadWriteOnce
  storageClassName: auto-ebs-sc
  resources:
    requests:
      storage: 8Gi
EOF

# Deploy the Application : The Deployment runs a container that writes timestamps to the persistent volume.
## Simple bash container that writes timestamps to a file
## Mounts the PVC at /data
## Requests 1 CPU core
## Uses node selector for EKS managed nodes
cat <<EOF | kubectl apply -f -
apiVersion: apps/v1
kind: Deployment
metadata:
  name: inflate-stateful
spec:
  replicas: 1
  selector:
    matchLabels:
      app: inflate-stateful
  template:
    metadata:
      labels:
        app: inflate-stateful
    spec:
      terminationGracePeriodSeconds: 0
      nodeSelector:
        eks.amazonaws.com/compute-type: auto
      containers:
        - name: bash
          image: public.ecr.aws/docker/library/bash:4.4
          command: ["/usr/local/bin/bash"]
          args: ["-c", "while true; do echo \$(date -u) >> /data/out.txt; sleep 60; done"]
          resources:
            requests:
              cpu: "1"
          volumeMounts:
            - name: persistent-storage
              mountPath: /data
      volumes:
        - name: persistent-storage
          persistentVolumeClaim:
            claimName: auto-ebs-claim
EOF
# 자원 삭제
kubectl delete deployment/inflate-stateful pvc/auto-ebs-claim storageclass/auto-ebs-sc
[노드 로그 확인]
노드에 접속할 순 없지만, 스트리밍으로 노드 로그를 확인할 수 있습니다. NodeDiagnostic 라고 S3 에 적재하는 방법이 있습니다 - Link
kubectl get node
NAME                  STATUS   ROLES    AGE   VERSION
i-0ff0783b6ffd38352   Ready    <none>   27s   v1.31.4-eks-0f56d01

# 디버깅 로그 생성
kubectl debug node/i-0ff0783b6ffd38352  -it --profile=sysadmin --image=public.ecr.aws/amazonlinux/amazonlinux:2023

# 확장 패키지 설치 및 로그 확인
yum install -y util-linux-core
nsenter -t 1 -m journalctl -f -u kubelet
자원 삭제
terraform destroy -auto-approve'Cloud' 카테고리의 다른 글
| EKS 파드로 노드 관리하기 (0) | 2025.04.12 |
|---|---|
| EKS Version Upgrade (0) | 2025.04.02 |
| EKS Security (2) | 2025.03.16 |
| EKS Karpenter (0) | 2025.03.09 |
| EKS Autoscaling (0) | 2025.03.09 |