Overview
EKS 클러스터에서 네트워크 addon인 AWS Load Balancer Controller 가 제공하는 기능들을 실습하여 동작 이해와 AWS 콘솔에서의 형상을 확인하겠습니다.
AWS Load Balancer Controller
AWS ELB를 자동으로 관리하며, 쿠버네티스 리소스(Ingress, SVC)를 AWS ELB에 매핑시켜 ELB의 트래픽을 쿠버네티스 서비스 리소스로 라우팅을 시켜주는 컨트롤러입니다. ELB를 자동으로 관리한다는 말은 쿠버네티스 서비스에 annotation을 정의하면 옵션에 맞게 아래 AWS ALB, NLB을 생성, 삭제, 수정시켜 쿠버네티스 리소스에 매핑시켜줍니다.
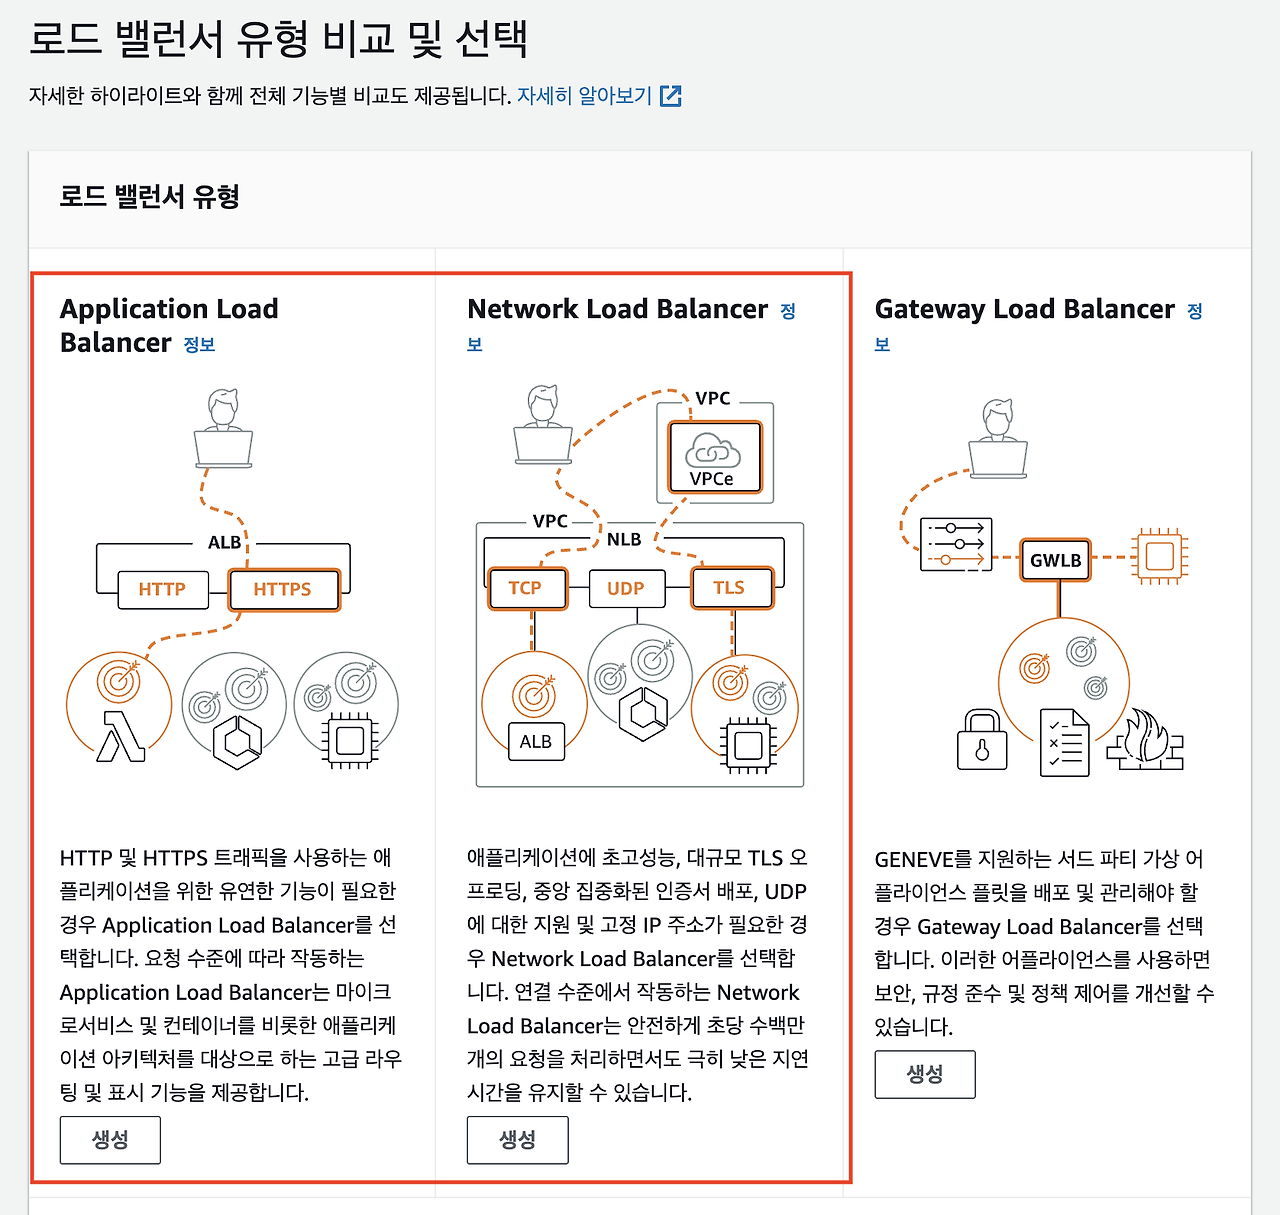
- It satisfies Kubernetes Ingress resources by provisioning Application Load Balancers.
- It satisfies Kubernetes Service resources by provisioning Network Load Balancers.
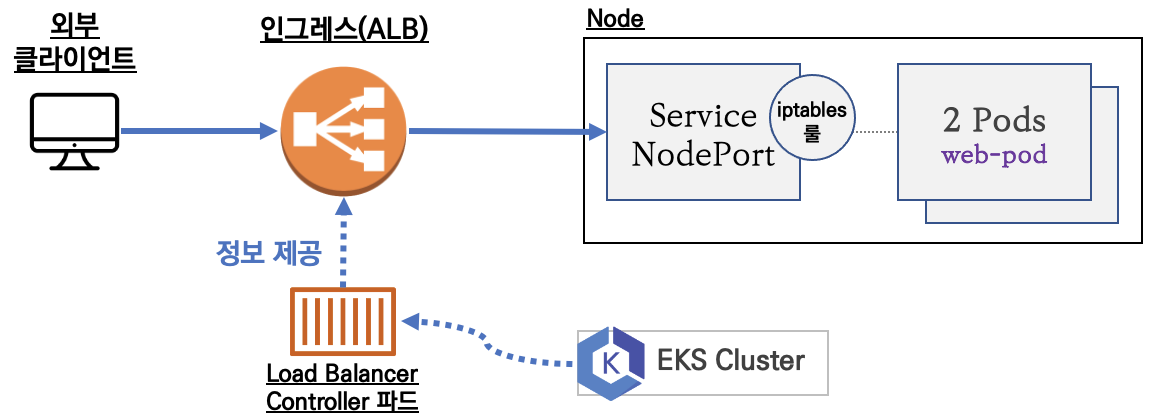
AWS Load Balancer Controller 가 ELB을 생성하고 쿠버네티스 서비스에 매핑하는 과정은 다음과 같습니다.

- AWS Load Balancer Controller 가 API Server 변경 사항을 감시합니다.
- API Server 이벤트에 서비스 리소스(service, ingress) 를 감시하면 annotation을 체크하여 AWS ELB을 생성합니다.
- 쿠버네티스 서비스에 대해 AWS에서 대상 그룹을 생성하여 지정합니다.
- annotation 에 설정한 포트를 확인하여 ELB Listeners을 생성합니다.
- 각 경로에 대한 ingress 에 지정된 경로에 대한 rule이 생성됩니다.
위 과정을 통해 ELB가 생성되고 쿠버네티스 서비스로 라우팅이 설정됩니다.
쿠버네티스 서비스로 트래픽이 인입되면 AWS ELB를 통해 서비스 파드로 전달됩니다.
EKS 클러스터를 구성하여 AWS Load Balancer Controller 를 배포하겠습니다.
클러스터 구성 및 배포는 eksctl을 통해 구성하였습니다.
apiVersion: eksctl.io/v1alpha5
kind: ClusterConfig

metadata:
  name:  hanhorang
  region: ap-northeast-2
  version: "1.30"

nodeGroups:
  - name: ng1
    instanceType: t3.medium
    desiredCapacity: 2
    volumeSize: 20
    maxPodsPerNode: 50
    ssh:
      allow: true
    privateNetworking: false

addons:
  - name: vpc-cni
    version: latest
    attachPolicyARNs:
      - arn:aws:iam::aws:policy/AmazonEKS_CNI_Policy
  - name: kube-proxy
    version: latest
  - name: coredns
    version: latest
  - name: aws-ebs-csi-driver
    wellKnownPolicies:
      ebsCSIController: true

iam:
  withOIDC: true
  serviceAccounts:
    - metadata:
        name: aws-load-balancer-controller
        namespace: kube-system
      wellKnownPolicies:
        awsLoadBalancerController: true
eksctl create cluster -f eksctl.yaml- 클러스터 배포에 약 15분 소요됩니다.
AWS Load Balancer Controller 는 helm 을 통해 배포하겠습니다.
사전 eksctl 을 통해 serviceaccount, IRSA 설정이 되어 helm 차트만 배포하면 설정이 완료됩니다.
배포와 예제 자료는 CloudNet@ AEWS 스터디를 참고하였습니다.
export CLUSTER_NAME =

## IRSA 정보 확인
eksctl get iamserviceaccount --cluster $CLUSTER_NAME
## 서비스 어카운트 확인
kubectl get serviceaccounts -n kube-system aws-load-balancer-controller -o yaml

# Helm Chart 설치
helm repo add eks https://aws.github.io/eks-charts
helm repo update
helm install aws-load-balancer-controller eks/aws-load-balancer-controller -n kube-system --set clusterName=$CLUSTER_NAME \
  --set serviceAccount.create=false --set serviceAccount.name=aws-load-balancer-controller
NLB with AWS Load Balancer Controller
예제 서비스 파드를 배포하여 ELB 구성을 확인하겠습니다.
아래 그림과 같이 쿠버네티스 서비스 객체에 NLB annotation을 추가하여 NLB를 구성하겠습니다.
NLB 유형은 IP모드를 구성하여 트래픽이 파드 endpoint로 바로 통신하도록 설정했습니다.

cat << EOT > echo-service-nlb.yaml
apiVersion: apps/v1
kind: Deployment
metadata:
  name: deploy-echo
spec:
  replicas: 2
  selector:
    matchLabels:
      app: deploy-websrv
  template:
    metadata:
      labels:
        app: deploy-websrv
    spec:
      terminationGracePeriodSeconds: 0
      containers:
      - name: akos-websrv
        image: k8s.gcr.io/echoserver:1.5
        ports:
        - containerPort: 8080
---
apiVersion: v1
kind: Service
metadata:
  name: svc-nlb-ip-type
  annotations: # AWS LoadBalancer Controller Watch
    service.beta.kubernetes.io/aws-load-balancer-nlb-target-type: ip
    service.beta.kubernetes.io/aws-load-balancer-scheme: internet-facing
    service.beta.kubernetes.io/aws-load-balancer-healthcheck-port: "8080"
    service.beta.kubernetes.io/aws-load-balancer-cross-zone-load-balancing-enabled: "true"
    service.beta.kubernetes.io/aws-load-balancer-target-group-attributes: deregistration_delay.timeout_seconds=60
spec:
  ports:
    - port: 80
      targetPort: 8080
      protocol: TCP
  type: LoadBalancer
  loadBalancerClass: service.k8s.aws/nlb
  selector:
    app: deploy-websrv
EOT

kubectl apply -f echo-service-nlb.yaml- AWS NLB가 IP 기반 대상(ip)으로 인터넷에서 접근 가능하게 설정(internet-facing)되며, 8080 포트로 헬스 체크를 수행하고, 가용 영역 간 트래픽 분산 및 60초의 등록 해제 지연 시간을 설정합니다.
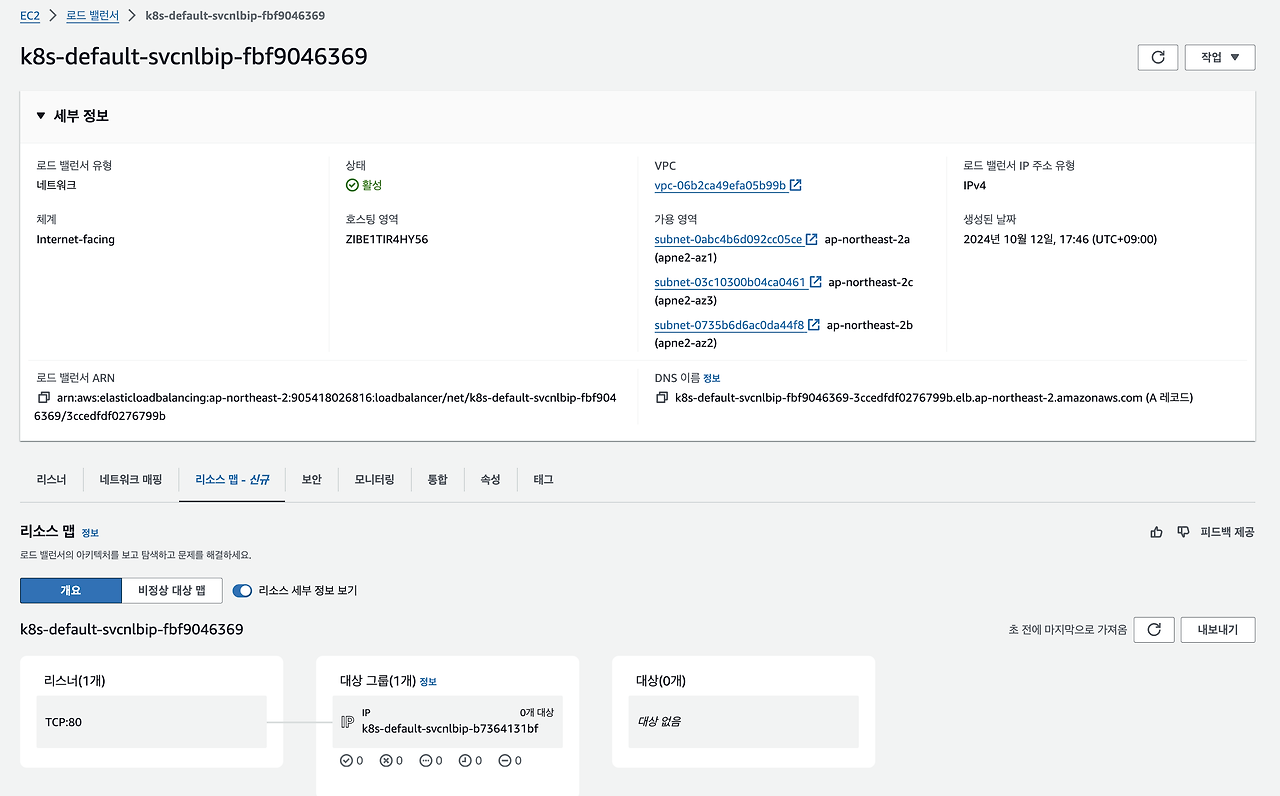
AWS 콘솔에서 확인하면 대상 그룹이 서비스 파드로 설정됨을 확인할 수 있습니다.
또한, NLB 와 대상 그룹의 옵션을 확인하면 위 annotation 값대로 설정됩니다.

NLB 서비스 접근을 위해 AWS Load Balancer Controller addon IAM Role에 추가 정책이 필요합니다.
AWS Load Balancer Controller 버전에 따라 필요 IAM policy가 달라지기 때문입니다.


위 로그를 확인하여 elasticloadbalancing:* Policy를 추가하고 서비스를 재배포하겠습니다.


- 프로비저닝에 약 5분정도 소요됩니다.
ALB with AWS Load Balancer Controller
쿠버네티스 Ingress 를 통해 Layer 7 기반의 로드밸런서를 구성할 수 있습니다.

cat << EOT > ingress.yaml
apiVersion: v1
kind: Namespace
metadata:
  name: game-2048
---
apiVersion: apps/v1
kind: Deployment
metadata:
  namespace: game-2048
  name: deployment-2048
spec:
  selector:
    matchLabels:
      app.kubernetes.io/name: app-2048
  replicas: 2
  template:
    metadata:
      labels:
        app.kubernetes.io/name: app-2048
    spec:
      containers:
      - image: public.ecr.aws/l6m2t8p7/docker-2048:latest
        imagePullPolicy: Always
        name: app-2048
        ports:
        - containerPort: 80
---
apiVersion: v1
kind: Service
metadata:
  namespace: game-2048
  name: service-2048
spec:
  ports:
    - port: 80
      targetPort: 80
      protocol: TCP
  type: NodePort
  selector:
    app.kubernetes.io/name: app-2048
---
apiVersion: networking.k8s.io/v1
kind: Ingress
metadata:
  namespace: game-2048
  name: ingress-2048
  annotations:
    alb.ingress.kubernetes.io/scheme: internet-facing
    alb.ingress.kubernetes.io/target-type: ip
spec:
  ingressClassName: alb
  rules:
    - http:
        paths:
        - path: /
          pathType: Prefix
          backend:
            service:
              name: service-2048
              port:
                number: 80
EOT


kubectl apply -f ingress.yaml
kubectl get ingress -A
kubectl describe ingress ingress-2048 -n game-2048 

- IP모드로 설정되어 서비스를 거치지 않고 파드로 Bypass 인입됩니다.

AWS Load Balancer Controller Option
그 외 annotation 설정 옵션은 다음의 표에서 확인할 수 있습니다(공식문서 참고)
각 옵션은 AWS ELB와 타켓 그룹에 대한 설정 옵션입니다.
|
Annotation
|
Type
|
Default
|
Description
|
|
stringList
|
N/A
|
허용할 소스 IP 범위를 지정합니다. 이 주석을 통해 특정 IP 범위만 접근 가능하게 설정할 수 있습니다.
|
|
|
string
|
N/A
|
로드 밸런서의 유형을 지정합니다. NLB를 사용하려면 "nlb"를 설정합니다.
|
|
|
string
|
N/A
|
NLB의 대상 타입을 설정합니다. ip (Pod IP 대상) 또는 instance (EC2 인스턴스 대상)를 지정할 수 있습니다.
|
|
|
string
|
N/A
|
로드 밸런서의 이름을 명시적으로 지정할 수 있습니다.
|
|
|
boolean
|
false
|
로드 밸런서를 내부 전용으로 설정합니다. 현재는 aws-load-balancer-scheme을 대신 사용합니다.
|
|
|
string
|
internal
|
로드 밸런서의 스키마를 정의합니다. internet-facing (공용) 또는 internal (사설)로 설정할 수 있습니다.
|
|
|
string
|
N/A
|
Proxy Protocol을 활성화합니다. "*" 값을 설정하여 모든 트래픽에 대해 Proxy Protocol을 사용할 수 있습니다.
|
|
|
string
|
ipv4
|
NLB의 IP 주소 유형을 설정합니다. ipv4 또는 dualstack을 사용할 수 있습니다.
|
|
|
boolean
|
false
|
NLB의 접근 로그 기능을 활성화합니다.
|
|
|
string
|
N/A
|
NLB 접근 로그를 저장할 S3 버킷 이름을 지정합니다.
|
|
|
string
|
N/A
|
S3 버킷 내에서 접근 로그가 저장될 경로(프리픽스)를 지정합니다.
|
|
|
boolean
|
false
|
Cross-Zone Load Balancing을 활성화하여 가용 영역 간에 트래픽을 분산합니다.
|
|
|
stringList
|
N/A
|
SSL/TLS 인증서를 지정합니다. 여러 개의 인증서를 사용할 수 있습니다.
|
|
|
stringList
|
N/A
|
SSL/TLS가 활성화될 포트를 지정합니다.
|
|
|
string
|
ELBSecurityPolicy-2016-08
|
NLB에서 SSL/TLS 협상을 위한 정책을 지정합니다.
|
|
|
string
|
N/A
|
백엔드에서 사용할 프로토콜을 지정합니다 (예: HTTP, TCP 등).
|
|
|
stringMap
|
N/A
|
NLB에 추가적인 리소스 태그를 지정합니다.
|
|
|
integer
|
3
|
헬스 체크 시 "정상"으로 간주되기 위한 시도 횟수입니다.
|
|
|
integer
|
3
|
헬스 체크 시 "비정상"으로 간주되기 위한 시도 횟수입니다.
|
|
|
integer
|
10
|
헬스 체크의 시간 초과 간격(초)입니다.
|
|
|
integer
|
10
|
헬스 체크가 수행되는 간격(초)입니다.
|
|
|
string
|
TCP
|
헬스 체크에 사용할 프로토콜을 지정합니다. (TCP, HTTP, HTTPS)
|
|
|
integer or traffic-port
|
traffic-port
|
헬스 체크에 사용할 포트를 지정합니다. traffic-port는 트래픽이 전달되는 포트와 동일하게 설정합니다.
|
|
|
string
|
"/"
|
HTTP 또는 HTTPS 헬스 체크 시 사용할 경로를 지정합니다.
|
|
|
stringList
|
N/A
|
공용 NLB에서 사용되는 Elastic IP 주소 목록을 지정합니다. 서브넷 순서와 일치해야 합니다.
|
|
|
stringList
|
N/A
|
내부 NLB에서 사용할 프라이빗 IP 주소 목록을 지정합니다. 서브넷 순서와 일치해야 합니다.
|
|
|
stringMap
|
N/A
|
NLB의 대상 그룹 속성을 설정합니다.
|
|
|
stringList
|
N/A
|
NLB가 배포될 서브넷 목록을 지정합니다.
|
|
|
stringList
|
N/A
|
Application-Layer Protocol Negotiation(ALPN) 정책을 지정합니다.
|
|
|
stringMap
|
N/A
|
NLB의 대상 노드에 대한 라벨을 지정합니다.
|
Target Group 로드밸런싱 알고리즘 설정

위에서 확인한 AWS ALB 는 L7(Http)로 트래픽에 대해 알고리즘 설정이 가능합니다.
AWS 콘솔에서 ALB로 구성한 대상 그룹의 속성을 확인하면 알고리즘 정책을 확인할 수 있습니다.
기본 옵션은 라운드 로빈으로 균일하게 트래픽 분배합니다.

위 옵션을 AWS Load Balancer Controller annotation에서 설정해야 합니다.
콘솔에서 임의로 설정하면 AWS Load Balancer Controller 에 의해 annotation 옵션으로 원복되기 때문입니다.
옵션 alb.ingress.kubernetes.io/target-group-attributes: load_balancing.algorithm.type을 통해 설정해야 합니다.

위에서 설정한 2048 게임를 통해 옵션을 변경하면 알고리즘이 변경됨을 AWS 콘솔에서 확인할 수 있습니다.


클라이언트 정보 보존 옵션
운영 요청에 따라 클라이언트의 원래 정보(예: IP 주소, 프로토콜)를 백엔드 서버에 그대로 전달(보존)이 필요합니다. 클라이언트 정보를 보존하기 위한 옵션은 L4, L7로 나뉘어 있습니다.
|
기능
|
Proxy Protocol v2
|
X-Forwarded-For / X-Forwarded-Proto
|
|
전달 방식
|
바이너리 형식의 메타데이터로 전달
|
HTTP 헤더로 전달
|
|
지원 프로토콜
|
TCP, UDP (L4)
|
HTTP/HTTPS (L7)
|
|
정보 범위
|
클라이언트 IP, 포트, 프로토콜, 통신 방향 등
|
X-Forwarded-For: 클라이언트 IP / X-Forwarded-Proto: 프로토콜
|
|
구성
|
로드 밸런서 및 백엔드 서버가 Proxy Protocol v2를 지원해야 함
|
웹 서버/애플리케이션이 HTTP 헤더만 해석하면 됨
|
|
사용 환경
|
L4 로드 밸런서, TCP/UDP 트래픽에서 원래 정보를 전달
|
L7 로드 밸런서, HTTP/HTTPS 트래픽에서 원래 정보를 전달
|
|
주요 사용 사례
|
네트워크 애플리케이션, DB 서버 등
|
웹 애플리케이션에서 클라이언트 정보 확인
|
L4 의 클라이언트 보존 옵션 Proxy Protocol v2 는 NLB annotation 에 아래의 옵션을 추가하면 확인할 수 있습니다.
annotations:
service.beta.kubernetes.io/aws-load-balancer-proxy-protocol: "*"- 옵션 적용은 백엔드단에서 직접 확인이 필요합니다.
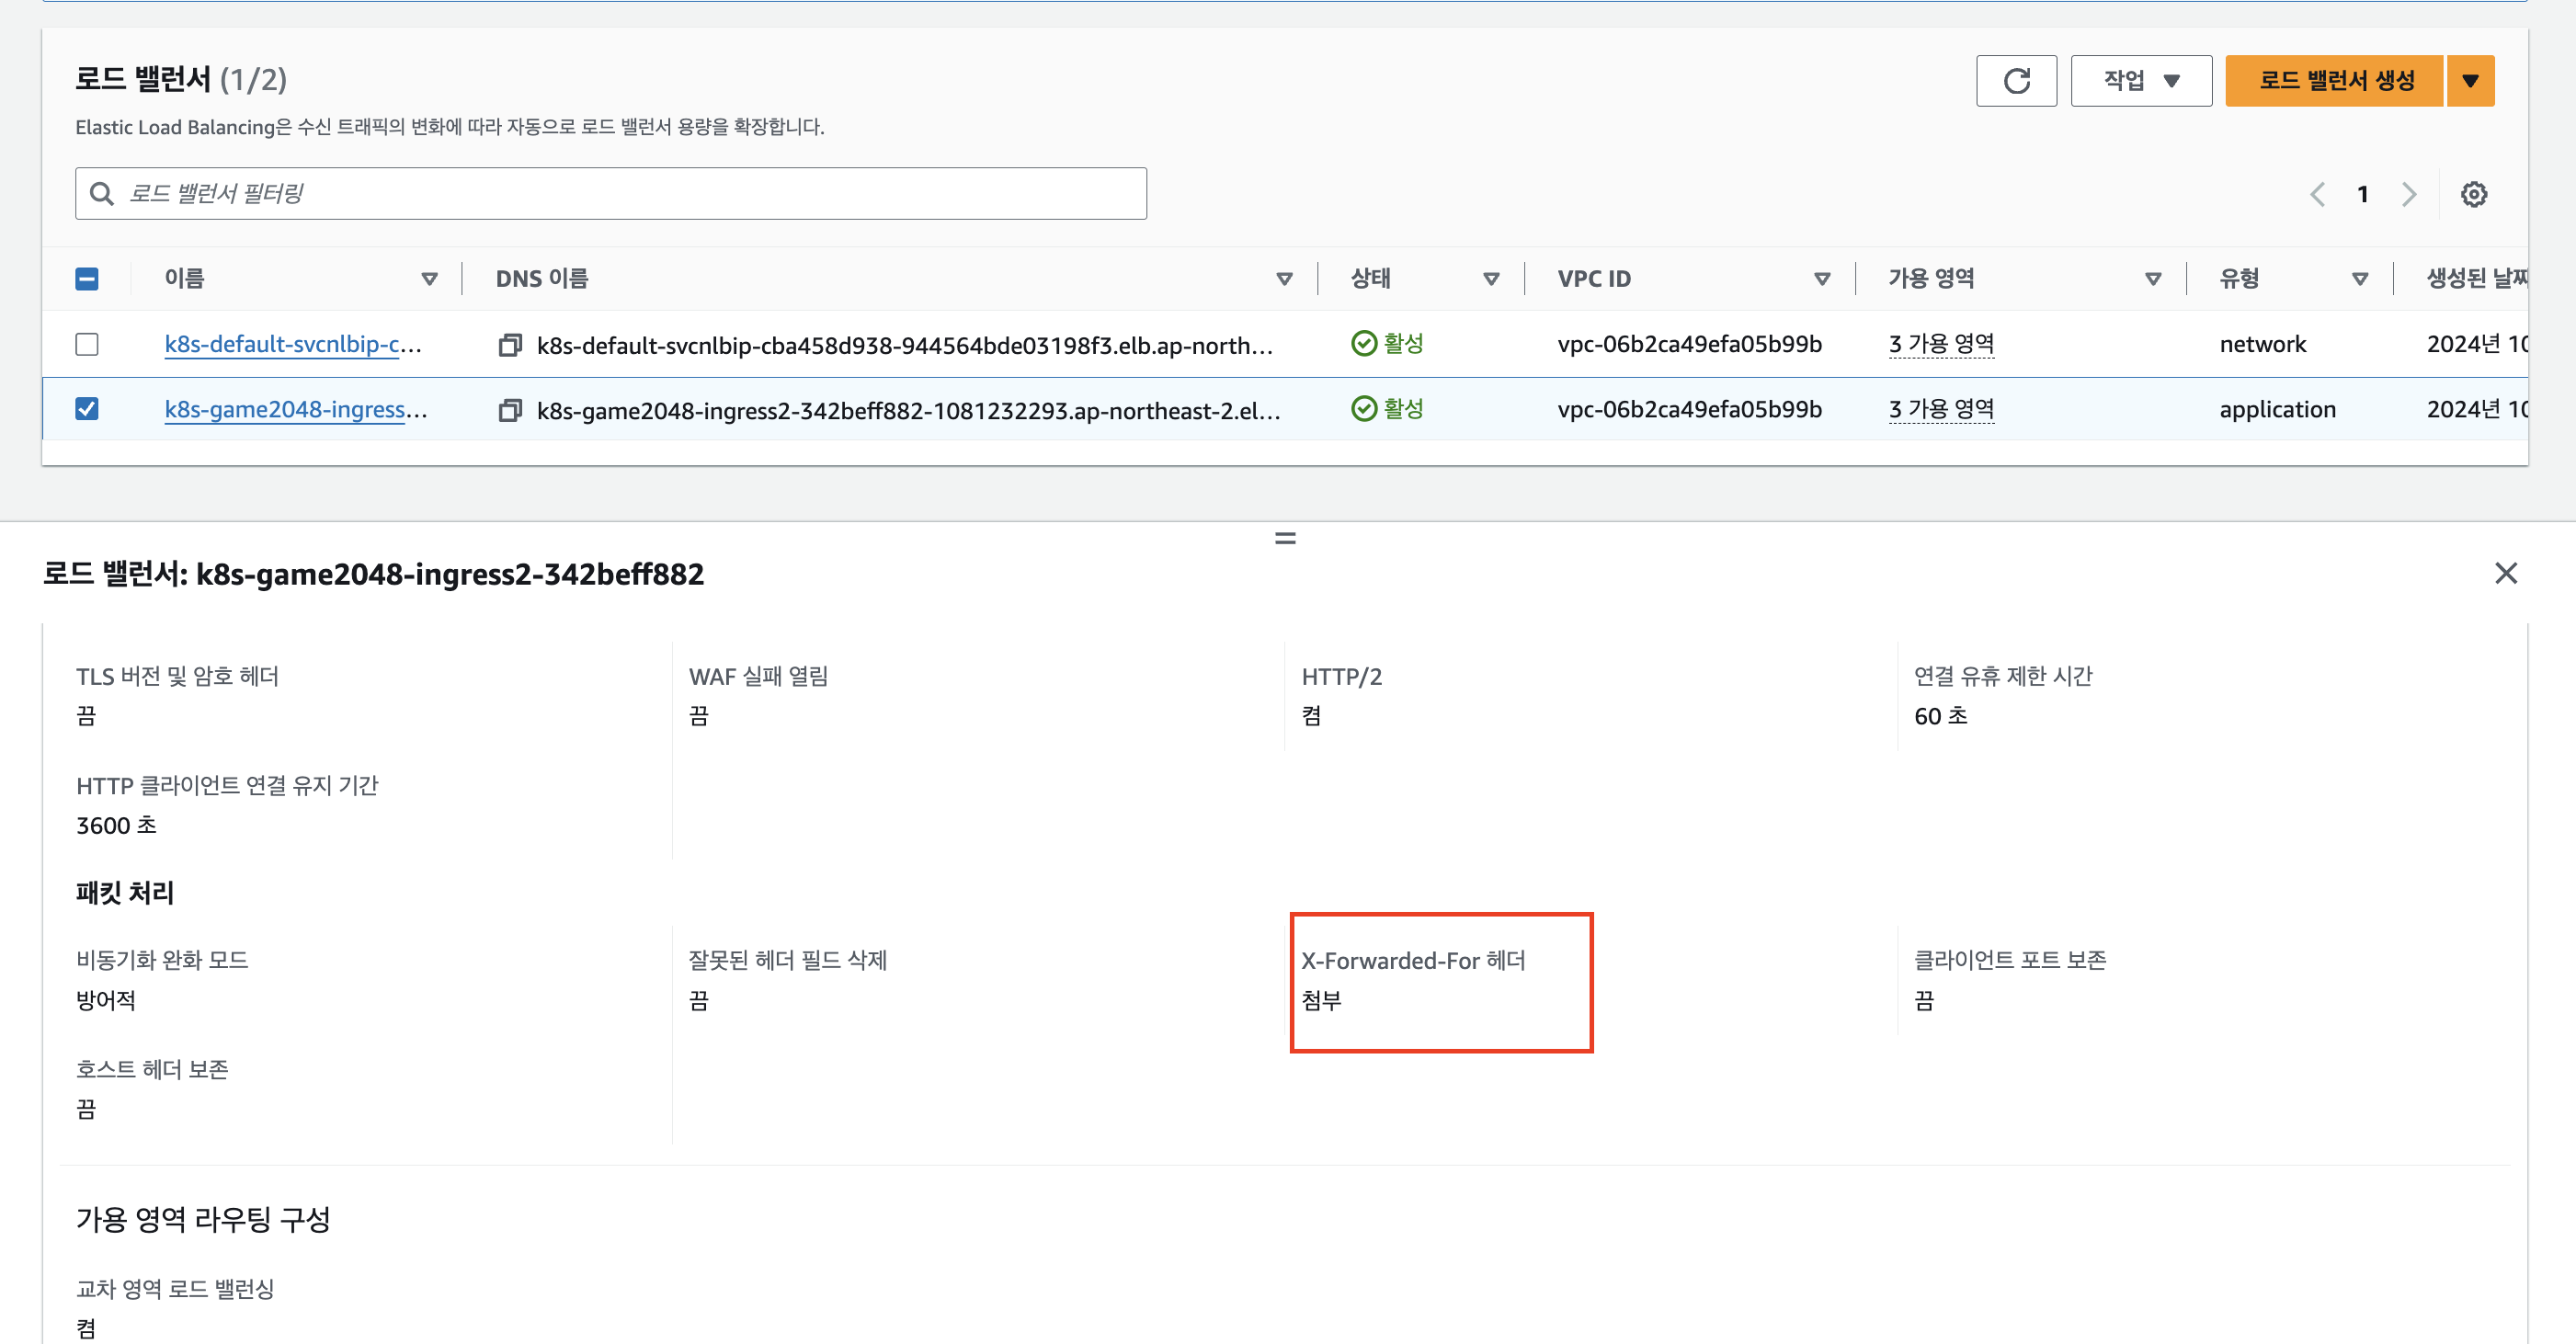
L7은 X-Forwarded-For 옵션은 기본적으로 활성화되어 있습니다.
카나리 배포
카나리란 디플로이먼트 버전별 트래픽 가중치를 분배하여 애플리케이션 트래픽을 옮기는 옵션입니다.
AWS loadbalacner controller를 통해 카나리 배포를 하고, AWS 콘솔 형태를 확인하겠습니다.
먼저 Deployment 와 SVC를 각각 배포합니다.
apiVersion: apps/v1
kind: Deployment
metadata:
  creationTimestamp: null
  labels:
    app: ng-canary
  name: ng-canary
spec:
  replicas: 1
  selector:
    matchLabels:
      app: ng-canary
  strategy: {}
  template:
    metadata:
      creationTimestamp: null
      labels:
        app: ng-canary
    spec:
      containers:
      - command:
        - /bin/sh
        - -c
        - echo "Im Canary service and being served from $HOSTNAME" > /usr/share/nginx/html/index.html  &&
          nginx -g "daemon off;"
        image: nginx
        name: nginx
        ports:
        - containerPort: 80
        resources: {}
status: {}
---
apiVersion: v1
kind: Service
metadata:
  creationTimestamp: null
  labels:
    app: ng-canary
  name: ng-canary
spec:
  ports:
  - port: 80
    protocol: TCP
    targetPort: 80
  selector:
    app: ng-canary
---
apiVersion: apps/v1
kind: Deployment
metadata:
  creationTimestamp: null
  labels:
    app: ng
  name: ng
spec:
  replicas: 1
  selector:
    matchLabels:
      app: ng
  strategy: {}
  template:
    metadata:
      creationTimestamp: null
      labels:
        app: ng
    spec:
      containers:
      - command:
        - /bin/sh
        - -c
        - echo "Im Primary service and being served from $HOSTNAME" > /usr/share/nginx/html/index.html  &&
          nginx -g "daemon off;"
        image: nginx
        name: nginx
        ports:
        - containerPort: 80
        resources: {}
status: {}
---
apiVersion: v1
kind: Service
metadata:
  creationTimestamp: null
  labels:
    app: ng
  name: ng
spec:
  ports:
  - port: 80
    protocol: TCP
    targetPort: 80
  selector:
    app: ng
다음은 Ingress 설정입니다. AWS 로드밸런서 컨트롤러는 annotation alb.ingress.kubernetes.io/actions.weighted-routing: 옵션 내 json 파일을 통해 카나리를 설정할 수 있습니다.
---
apiVersion: networking.k8s.io/v1
kind: Ingress
metadata:
  name: traffic-split
  annotations:
    alb.ingress.kubernetes.io/group.name: traffic-split
    alb.ingress.kubernetes.io/load-balancer-name: traffic-split
    alb.ingress.kubernetes.io/target-type: ip
    alb.ingress.kubernetes.io/scheme: internet-facing
    alb.ingress.kubernetes.io/actions.weighted-routing: |
      {
          "type": "forward",
          "forwardConfig": {
              "targetGroups": [
                  {
                      "serviceName": "ng",
                      "servicePort": 80,
                      "weight": 50
                  },
                  {
                      "serviceName": "ng-canary",
                      "servicePort": 80,
                      "weight": 50
                  }
              ],
              "targetGroupStickinessConfig": {
                  "enabled": false
              }
          }
      }
spec:
  ingressClassName: alb
  rules:
    - http:
        paths:
          - backend:
              service:
                name: weighted-routing
                port:
                  name: use-annotation
            pathType: ImplementationSpecific
AWS 콘솔에서 확인하면 규칙을 통해 50:50으로 설정되어 있으며, 서비스 호출시 각 서비스로 라우팅되는 것을 확인할 수 있습니다.

for i in {1..100}; do curl -s http://traffic-split-579209465.ap-northeast-2.elb.amazonaws.com/; done
SSL/TLS 보안 처리 옵션
SSL/TLS 보안 처리로 로드밸런서를 활용한 기능 2가지 있어 정리합니다.
- SSL 리다이렉션: 클라이언트가 HTTP로 요청하면 이를 HTTPS로 리다이렉트하는 기능입니다. 트래픽이 처음에 HTTP로 들어오고, 리스너가 HTTPS로 전환합니다.
- NLB SSL Termination: NLB가 HTTPS 요청을 처리하고, 서버로는 평문(HTTP) 트래픽을 전달합니다. 클라이언트와 NLB 간에만 SSL 암호화가 적용됩니다.
SSL Redirect
SSL 리다이렉션을 설정하기 위해 ACM ARN 값이 필요합니다. 필자는 별도로 구성한 ACM 인증서를 통해 https를 설정하겠습니다. 위 game-2048 게임 예제 Ingress 의 annotation을 다음과 같이 구성하여 확인하겠습니다.
apiVersion: networking.k8s.io/v1
kind: Ingress
metadata:
  namespace: game-2048
  name: ingress-2048
  annotations:
    alb.ingress.kubernetes.io/scheme: internet-facing
    alb.ingress.kubernetes.io/target-type: ip
      alb.ingress.kubernetes.io/certificate-arn: arn:aws:acm:ap-northeast-2:~
    alb.ingress.kubernetes.io/listen-ports: '[{"HTTP": 80}, {"HTTPS":443}]'
    alb.ingress.kubernetes.io/ssl-redirect: '443'
spec:
  ingressClassName: alb
  rules:
    - http:
        paths:
        - path: /
          pathType: Prefix
          backend:
            service:
              name: service-2048
              port:
                number: 80
NLB SSL Termination
백엔드에서 TLS 인증서를 분리하여 로드밸런서에서만 관리하도록 합니다. 로드밸런서에서만 TLS 를 관리하게 되면 안정성이 향상되고, NLB에서 서비스에서의 통신이 HTTP로 소량의 성능 향상을 할 수 있습니다.

apiVersion: v1
kind: Service
metadata:
  name: svc-nlb-ip-type
  annotations:
    service.beta.kubernetes.io/aws-load-balancer-nlb-target-type: external
    service.beta.kubernetes.io/aws-load-balancer-scheme: internet-facing
    service.beta.kubernetes.io/aws-load-balancer-healthcheck-port: "8080"
    service.beta.kubernetes.io/aws-load-balancer-cross-zone-load-balancing-enabled: "true"
    service.beta.kubernetes.io/aws-load-balancer-target-group-attributes: deregistration_delay.timeout_seconds=60
    service.beta.kubernetes.io/aws-load-balancer-ssl-cert: "arn:aws:acm:ap-northeast-2:~ "
    service.beta.kubernetes.io/aws-load-balancer-ssl-ports: "443"
spec:
  ports:
    - port: 80
      targetPort: 8080
      protocol: TCP
  type: LoadBalancer
  loadBalancerClass: service.k8s.aws/nlb
  selector:
app: deploy-websrv- aws-load-balancer-nlb-target-type 옵션을 external 로 설정하여 L7 계층의 옵션을 사용할 수 있도록 설정합니다.
- aws-load-balancer-ssl-cert, aws-load-balancer-ssl-ports : 클라이언트에서 ALB에서의 HTTPS 통신을 위해 TLS 인증서를 적용합니다.
다음 작업으로 NLB의 DNS를 Route53로 등록이 필요합니다.
아래 DNS 를 확인하여 Route53 A레코드, 별칭 설정으로 지역과 NLB 로드밸런서를 설정해주세요.
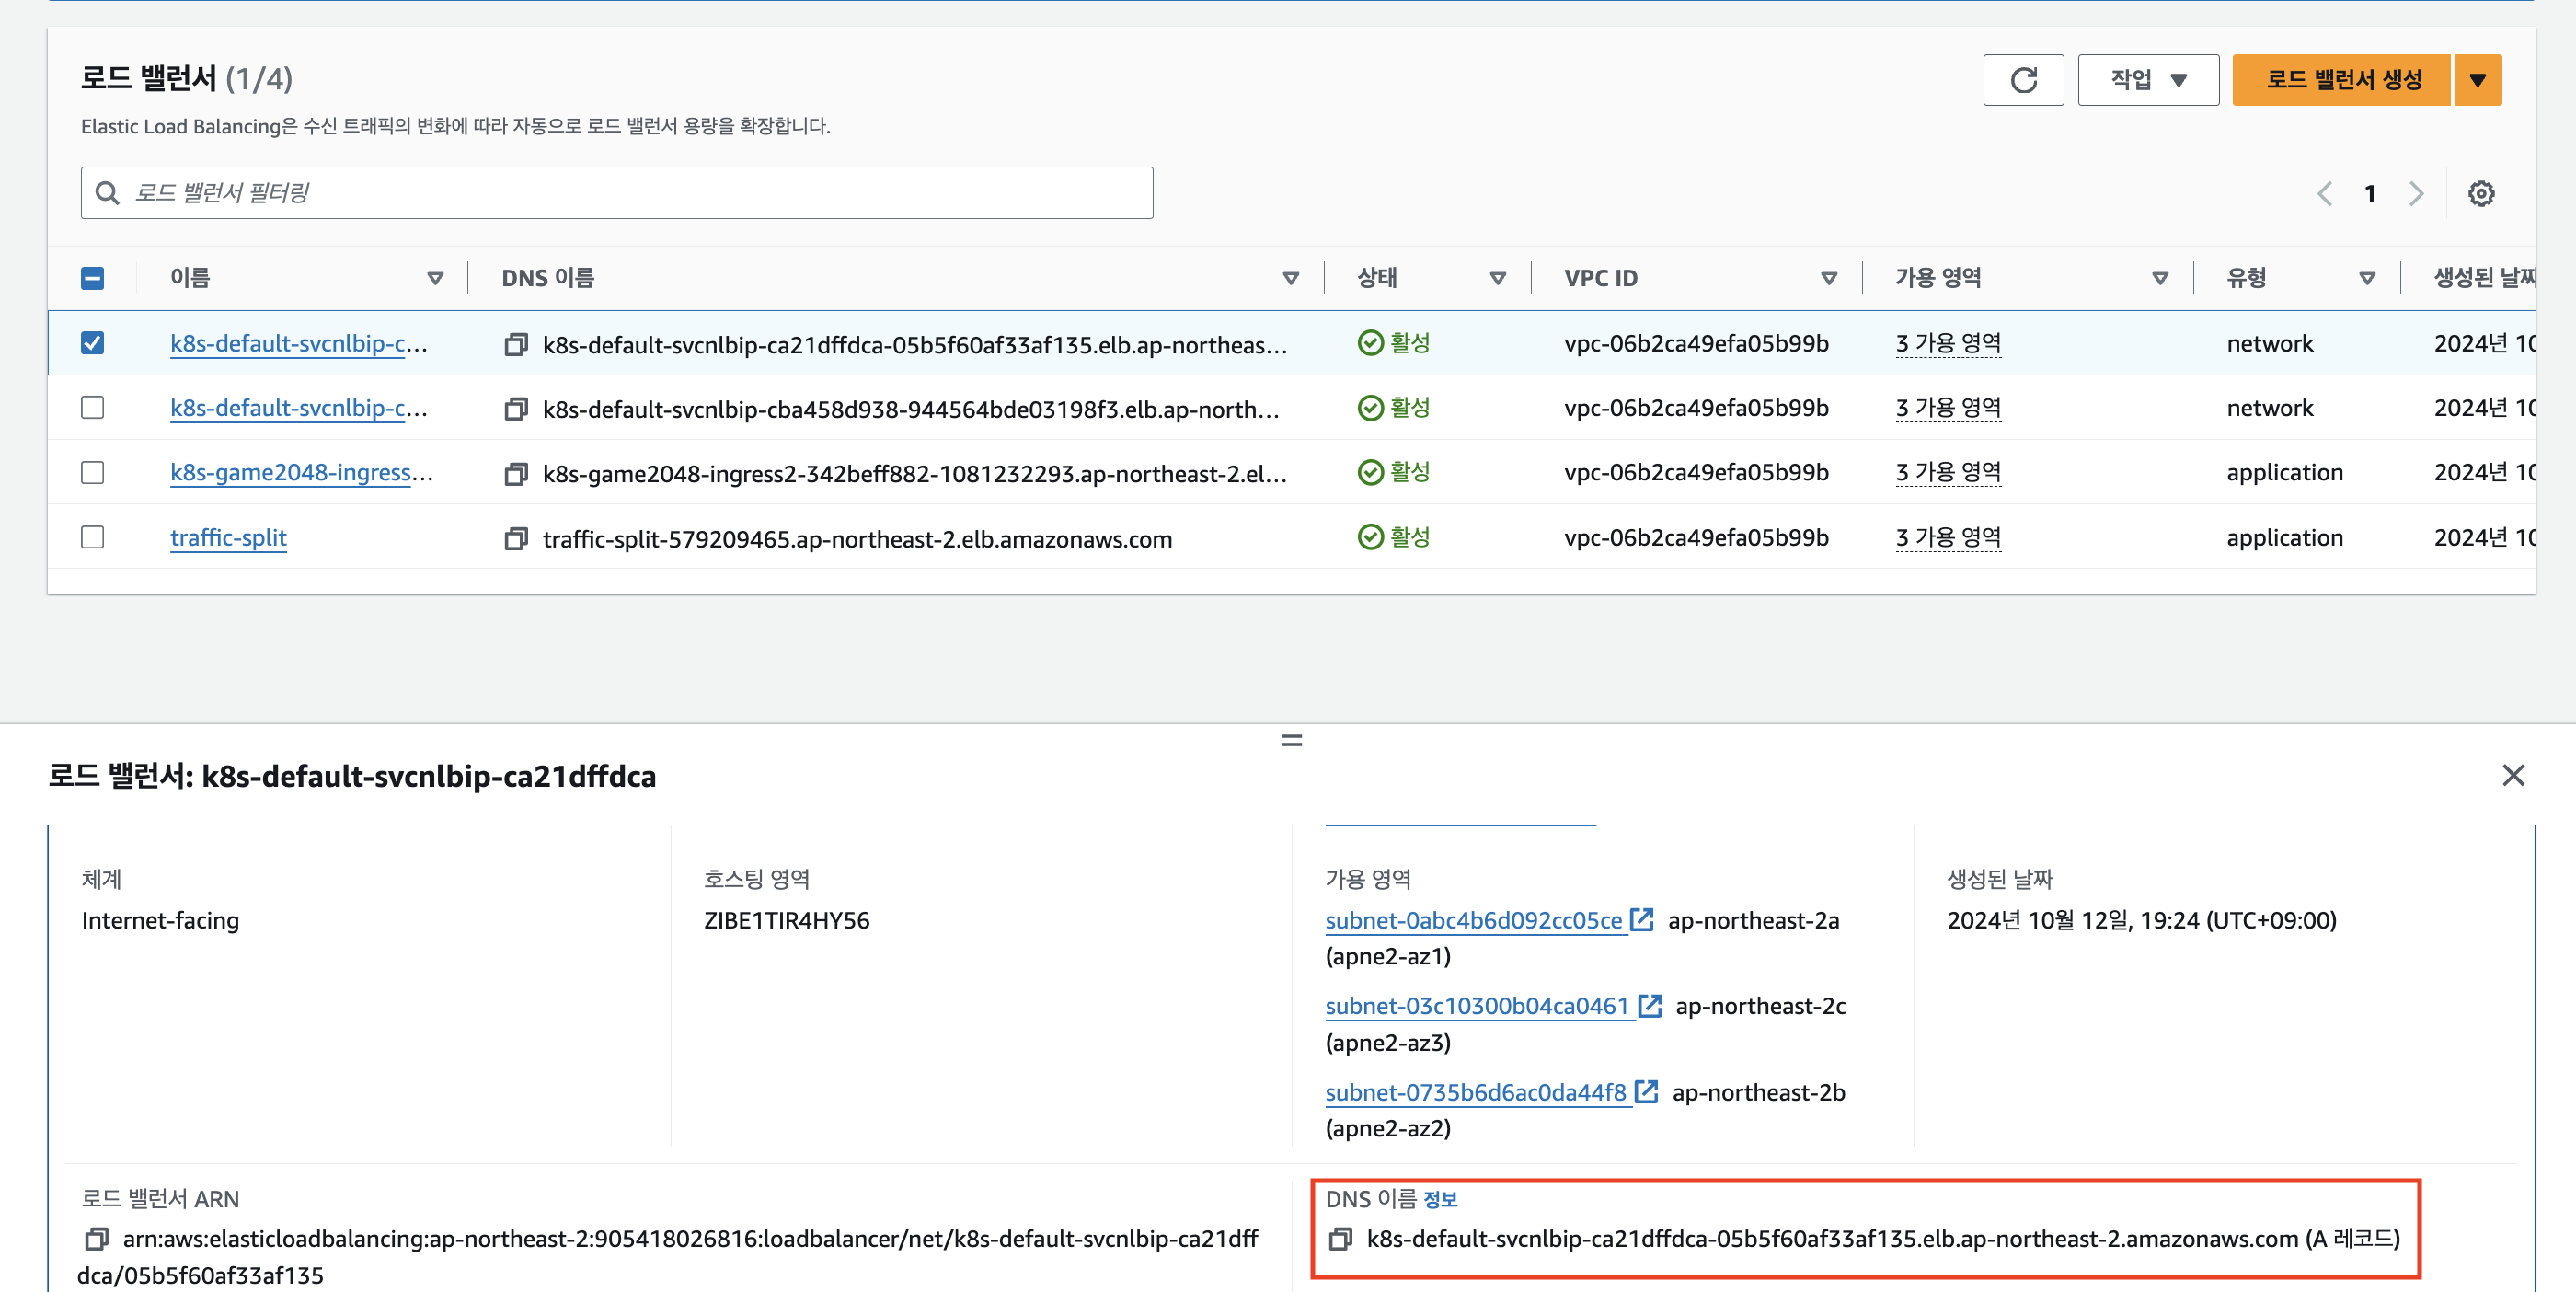

설정 후 http로 NLB로 접근하면 400에러를 반환받는 것을 확인할 수 있습니다.

빠른 파드 스케일링에서 서비스 안정성 설정하기
HPA에 따른 파드 오토스케일링으로 파드의 증감에 따라 대상 그룹도 변경됩니다.
AWS LoadBalancer Controller 는 파드의 생명주기를 민첩하게 대응하지 못하여 watch하고 이벤트하는 시간동안의 특정 상황에서 최종 사용자에게 잠시 중단이 발생합니다.
이를 방지하기 위해 HPA 로 인한 파드 증가, 감소에서 서비스 안정성을 올릴 수 있는 방법을 알아보겠습니다.
- 파드 증가 과정에서 Pod Readiness Gate 설정을 통한 트래픽 인입 에러 최소화
- 파드 감소 과정에서 PreStop 후크와 준비 프로브를 상태 검사 엔드포인트와 결합한 설정으로 중단 최소화
Pod Readiness Gate
Pod Readiness Gate는 Pod가 ALB 또는 NLB의 대상 그룹(Target Group)에 완전히 등록되고, 헬스 체크에서 "Healthy" 상태로 설정될 때까지 트래픽을 받지 않도록 하는 옵션입니다. (단, IP모드에서만 동작)
해당 옵션을 사용하면 AWS Load Balancer Controller가 Pod의 readiness 상태를 관리하여, 해당 Pod가 ALB/NLB에서 "Healthy" 상태가 될 때까지 기존 Pod를 종료하지 않고 트래픽을 보내지 않습니다.
설정 하는 방법은 네임스페이스에 아래 라벨을 추가하고 네임스페이싀 파드들을 삭제하여 재배포시켜줍니다.
kubectl label namespace default elbv2.k8s.aws/pod-readiness-gate-inject=enabled
kubectl delete pod --all
적용 후 파드를 확인하면 Readiness Gate 옵션이 추가됨을 확인할 수 있습니다.
kubectl describe pod
Pod GraceFul Shotdown with ALB
파드 GraceFul Shotdown 를 통해 파드 축소 과정 동안 사용자에게 중단이 없도록 설정할 수 있습니다.
설정은 파드 내 PreStop, readinessProbe를 설정한 URL을 ALB annotation health check로 지정합니다.
PreStop 후크는 포드가 중지되기 전에 SIGTERM 신호를 받으면, 준비 상태를 비정상으로 표시하여 더 이상 트래픽을 받지 않도록 설정합니다.
비정상인 대상 그룹을 확인한 로드 밸런서는 해당 포드를 대상으로 트래픽을 보내지 않게 되어, 트래픽 손실을 방지합니다.
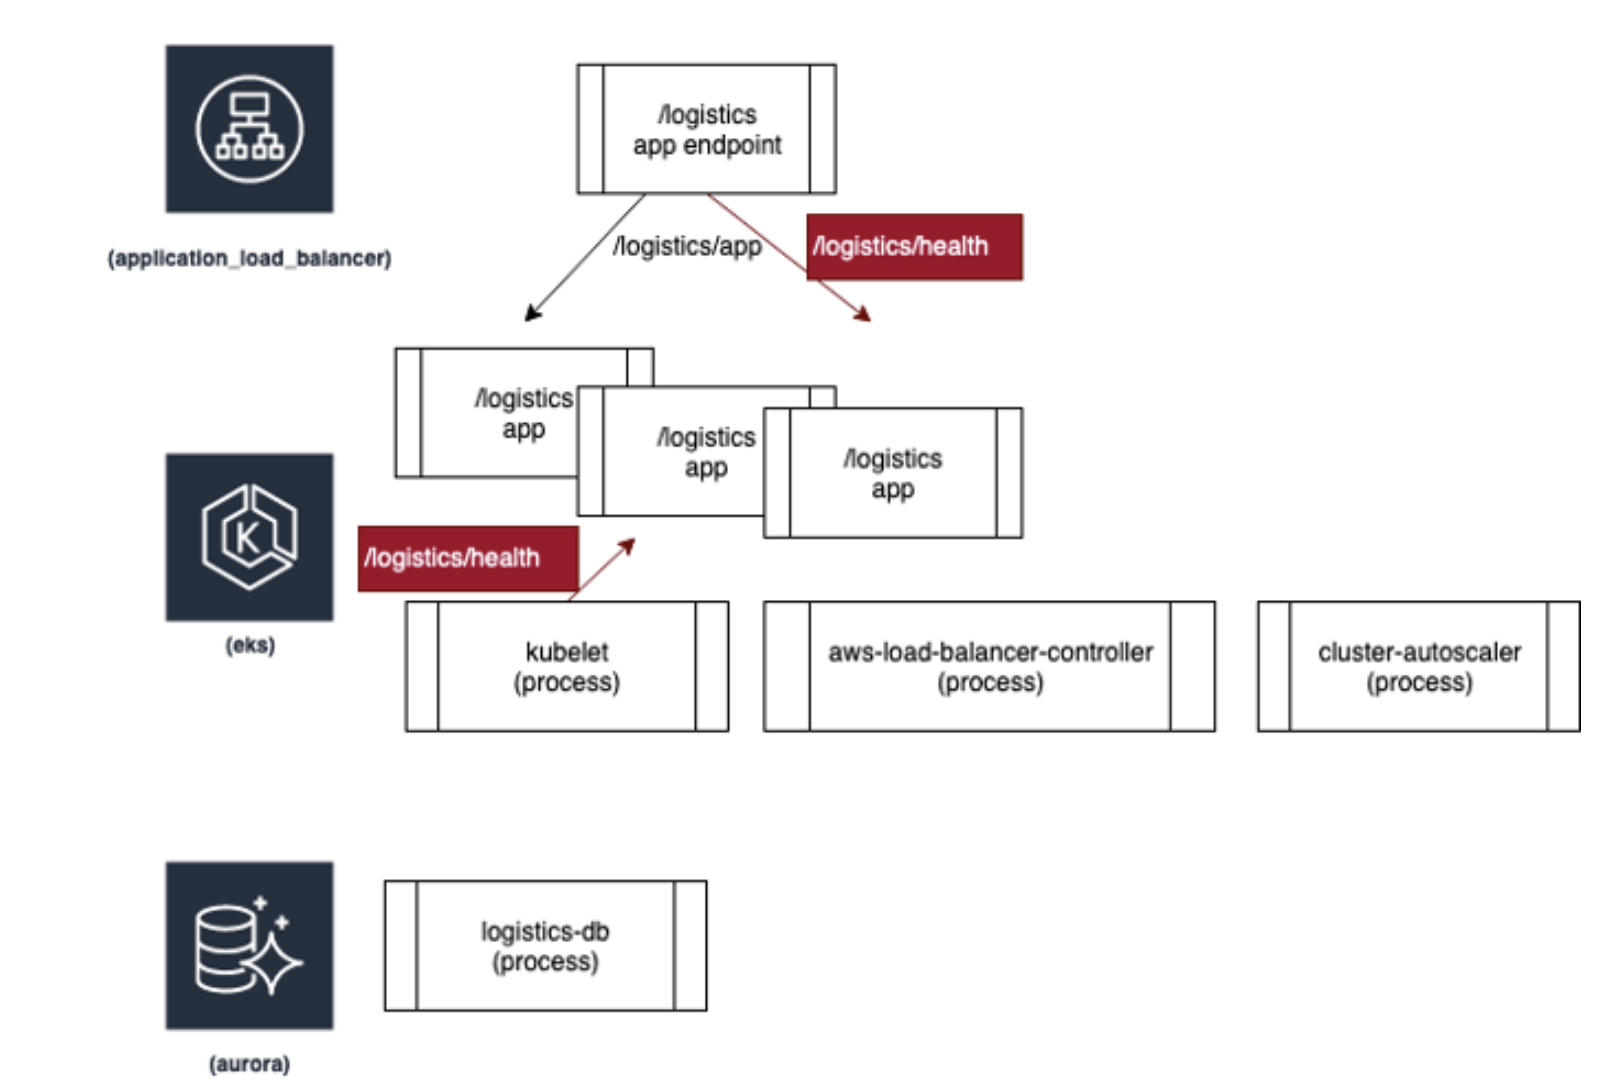
AWS 블로그에서 활용한 예제를 통해 옵션 설정 값을 확인하겠습니다.
preStop:
    exec:
command: ["/bin/sh", "-c", "sed -i 's/health/nothealthy/g' /usr/src/app/logistics/health.py && sleep 120"]- 파드가 종료하기 전 prestop 으로 설정된 명령어를 실행합니다. 명령어에서는 logistics/health 파일에서 health라는 문자열을 nothealthy 로 설정하여 로드밸런서가 비정상으로 체크되어 더이상 트래픽을 주지않도록 설정합니다.
readinessProbe:
httpGet:
  path: /logistics/health
  port: 8000
initialDelaySeconds: 3
periodSeconds: 3- 파드 시작 3초 후 3초 동안 해당 URL 를 호출하여 파드 정상 상태를 확인합니다. 해당 URL이 호출되지 않으면 파드를 죽이며 죽이기 전 위 prestop 명령어가 실행됩니다.
kind: Ingress
metadata:
  name: django-ingress
  annotations:
    kubernetes.io/ingress.class: alb
    alb.ingress.kubernetes.io/healthcheck-path: /logistics/health # URL 설정
    alb.ingress.kubernetes.io/success-codes: '200-301'
alb.ingress.kubernetes.io/healthcheck-interval-seconds: '3'- ALB health 경로를 Prestop 명령어에서 설정하는 URL로 설정합니다. 만약 preStop 후크가 실행되면 해당 파드를 비정상으로 간주하여 더 이상 트래픽을 전달하지 않습니다.
(AWS 블로그 참고)
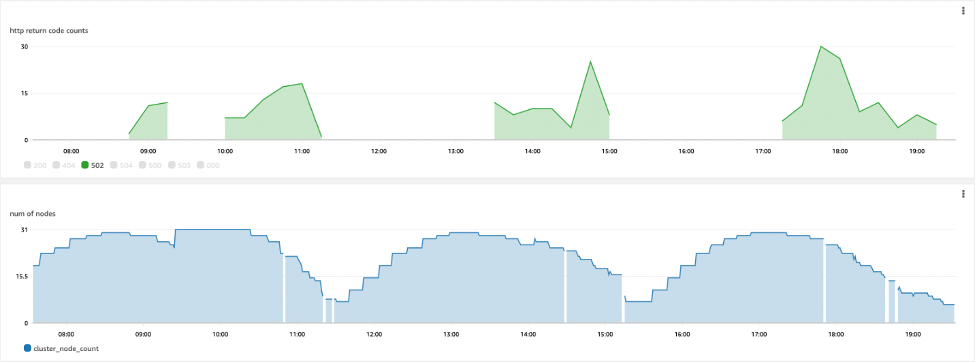
위 설정 변경의 결과로 504 오류의 수는 축소 이벤트 중에 평균 340개에서 0개로 감소했고, 502 오류의 수는 200개에서 30개로 감소했습니다. 이러한 502 문제는 kubelet에서 감지했지만 ALB를 통해 애플리케이션을 방문하는 최종 사용자는 감지하지 못했다고 합니다.

참고
CloudNet@ AEWS 스터디
https://kubernetes-sigs.github.io/aws-load-balancer-controller/v2.7/deploy/pod_readiness_gate/
'Cloud' 카테고리의 다른 글
| Cilium Service Mesh on EKS (1) | 2024.10.26 |
|---|---|
| EKS VPC CNI 네트워크 최적화 설정과 Kubeflow에서의 istio 구성 (2) | 2024.10.20 |
| k8s node-shell 원리이해 (0) | 2024.10.04 |
| 쿠버네티스 서비스 Iptabls 모드 정리 (0) | 2024.09.28 |
| Calico CNI 이해 (0) | 2024.09.20 |